BLIP Captioning: A Guide for Creating Captions and Datasets for Stable Diffusion
Stable diffusion uses a pre-trained model that can encode and decode both images and text using the Transformer architecture. To fine-tune the model on your own dataset, you need to provide captions for your images that describe the visual elements you want the model to learn.
Creating Captions and Datasets Using BLIP Captioning
BLIP captioning is a method of generating captions for images using another pre-trained model that can handle both vision-language understanding and generation tasks. BLIP stands for Bootstrapping Language-Image Pre-training, which means that the model learns from noisy web data by filtering out the bad captions and keeping the good ones. BLIP captioning can produce high-quality captions for various types of images and even videos.
In this tutorial, we will show you how to use BLIP captioning to create captions for your own images and fine-tune a Stable Diffusion model with them. We will also explain some best practices and tips for writing effective captions that can improve the quality and diversity of the generated images by using Kohya_ss GUI’s utility.
Table of Contents
Kohya_ss GUI allows you to select any model that can generate text and image pairs and fine-tune it on your own dataset. In this guide, we will be using BLIP captioning to generate captions for datasets.
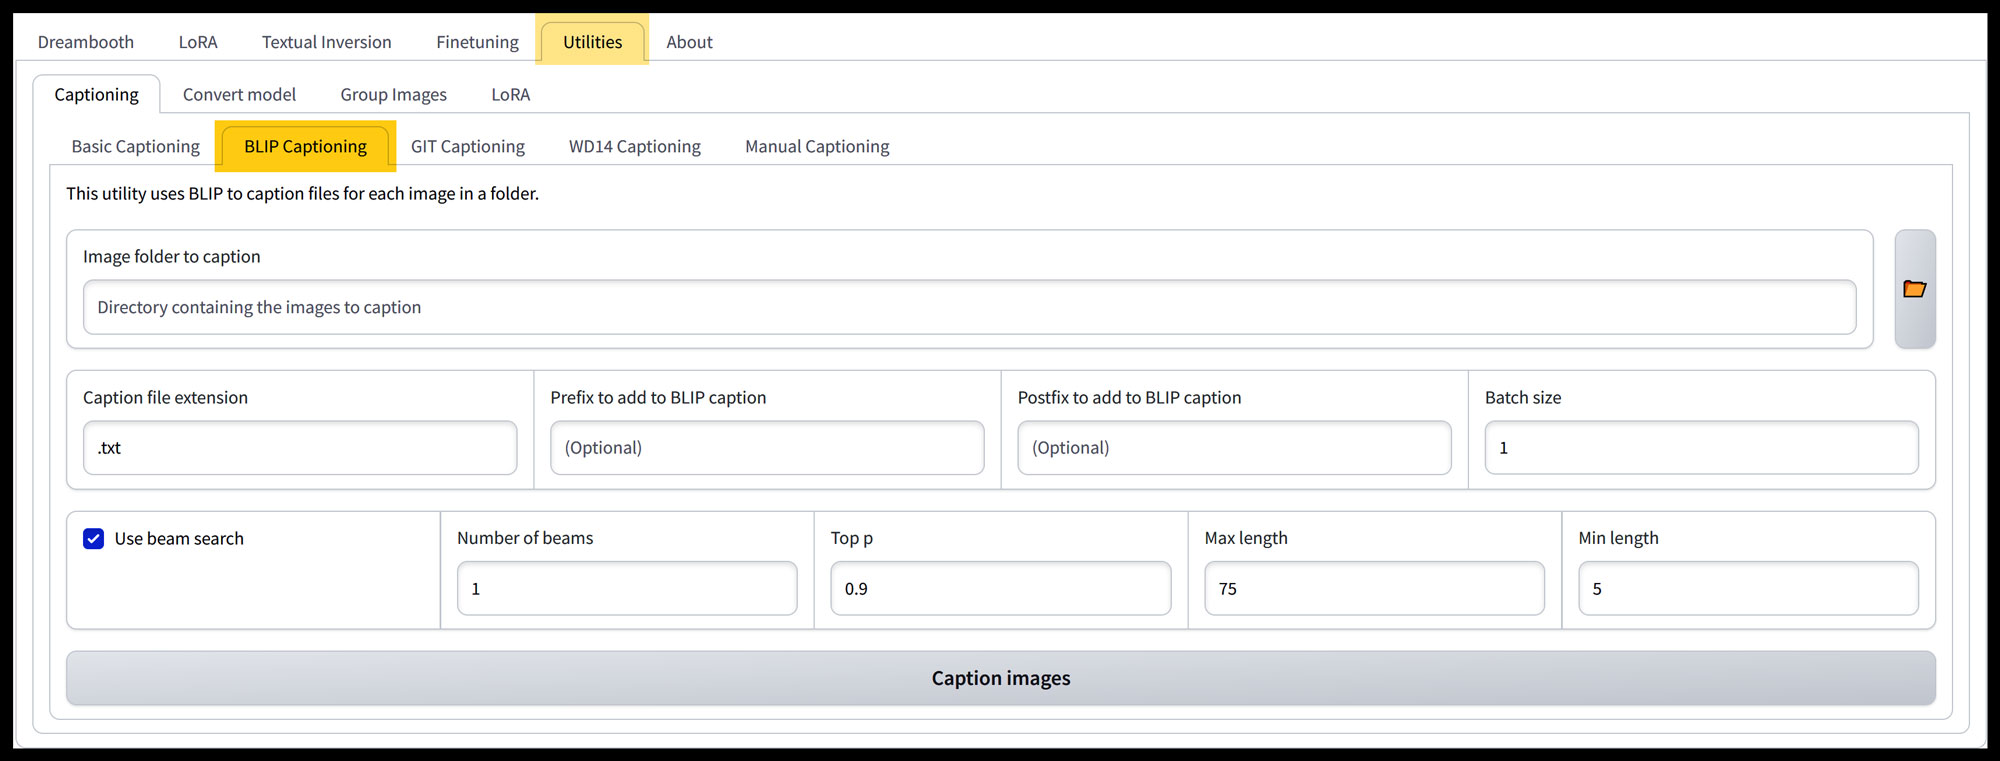
Image folder to caption
The Image folder caption is a setting that allows you to specify the folder that contains the images you want to caption using BLIP captioning. The folder you choose should contain only the images you want to caption, and they should be in a format that the BLIP captioning model can read, such as JPEG or PNG. The folder can have any name and location, as long as you provide the correct path to it in the Image folder caption setting. Alternatively, you can use the folder button to the right to navigate to the desired folder.
The folder is supposed to be used as the input for the BLIP captioning model, which will generate a text file for each image in the folder, containing the caption for that image. The text files will have the same name as the images, but with a .txt extension. For example, if your folder contains an image named cat.jpg, the BLIP captioning model will create a text file named cat.txt, containing the caption for the cat image. The text files will be saved in the same folder as the images.
Caption file extension
The “Caption file extension” is a setting that allows you to specify the file format of the captions that BLIP captioning will generate for your images.
The default file format is .txt, which is a plain text format that can be easily edited and read by most software. However, you can also choose other file formats that support more advanced features, such as styling, positioning, and timing of the captions, but I recommend leaving it as the default .txt unless you have other specific purpose for it.
Prefix and Postfix to add to BLIP Caption
Prefix and Postfix Overview: The prefix and postfix settings in BLIP captioning are used to add additional text before and after the generated caption. This can be particularly useful in providing extra context, emphasizing a specific theme, or structuring data in a way that aligns with your training objectives.
Usage of Prefix:
The prefix is added at the beginning of the caption. It’s useful for setting a tone or introducing a theme. In a training context, this could be a specific token or identifier related to the subject you’re focusing on. For instance, if you are training a model to recognize and generate captions for images of a particular person, you might use their name or a unique identifier as the prefix. This helps the model to associate the caption more closely with the subject matter. I typically add the “triggerword” here which is the subject or the style you’re training as the beginning of the structure.
Usage of Postfix:
The postfix is appended at the end of the caption. It can be used to provide a concluding remark or additional information that you want to be consistently included in every caption. This might be less about the content of the image and more about the style or context of the caption.
Importance in Training: When training models, especially for specific tasks or themes, these prefixes and postfixes can be extremely valuable. They help in creating a uniform structure in your data, which can be important for machine learning models to understand and learn from the patterns in your dataset.
Batch Size
The batch size parameter is the number of images that BLIP captioning processes at once.
A batch size of 2 will train 2 images at a time simultaneously. A higher batch size speeds up training but might reduce accuracy and increase VRAM usage.
The batch size affects the speed and quality of the caption generation. A higher batch size means faster processing, but also more memory usage and less accuracy. A lower batch size, conversely, enhances accuracy and reduces memory usage but slows down the process. The optimal batch size depends on your hardware and the type of images you want to caption. You can experiment with different batch sizes to find the best trade-off for your needs. According to some sources, a batch size of 1-2 is recommended for most cases, unless you have a GPU with a lot of VRAM, in which case you can go up to 5-8. [Source]
Using Beam Search and Number of Beams
Beam search is a text generation technique used in language models. It evaluates multiple possibilities for the next word or sequence, maintaining a set of the most likely options (‘beams’) at each step.
Number of Beams:
This parameter defines how many potential word sequences are considered. A higher number leads to more diverse and potentially higher quality captions but requires more computational power and time. Conversely, a lower number of beams speeds up the process but may reduce diversity and richness in the captions.
When to Use Beam Search:
Enable beam search when seeking more creative, varied captions. It’s preferable over greedy search, which only picks the most likely next word, for generating intricate and nuanced text.
Balancing Speed and Quality:
If your priority is faster processing with reasonable quality, opt for greedy search or a lower number of beams. For richer, more detailed captions, choose beam search with a higher number of beams.
Experimentation:
Adjust the number of beams based on your requirements for speed and caption quality. Test different settings to find the ideal balance for your project’s needs.
The recommended setting for the number of beams in text generation tasks like BLIP captioning typically balances between performance and output quality. While there’s no one-size-fits-all number, a common recommendation is to start with a moderate number of beams, such as 4-6, but many uses 10-15. This provides a good mix of diversity in the output and computational efficiency. However, the optimal number can vary depending on the specific requirements of your task and the capabilities of your system. Experimenting with different settings is often necessary to find the best fit for your particular use case. [Source]
| Use beam search: Off | |
|---|---|
| Jemwolfie_01 | Jemwolfie_02 |
| a woman wearing red sports pants and a backpack | a woman in a white bikini standing near a brick wall |
| Use beam search: On | |
| a woman in a red sports bra top and leggings | a woman in a bikini and jacket standing in a doorway |
Top p Parameter
The Top p parameter is a way of controlling the diversity of the generated captions in BLIP. It filters out the words or phrases that have a low probability of being the next word, and only keeps the ones that have a cumulative probability higher than a certain threshold p. The higher the p value, the more diverse the captions will be, but also the more likely they will contain errors or irrelevant words. The lower the p value, the more conservative the captions will be, but also the more likely they will be repetitive or boring.
The default value of p is 0.9, which means that the language model will only consider the top 10% of the most probable words or phrases for each caption. The minimum value of p is 0, which means that the language model will only choose the most likely word or phrase for each caption, resulting in very simple and predictable captions. The maximum value of p is 1, which means that the language model will consider all possible words or phrases for each caption, resulting in very diverse and creative captions, but also very noisy and nonsensical ones.
You can adjust the p value according to your preference and the task at hand.
For example, if you want to generate captions that are more informative and factual, you might want to use a lower p value, such as 0.5 or 0.6. If you want to generate captions that are more creative, you might want to use a higher p value, such as 0.95 or 1. You can also experiment with different p values and see how they affect the quality and style of the captions.
- Minimum Top p Value: 0.00
- Maximum Top p Value: 1.00
| Use Beam Search: Off | Use Beam Search: On |
|---|---|
| Top p 0.0: Error Top p 0.1: a woman in a red sports bra top and leggings Top p 0.2: a woman in a red sports bra top and leggings Top p 0.3: a woman in a red sports bra top and leggings Top p 0.4: a woman in red sports bra top and leggings Top p 0.5: a woman wearing red sports wear standing in front of a door Top p 0.6: a woman wearing red sports bra top and leggings Top p 0.7: a woman wearing red sports bra and matching leggings Top p 0.8: a woman wearing red sports pants and a backpack Top p 0.9: a woman wearing red sports pants and a backpack Top p 1.0: a woman wearing red sports pants and a yoga suit | Top p 0.0: Error Top p 0.1: a woman in a red sports bra top and leggings Top p 0.2: a woman in a red sports bra top and leggings Top p 0.3: a woman in a red sports bra top and leggings Top p 0.4: a woman in a red sports bra top and leggings Top p 0.5: a woman in a red sports bra top and leggings Top p 0.6: a woman in a red sports bra top and leggings Top p 0.7: a woman in a red sports bra top and leggings Top p 0.8: a woman in a red sports bra top and leggings Top p 0.9: a woman in a red sports bra top and leggings Top p 1.0: a woman in a red sports bra top and leggings |
Max and Min length
The Max and Min Length are settings that control the length of the captions that BLIP captioning generates for your images.
The Max and Min Length are measured in tokens, which are the basic units of text that the model uses. A token can be a word, a punctuation mark, or a special symbol. The Max and Min Length specify the maximum and minimum number of tokens that the captions can have. For example, if you set the Max Length to 75 and the Min Length to 25, the captions will have between 25 and 75 tokens.
The Max and Min Length affect the quality and diversity of the captions. A higher Max Length means that the captions can be longer and more descriptive, but also more verbose and redundant. A lower Max Length means that the captions can be shorter and more concise, but also more generic and vague. A higher Min Length means that the captions can be more informative and detailed, but also more constrained and rigid. A lower Min Length means that the captions can be more flexible and varied, but also more incomplete and ambiguous.
The optimal Max and Min Length depend on your preference and the type of images you want to caption. You can experiment with different values and see how they affect the output of BLIP captioning.
Best Resolution and Size Dimension
When training models in Kohya_ss, it’s important to consider the size of your images. The size requirements can vary depending on the specific training method and the model you are using. For some models and training types, there might be strict size requirements where images need to be cropped or resized to specific dimensions. This ensures that the model receives uniformly sized input, which can be critical for effective learning.
On the other hand, the ‘bucket’ technique allows for more flexibility, grouping images of various sizes into different categories. This method can be more adaptable and efficient, especially for datasets with diverse image sizes. It’s important to refer to the specific guidelines of the training method and model to determine the optimal image size and whether cropping or bucketing is required.
The choice of image size, such as 512×512, for training in Kohya_ss largely depends on the model and training method you’re using. While 512×512 is a common size due to its balance between detail and computational efficiency, some models and training scenarios may require different dimensions. It’s important to consult the specific requirements of the model and training approach you’re using. Some models are optimized for certain image sizes, and using the recommended size can significantly impact the effectiveness of your training. If you’re unsure, starting with a standard size like 512×512 and then adjusting based on the model’s performance and guidelines is a reasonable approach.
Naming Your Images for BLIP Captioning
Naming your images is a critical step for captioning, as it can help you organize your files, identify your subjects, and provide useful information for the BLIP captioning model.
Here are some tips and best practices for naming your images for captioning:
Use descriptive and meaningful names that reflect the content and context of your images.
For example, instead of naming your image “IMG_1234.jpg”, you can name it “cat_sleeping_on_sofa.jpg” or “landscape_sunset_mountain.jpg”.
Use consistent and clear naming conventions that make it easy to sort and search your images. ”, “cat_02_playing.jpg”, “cat_03_eating.jpg”.
For example, you can use underscores, hyphens, or spaces to separate words, and use lowercase or uppercase letters to indicate different categories or levels of information. You can also use numbers or dates to indicate the order or chronology of your images. For example, you can name your images:n“cat_01_sleeping.jpg
Use keywords or tags that can help the BLIP captioning model generate more accurate and relevant captions for your images.
For example, you can use the prefix or postfix settings in Kohya_ss GUI to add a token that represents the subject or style you are trying to train, such as “[CAT]” or “[LANDSCAPE]”. This can help the language model to select the words or phrases that best match the image. You can also use keywords or tags that describe the genre, mood, or theme of your images, such as “[HAIKU]”, “[HORROR]”, or “[FUNNY]”. This can help the language model to generate more creative and diverse captions that suit your needs and preferences.
While BLIP Captioning isn’t always the end-all solution, it’s an excellent starting point for those uncertain about initiating their captioning workflow. It provides a foundational idea which can be refined and edited as needed. In this guide, we’ll walk through the basic steps of using BLIP Captioning for image training. Note that I have my own preferred manual method, which I’ll cover in an upcoming guide on captioning with ChatGPT. For now, let’s dive into the BLIP Captioning process:
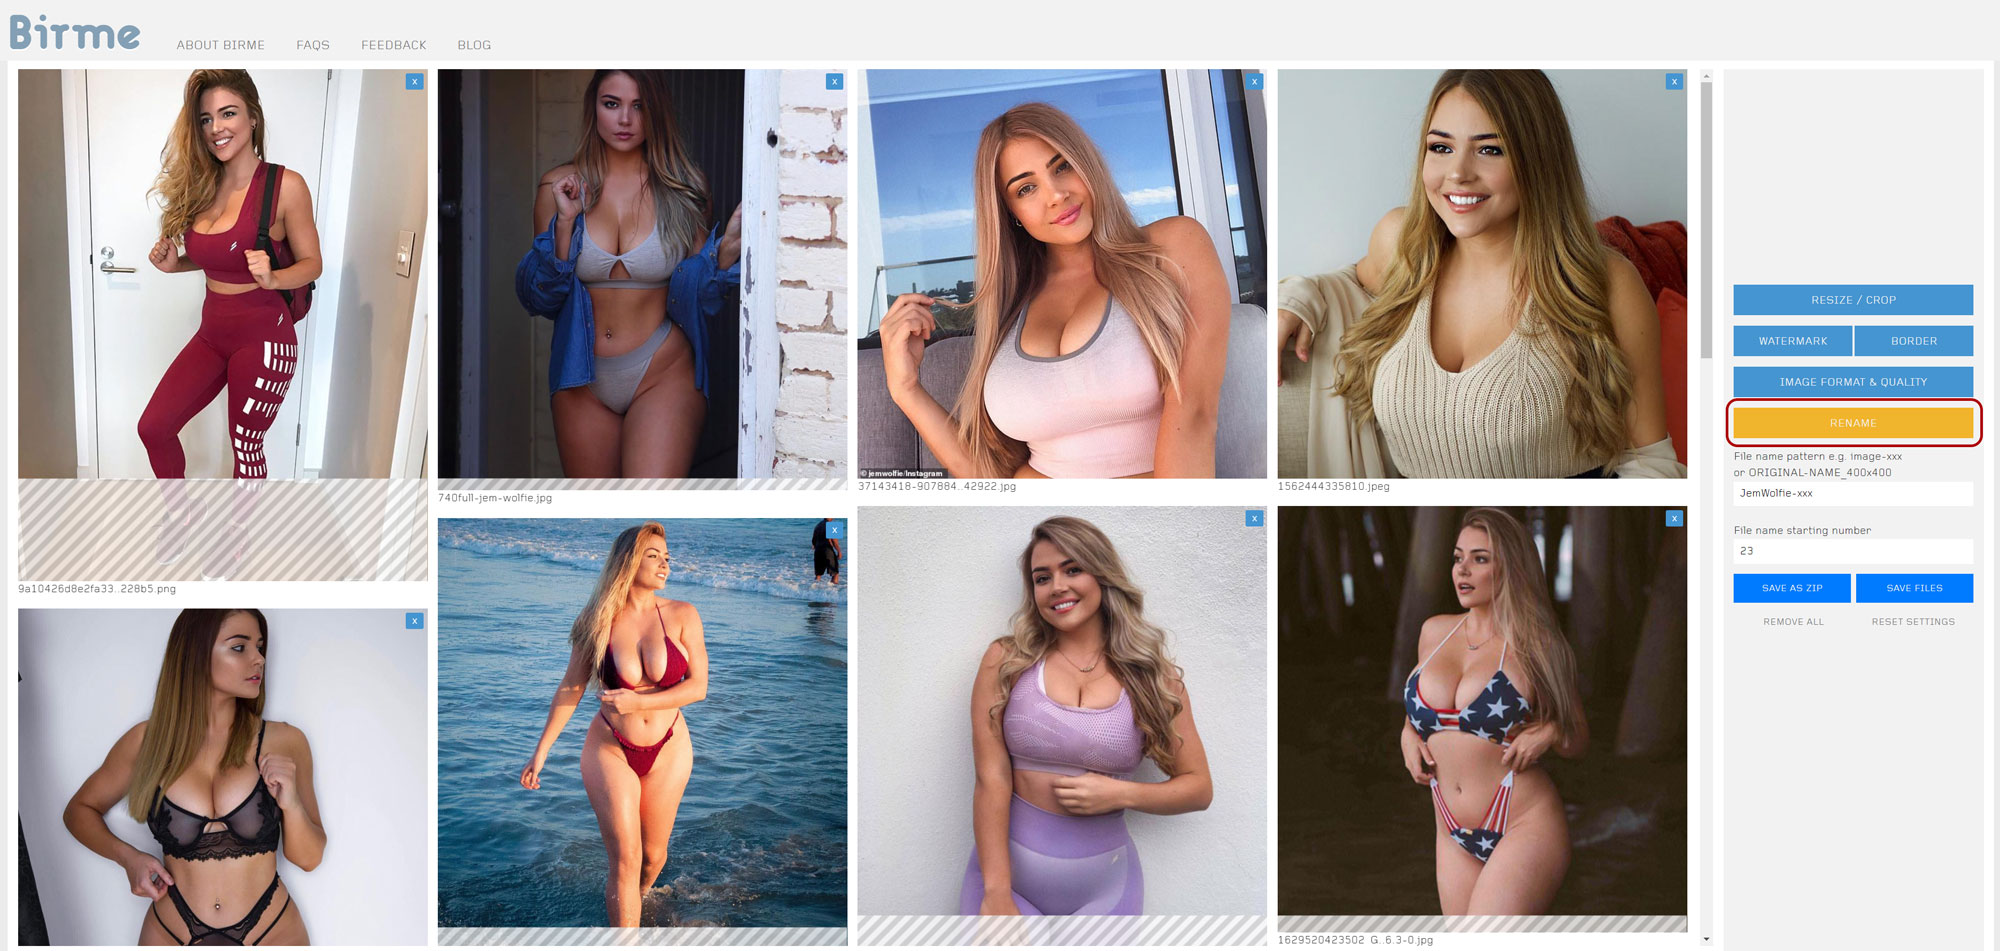
Image Selection
Choose the images you want to use for training. In this example, we’re using Jem Wolfie images, but feel free to use any images available to you.
Renaming Files
Visit Birme for file renaming.
Click on ‘Rename’ and assign a desired name format for your images. In this example, we’ll use “jemwolfie_xx”, where ‘xx’ represents a two-digit number.
Set ‘1’ as your ‘File name starting number’ for the first image.Accessing the Kohya_SS GUI
Open the Kohya_SS GUI and navigate to the ‘Utilities’ tab.
Locating the Captioning Section
Switch to the ‘Captioning’ Tab, then find the ‘BLIP Captioning’ section.
Selecting the Image Folder
Choose the folder where your training images are stored.
Setting Your Prefix
In the “Prefix to add to BLIP caption” field, enter a prefix. For our example, we’ll use ‘Jemwolfie’ since we are trying to train our images on the likeness of Jem Wolfie.
Adjusting Settings
You may customize the settings to your preference, although the default settings are usually sufficient for most purposes.
Editing Captions
After processing, open the generated caption txt files and edit them as needed, ensuring a consistent structure.
Example of an edit I would do based on the first image of Jem Wolfie:
Generated BLIP Caption: Jemwolfie a woman in a red sports bra top and leggings Edited Caption: Jemwolfie a woman in a red sports bra top and leggings featuring a striking geometric pattern and a backpack slung over one shoulder. Her attire is complemented by long, styled blonde hair, as she stands against a simple white door in the background. Note: Do not repeat the same words more than once. It will add weight to that word. In machine learning, when we mention descriptors like “red sports pants” and “backpack,” we provide the algorithm with specific features to identify. These details are variables that can change and are important for training models to recognize similar items in diverse images. Descriptions become a series of variables and constants; variables are the changing features like color or accessories, while constants, such as the woman’s hair in this series of images, remain unchanged. The constant features anchor the model’s understanding of the subject, while the variables allow it to learn the differences and similarities across various images. Completion
Congratulations! You’ve completed the captioning process using BLIP Captioning.
For a deeper dive into crafting captions for Data Sets, check out my detailed blog post on the art of caption writing Below:
This captions and data sets guide is intended for those who seek to deepen their knowledge of Captioning for Training Data Sets in Stable Diffusion. It will assist you in preparing and structuring your captions for training datasets.


Leave a Reply