ADetailer Workflow 02: How to Use ADetailer Inpainting to Blend Styles with Different Models
Welcome to the second workflow of ADetailer Inpainting, where I will show you how to use Inpainting to blend styles with different models. In the first workflow, we learned how to use detection confidence to select which subject to focus on for detailing, but that was just the tip of the iceberg. In this workflow, we will explore how to use the prompts and negative prompts features to guide the inpainting process and achieve more creative results.
We will also experiment with the basic controls of detection, such as the threshold and the mask, to fine-tune the inpainting effect. Moreover, we will see how to use different models in the Inpainting tool, such as separate steps, VAE, CFG Scale and samplers, to change the face styles of the images. By using different models and samplers, we can create new and diverse styles that suit our preferences. In this workflow, you will learn how to use Inpainting to blend styles with different models in a fun and easy way. Let’s get started!
Table of Contents
| To follow along, you can download the model from the link below: | Use the same prompts and settings: |
|---|---|
| Prompts: | cal70, Glamour photo, amateur photography, vintage photography, 1960s, beach, rio de janeiro, gorgeous blonde woman, (tanlines:1.1), beach towel on the sand, surrounded by the beachgoers, Rain or Shine, Embracing the elements by posing in the rain with a wet look or in bright sunlight for a radiant effect, relaxed atmosphere, subsurface scattering, (oily skin, glossy skin:1.2),film camera, grainy aesthetic |
| Negative Prompts: | epiCPhoto-neg, cartoon, painting, illustration, (worst quality, low quality, normal quality:2), ng_deepnegative_v1_75t, not-best-physical-appearance-perfect::2, nude |
| Model: epiCPhotogasm V1 (Click to Download) | Seed: 1124573 |
|---|---|
| Sampling Method: DPM++ 2 m Karras | CFG Scale: 7 |
| Steps: 20 | Clip Skip: 2 |
| Height: 768 | Width: 512 |
In this section, I will show you how to use Inpainting and different models to change the styles of the images you generate. We will use the prompts and negative prompts features to guide the inpainting process and achieve more creative results. Your first step is to generate the image with the above settings and enable ADetailer.
Generate the Image.
The first step is to generate an image using the Image Generator tool. You can leave the prompts blank for now as we just want to sketch out a starting point.
Enable ADetailer
Under ADetailer dropdown menu, select face_yolov8s.pt
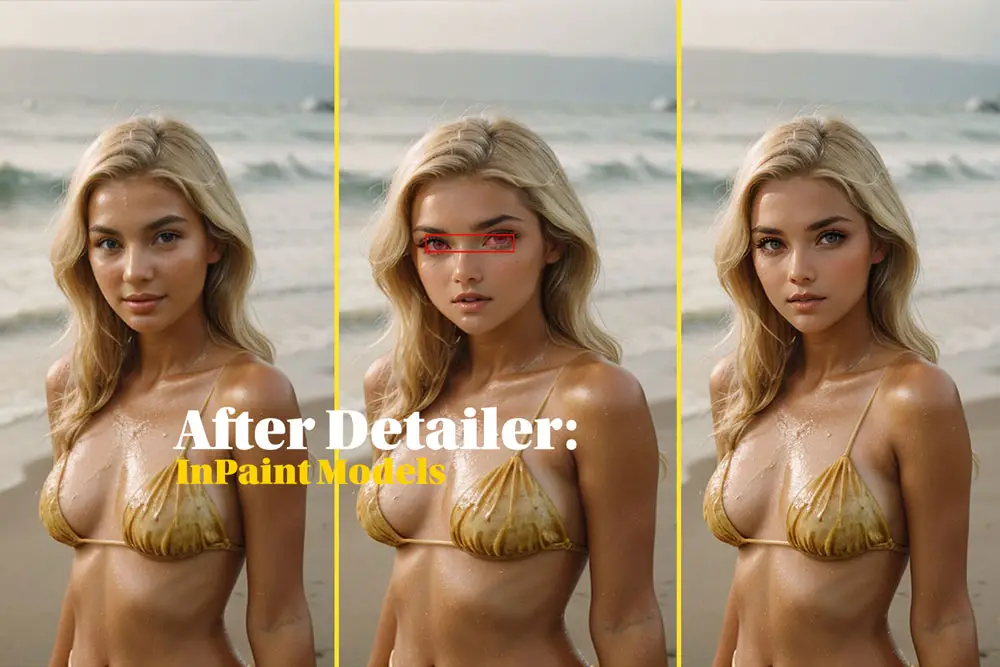
 Detection Map (Middle) Detailed (Right)")
On the left is the base image that you generated in the previous step. In the middle is the detection map, which shows the regions that the model detected as faces. On the right is the face detail image, which shows the inpainted faces that the model created. You might notice that the base image looks better than the face detail image, but don’t worry, this is just the starting point, and our goal is to change the style in this workflow using different models to play around with.
To use separate checkpoints, you need to enable the ‘Use separate checkpoint’ option. This option allows you to use a different model for the inpainting process than the one you used for the image generation. Under the ADetailer checkpoint menu, you can choose from various models that have different styles and features. For this tutorial, I will use the Ether Real Mix model, which is trained mostly on styles similar to Studio Ghibli style anime art.
This model will create a contrast with our main model and style, which is the epiCPhotoGasm model that is trained on photorealistic images. We also prompted a vintage style of photography for the image generation, which is completely different from the Ether Real Mix model that we will use for the inpainting.

‘Use separate checkpoint’ option:
Click on the ‘Use separate checkpoint’ box to activate the ADetailer selector.
Click on the ADetailer checkpoint dropdown menu.
Select the Ether Real Mix model from the list.
Generate the image.
You will see a new image on the right side of the screen, which shows the inpainted faces using the Ether Real model.

When comparing the face detail image using the Ether Real Mix model with the face detail image using the face_yolov8s.pt model. You will notice that the styles are very different and create a unique effect like a face swap. The girl in the image now looks like a realistic anime girl taken with a vintage camera.
ADetailer Steps
The Ether Real Mix model works best at 20 steps, but since we’re already using 20 steps for the current generation, let’s try and increase it to 25, 30, and 40 to see what effects it gives us.nnTo do this, activate the “Use separate steps” and increase your ADetailer steps. Generate iterations of 20, 25, 30, 40 and compare. After generating all these steps, I compared saw very little or no changes as these are heavily dependent on the models you use. For Ether Real Mix, these higher steps don’t make much of a difference. Try using a different model that works well at different iterations of steps and you you’ll changes.
Adding ADetailer Prompts
Let’s explore the ADetailer Prompt feature. This feature allows you to use words or phrases to influence the inpainting process and create different styles. You can experiment with different prompts and see how they affect the inpainted faces. However, keep in mind that the prompts may not always work as you expect, because they depend on the model you use. So, you may need to try different combinations of prompts until you find something that works for you.
For example, I will use red lips, eye shadows and freckles as my prompts. I noticed that the freckles prompt was too strong and made her face look too speckled, so I adjusted the weight of the freckles by writing (freckles:0.75) which reduces the effect of the prompt by 25%.
Enable the ADetailer feature:
Click on the ADetailer box.
Select the face_yolov8s.pt model.
Select it from the ADetailer dropdown menu.
Type your prompts in the ADetailer Prompt box.
You can use words or phrases to influence the inpainting process and create different styles. For example, you can type “red lips, eye shadows and freckles”.
Adjust the weight of the prompts by adding a colon and a number after the prompt.
The number represents the strength of the prompt, from 0 to 1. For example, you can type “(freckles:0.75)” to reduce the effect of the freckles prompt by 25%.
Generate the image.
You will see the updated face detail image on the right side of the screen. You can compare it with the original face detail image and see how the prompts changed the style of the faces.

In this workflow, we don’t need to use all the parameters in Inpainting, but only the ones that are necessary to create a different style. Most of these separate controllers do what their names suggest, they use settings from the alternative model that you choose. For this final step, we want to create something very anime-like in appearance.
To achieve this, we will use the recommended settings for Ether Real Mix, which will create an anime look. This will be layered on top of our main model and style, which is the epiCPhotogasm model that is trained on photorealistic images.
Apply Everything We Learned:
Select the ADetailer Model face_yolov8s.pt
(this is the better version) from the ADetailer dropdown menu.
Type your prompts in the ADetailer Prompt box.
For this example, we will use “perfect eyes” as our prompt.
Type your negative prompts in the ADetailer Negative Prompt box:
For this example, we will use the recommended negative prompts for Ether Real Mix, which are “realistic, photorealistic, photograph, 3D, NSFW, (worst quality, low quality:1.3)”.
Enable ‘Use separate width/height’
Adjust the Width and Height to 768×1024. This will change the resolution of the inpainted faces.
Enable ‘Use separate CFG scale’ and the inpainted faces.
Adjust the ADetailer CFG scale to 9.5, which is recommended for Ether Real Mix. This will change the complexity of
Enable ‘Use separate checkpoint’
Select the etherRealMix model from the Adetailer checkpoint dropdown menu. This will change the style of the inpainted faces to anime-like.
Go to the 2nd tab of the ADetailer panel:
This is where you can choose a different model for the eyes only. This will allow you to customize the eyes of the inpainted faces further.
Select the ‘mediapipe_face_mesh_eyes_only’ ADetailer Model from the ADetailer dropdown menu.
This will inpaint the eyes using a model that is trained on realistic eye shapes.

Change the Resolution with Inpainting
You can change the resolution of the inpainted faces by checking the ‘Use separate width/height’ option. This option will use a different resolution than the one you used for the image generation. Unlike your typical masking and inpainting workflow, this feature actually changes the resolution of the entire image.
For example, if you check this option and set the resolution to 768×1024, you will see that the image becomes wider and the lighting becomes softer than the image without this option. This may be because the higher resolution improves the inpainting quality. On the other hand, if you uncheck this option, the image will go back to the original resolution of 512×768 and the subject will look thinner and more contrasted than the image with this option.
You can experiment with this feature and see what resolution suits your style best. I personally like the softer lighting of the image with the higher resolution, because it gives a more gentle feel to the image, but it did widen the image for my liking.

To solve the issues above, I activated the ‘Use separate width/height’ option and increased the resolution to 1024×1536. This improved the sharpness of the image and the proportion of the subject. However, keep in mind that the final image is not the better image, but just a means to create contrasting styles by mixing different models.

Final Results
In this guide, our aim was to mix different stable diffusion models that have contrasting styles to create an effect of realism and art style. You can use this technique for yourself by inpainting separate models, VAEs, steps, CFG, etc. You can also fix certain parts of the image by using models that perform better in those areas.
We did not use the “restore faces after ADetailer” checkbox because it does not help the image quality.
The inpaint feature in ADetailer has a lot of depth and possibilities that you can discover by trying out all the options available. In the ADetailer Workflow 03, we will introduce other concepts.
Before you continue with this guide, you may want to read my previous guides on ADetailer that cover some important topics. Please follow the links below if you haven’t read them yet.

What is ADetailer and why is it useful? ADetailer or After Detailer is a web-UI extension that allows you to automatically enhance your images using inpainting and other techniques. It is especially useful for fixing common problems such as distorted faces or hands in your generated images. ADetailer works with Stable Diffusion, a powerful tool…


Leave a Reply