
Comprehensive Guide for the ComfyUI User Interface
In this blog, you will understand what some of these default nodes are in the ComfyUI User Interface. ComfyUI is a powerful and modular Stable Diffusion GUI with a graph/nodes interface. When you first open it, it may seem simple and empty, but once you load a project, you may be overwhelmed by the node system. A node system is a way of designing and executing complex stable diffusion pipelines using a visual flowchart. As you connect different nodes with cables, you may end up with a messy network that looks like spaghetti noodles.
If you are not familiar with nodes, this can be intimidating. I have some experience with nodes from other software, but even I felt daunted at first. However, as you use it more, you will realize that it is fairly simple and intuitive. You can also use the workflows that other users have uploaded, which are collections of nodes that they have saved for specific tasks. The term “workflow” is very common in Comfy UI. ComfyUI is the best when it comes to rolling out the latest innovations and will become a playground for exploring new tools not yet available on other UI’s.
In this blog, I will guide you through the ComfyUI user interface and explain everything from beginner to advanced levels. I will update this page frequently as I learn more and I hope this will help you understand how to use Comfy UI and not be afraid of it. Some people think that Comfy UI is the future of Stable Diffusion, but I think this is too early to say, as there are other tools like Automatic1111 and Invoke AI that are also very good and have some advantages over Comfy UI.
It reminds me of when people said that nodes were the best way to do visual effects when Shake, by Nothing Real was very popular for its node based workflow, but now the most popular app for that is After Effects, which uses layers instead. Sony Vegas (Nodes) vs Premiere (Layers) are also examples of this. However, nodes do feel natural for Stable Diffusion, so maybe they will prevail in the end. Who knows?
Learn How to Navigate the ComyUI User Interface
Before you proceed, make sure you have ComfyUI installed. Follow the link below to learn how.
Table of Contents

ComfyUI: A Simple and Efficient Stable Diffusion GUI n ComfyUI is a user-friendly interface that lets you create complex stable diffusion workflows with a node-based system. You don’t need any coding skills to use it. Before you install ComfyUI, make sure you follow our prerequisite guide [here]. This will prepare you for using other tools…

The user interface of ComfyUI is based on nodes, which are components that perform different functions. When you launch ComfyUI, you will see an empty space. To launch the default interface with some nodes already connected, you’ll need to click on the ‘Load Default’ button as seen in the picture above and a network of basic nodes will appear. From left to right, they are:
Load Checkpoint:
This node lets you load a Stable Diffusion model or checkpoint
CLIP Text Encode (Prompt):
This node lets you enter a text prompt that will guide the image generation
Empty Latent Image:
This node creates an empty latent image that will be filled by the model
KSampler:
This node samples the latent image using different parameters
VAE Decode:
This node decodes the latent image into a visible image
Save Image:
This node saves the generated image to a file
Queue Prompt:
This is the main menu that lets you access different options, such as Save, Load, Refresh, Clipspace, Clear, and Load Default. If you have installed the ComfyUI Manager, you will also see a button for it.
These are the basic nodes that you need to start generating images with ComfyUI. You can add more nodes and customize your workflow as you wish. You can even load up other user’s workflows.
This node lets you load a Stable Diffusion model or checkpoint from different sources.
The ‘Load Checkpoint’ node has a box where you can enter the name or path of the model or checkpoint that you want to load. You can also browse for the file by clicking on the folder icon. The box has three colored circles: purple, yellow, and red. These represent the Model, CLIP, and VAE components of the Stable Diffusion pipeline.

MODEL:
This is the main component that generates the latent image from the text prompt. The latent image is a hidden representation that contains the information for the final image. The model can be a checkpoint file (ckpt), a safe tensors file (st), or a diffusers file (df).
CLIP:
This is an auxiliary component that encodes the text prompt into a vector that guides the model. The vector is a numerical representation of the meaning and style of the text. The CLIP can be a checkpoint file (ckpt) or a diffusers file (df).
VAE:
VAE stands for variational autoencoder. It is a neural network model that encodes and decodes the images to and from a smaller latent space, so that computation can be faster.
Let me try to explain the options for each nodes. Each button has four common options: add node, search, reroute and LoraLoader. LoRa Loader is only in MODEL and CLIP buttons. These are useful for creating and modifying your node network.
Add node:
This option lets you add a new node to your network. You can choose from different categories of nodes, such as Sampling, Loaders, Conditioning, Latent, Image, Mask, for testing, Advanced, and Utils. Each category has different nodes that perform different functions. For example, Sampling nodes let you sample the latent image using different methods, Loaders nodes let you load different models and components, Conditioning nodes let you apply different conditions to the text or image, and so on.
Search:
This option lets you search for a specific node by name or keyword. You can type in the search box and see the matching nodes. You can then drag and drop the node that you want to your network.
Reroute:
This option lets you create a reroute node that helps you organize your cables. A reroute node is a small dot that you can place anywhere on your network. You can then connect your cables to it and move it around. This helps you avoid crossing or overlapping cables and make your network more readable.
LoraLoader:
This node allows you to load LoRa (Low-Rank Adaptation) checkpoints that are stored on your LoRa folder. The LoraLoader node facilitates the loading of these LoRa checkpoints into ComfyUI, enabling you to utilize these fine-tuned models for your Stable Diffusion projects.
The other options that each button has are specific to the MODEL Output Node


KSampler:
This node lets you sample and refine the latent image using K-Sampling, a technique that smooths out the noise and makes the image more realistic. You can connect this node to the model, the text prompts, and the latent image, and adjust various parameters to control the sampling process. You can also choose different samplers, schedulers, and denoising options to experiment with different methods and outcomes.
KSamplerAdvanced:
This is similar to the KSampler node, but it has more parameters that you can adjust to fine-tune the sampling process. The extra parameters let you add noise, set the starting and ending steps, and return the latent image with or without the leftover noise. You can use this node along with the other parameters that are available in the KSampler node, such as sampler_name, scheduler, and denoise. The KSampler (Advanced) node gives you more control over the sampling process and lets you experiment with different effects and outcomes.
Load ControlNet Model (diff):
This is a special node that can load ControlNet models in a diffuser format. A diffuser format is a way of storing the difference between a base model and a modified model, which can reduce the file size and improve the performance. The DiffControlNetLoader node can also load regular ControlNet models, but it is mainly used for diffuser models.
HypernetworkLoader:
This node allows you to load a hypernetwork checkpoint file, which is a model that can generate other models on the fly. You can use this node to create different models for different tasks, such as image generation, image editing, or image classification. n ModelMergeSimple: This node allows you to merge two models using a simple average of their weights. You can use this node to create new models that combine the features of the original models.
ModelMergeBlocks:
This node allows you to merge two models using a more complex method that involves swapping or mixing blocks of weights. You can use this node to create new models that have more diversity and flexibility than the simple merge.
TomePatchModel:
This node allows you to apply a patch to a model, which is a small modification that can improve the performance or quality of the model. You can use this node to fix bugs, add features, or fine-tune a model.
FreeU:
This node allows you to free up the memory used by a model, which can improve the speed and stability of ComfyUI. You can use this node to delete a model that you no longer need.
CheckpointSave:
This node allows you to save the current state of the model and the latent codes to a file, so you can resume the image generation process later. It’s available as outputs for the Load Checkpoint node.
LoraLoader:
See Above.
The other options that each button has are specific to the CLIP Output Node,


CLIP Text Encode (Prompt):
This node lets you enter a text prompt that will be encoded by the CLIP component. You can also use the syntax (keyword:weight) to control the weight of the keyword.
CLIP Set Last Layer:
This node lets you set the last layer of the CLIP component. The last layer is the part of the neural network that produces the final vector. You can choose from different layers, such as 0, 1, 2, or 33.
GLIGENTTextBoxApply:
This node lets you play with the text prompt that you use to create images. This node gives you a tool that helps you change the text prompt in different ways. You can use it to try different words, phrases, or styles that mean the same thing or something similar. [Learn More Below]
CLIPMergeSimple:
This node allows you to merge two images using CLIP, which is a neural network that can compare images and text. You can specify the text prompt and the blending ratio for the merge operation.
CLIPSave:
This node allows you to save the generated image to a file, along with the text prompt and the CLIP score, which measures how well the image matches the text.
CLIPTextEncodeSDXLRefiner:
This node allows you to encode a text prompt using CLIP and use it to refine an image generated by SDXL, which is a variant of Stable Diffusion that can produce high-resolution images. You can adjust the refinement parameters such as the number of steps and the temperature.
CLIPITextEncodeSDXL:
This node allows you to encode a text prompt using CLIP and use it to generate an image from scratch using SDXL. You can also specify the image size and the number of samples to generate.
CheckpointSave:
This node allows you to save the current state of the model and the latent codes to a file, so you can resume the image generation process later. It’s available as outputs for the Load Checkpoint node.
LoraLoader:
See Above.
The other options that each button has are specific to the VAE Output Node


VAE Decode:
This node decodes the latent image into a visible image. The latent image is a hidden representation that contains the information for the final image. The visible image is the final output that you can see and save.
VAE Encode:
This node encodes the visible image into a latent image. It does the opposite of VAEDecode. It compresses the visible image into a smaller representation that can be used for other nodes, such as KSampler or SaveLatentImage.
VAE Encode (for Inpainting)
This node is similar to VAEEncode, but it also crops the visible image before encoding it. It removes the parts of the image that are not relevant for the text prompt. This makes the encoding more efficient and accurate.
VAE Decode (Tiled):
This node is similar to VAEDecode, but it also splits the latent image into tiles before decoding it. It decodes each tile separately and then stitches them together to form the visible image. This reduces the memory usage and allows for higher resolutions. [Source]
VAE Encode (Tiled):
This node allows you to encode an image using a variational autoencoder (VAE), which is a model that can compress and reconstruct images. This node uses a tiled approach, which means it splits the image into smaller patches and encodes them separately. This can reduce the memory usage and allow higher resolution images to be encoded.
VAESave:
This node allows you to save the encoded image to a file, along with the VAE model parameters. You can use this node to store the compressed image for later use or transfer.
CheckpointSave:
This node allows you to save the current state of the model and the latent codes to a file, so you can resume the image generation process later. It’s available as outputs for the Load Checkpoint node.
The Load Checkpoint node is an essential node that lets you load different models and components for your Stable Diffusion projects. You can use it to choose and load different sources, such as checkpoint files, safe tensors files, or diffusers files. You can also use it to customize your node network by adding, searching, rerouting, or loading different nodes.
In the next section, I will continue down the list and explain another important node that loads up in the default interface: the CLIP node. The CLIP node is a node that encodes the text prompt into a vector that guides the image generation. We’ve already touched on The CLIP node, but in this next section we will go in-depth and I will explain how to use it and what options it has.

When you launch ComfyUI, you will see two CLIP Text Encode (Prompt) nodes . They are identical, but they have different purposes when connected to other similar colored nodes. The top one is for the positive text prompt and the bottom one is for the negative text prompt . The positive text prompt tells the model what features you want in the image and the negative text prompt tells the model what features you don’t want in the image.
A few unique input and output connectors:
The Input Nodes:
Load Checkpoint
CLIP Set Last Layer
Load CLIP
DualCLIPLoader
unCLIPCheckpointLoader
Load Checkpoint with Config (Depreciated)
CLIPMergSimple
DifusersLoader
The Output Nodes:
KSampler
Conditioning (Combine)
Conditioning (Concat)
ConditioningAverage
Conditioning (Set Area):
Conditioning (Set Area with Percentage):
Conditioning (Set Mask):
unCLIPConditioning:

To use these nodes, you need to connect them to the KSampler node, which samples and refines the latent image. The KSampler node has two inputs for the text prompts: positive and negative. You can connect the conditioning output of the CLIP Text Encode (Prompt) node to the corresponding input of the KSampler node. The conditioning output is the right connector of the CLIP Text Encode (Prompt) node.
You also need to connect the clip output of the CLIP Text Encode (Prompt) node to the CLIP input of the Load Checkpoint node, which loads the model and the components for the stable diffusion pipeline. The clip output is the left connector of the CLIP Text Encode (Prompt) node.
The other options that each button has are specific to the Conditioning node.
Conditioning (Combine):
Conditioning (Combine): This node lets you combine two or more text prompts into one prompt using logical operators such as AND, OR, NOT, etc. For example, you can use this node to create a prompt like “a dog AND a cat” or “a dragon OR a unicorn”.
Conditioning (Concat):
This node lets you concatenate two or more text prompts into one prompt using a separator such as a comma, a semicolon, a dash, etc. For example, you can use this node to create a prompt like “a forest, a lake, a cabin” or “a knight; a sword; a shield.
ConditioningAverage:
This node lets you average two or more text prompts into one prompt using a weighted sum. For example, you can use this node to create a prompt like “0.5 * a horse + 0.5 * a zebra” or “0.8 * a sunny day + 0.2 * a rainy day.
Conditioning (Set Area):
This node allows you to set a rectangular area on the image where you want to apply a text prompt. You can specify the coordinates and the size of the area in pixels. This node is useful for creating compositions or edits with multiple prompts.
Conditioning (Set Area with Percentage):
This node is similar to Conditioning (Set Area), but it allows you to set the area with values from 0.0 to 1.0 instead of pixels. This node is useful for creating compositions or edits with multiple prompts that are independent of the image resolution.
Conditioning (Set Mask):
This node allows you to set a mask on the image where you want to apply a text prompt. A mask is a black and white image that defines which pixels are affected by the prompt. You can use this node to create more precise and complex compositions or edits with multiple prompts.
unCLIPConditioning:
This node allows you to remove the CLIP conditioning from a text prompt. CLIP is a neural network that can compare images and text. By default, ComfyUI uses CLIP to condition the image generation process, which means it tries to make the image match the text as closely as possible. However, sometimes you may want to generate images that are not constrained by CLIP, such as abstract or surreal images. You can use this node to disable the CLIP conditioning for a specific prompt.
Apply Style Model:
This node allows you to apply a style model to an image. A style model is a model that can transfer the style of one image to another, such as changing the color, texture, or mood of the image. You can use this node to create stylized or artistic images.
ControlNetApply:
This node allows you to apply a control network to an image. A control network is a model that can manipulate the pose, expression, or orientation of a face or a body in an image. You can use this node to create animations or transformations of human figures.
ControlNetApply (Advanced):
This node is similar to ControlNetApply, but it allows you to adjust more parameters of the control network, such as the strength, the smoothness, or the interpolation of the manipulation. You can use this node to create more fine-grained or realistic animations or transformations of human figures.

The KSampler node is a node that lets you sample and refine the latent image using K-Sampling, a technique that smooths out the noise and makes the image more realistic. The latent image is a hidden representation that contains the information for the final image. The KSampler node has various inputs and outputs.
The KSampler inputs are:
Model:
This is where you connect the model that generates the latent image from the text prompt.
Positive:
This is where you connect the positive text prompt that guides the image generation.
Negative:
This is where you connect the negative text prompt that prevents unwanted features in the image.
Latent_image:
This is where you connect the latent image that will be sampled by the node.
The KSampler output is:
LATENT:
This is where you connect the sampled latent image to another node, such as VAE Decode or Save Image.
The KSampler node also has several parameters that you can adjust to control the sampling process. They are:
Seed:
This is where you set the random seed for the sampling. A random seed is a number that determines the randomness of the sampling. You can use any integer number for this parameter. You can also save the seed value and use it again to generate the same or similar image later.
Control_after_generate:
This is a parameter that controls how the seed value changes after each image generation in ComfyUI. The seed value is a number that determines the randomness of the image generation process. You can choose from four options for Control_after_generate: Randomize, Increment, Decrement, or Fixed.
Randomize will change the seed value randomly after each image generation. Increment will increase the seed value by one after each image generation. Decrement will decrease the seed value by one after each image generation. Fixed will keep the seed value unchanged after each image generation. Control_after_generate can affect the diversity and consistency of the image generation results.Steps:
This is where you set how many steps or iterations the sampling will take. A step is a cycle of generating and refining the latent image. You can use any positive integer number for this parameter. In general, higher steps means more time to figure out the image generation, which results in better quality, but too many steps can ruin the image.
Cfg:
This is where you set the CFG scale (classifier-free guidance scale) or guidance scale for the sampling. The CFG scale is a parameter that controls how much the image generation process follows the text prompt. The higher the value, the more the image sticks to a given text input. The lower the value, the more the image deviates from the text input and becomes more creative.
Sampler_name:
Samplers are methods that perform the denoising steps in Stable Diffusion, a technique that generates realistic images from text prompts. Samplers add and subtract noise from the latent image, which is a hidden representation that contains the information for the final image. Different samplers have different effects on the speed, quality, and diversity of the image generation process.
Denoise:
Denoising Strength can range from 0 to 1. A value of 0 means no noise is added, so the output image will be exactly the same as the input image. A value of 1 means the input image is completely replaced by noise, so the output image will have nothing to do with the input image. A value between 0 and 1 means some noise is added, so the output image will be influenced by the input image, but not entirely. You can use Denoising Strength to control how much you want the output image to follow the input image or deviate from it.
Scheduler:
The Scheduler is a parameter that controls the speed and progress of the sampling process in ComfyUI. Sampling is a technique that generates realistic images from text prompts using Stable Diffusion. The Scheduler determines how many times and at what intervals the sampling process is repeated. Different Schedulers have different effects on the quality and diversity of the image generation process.
| Some of the Schedulers available in ComfyUI are: | |
|---|---|
| Normal: | A default and balanced Scheduler that uses a linear function to define the sampling intervals. |
| Karras: | A Scheduler that uses a logarithmic function to define the sampling intervals. It spends more time sampling smaller intervals than the Normal Scheduler, which can result in smoother and clearer images. |
| Simple: | A Scheduler that uses a constant function to define the sampling intervals. It samples at the same interval for every step, which can work well for some scenarios like second pass of Hires fix. |
| DDIM Uniform: | A Scheduler that uses a dynamic function to define the sampling intervals. It adapts to the input image and the text prompt, and samples at different intervals for different steps, which can result in more diverse and creative images. |

The Empty Latent Image Node is a node that creates a blank image that you can use as a starting point for generating images from text prompts. The blank image is called a latent image, which means it has some hidden information that can be transformed into a final image.
The Empty Latent Image Node has three parameters that you can change:
Width:
This is where you set the width of the latent image in pixels. You can use any positive integer number for this parameter.
Height:
This is where you set the height of the latent image in pixels. You can use any positive integer number for this parameter.
Batch_size:
This is where you set the number of latent images that will be created at once. You can use any positive integer number for this parameter, but a higher number will use more memory and take longer to process.
The output of the Empty Latent Image Node is a latent image that you can connect to other nodes that can use a latent image as input, such as VAE Decode, KSampler, Upscale Latent, or Upscale Latent by.
The Upscale Latent Node is a node that makes the latent image bigger by a fixed factor, such as 1.25x, 1.5x, or 2x. Making the latent image bigger can improve the resolution and quality of the final image, but it can also introduce some noise and distortion.
The Upscale Latent Node has four parameters that you can change:
Upscale_method:
This is where you choose the method that will be used to make the latent image bigger. Different methods have different effects on the speed and quality of the upscaling. You can choose from different methods, such as nearest-exact, bilinear, area, bicubic, or bislerp.
Width:
This is where you set the width of the upscaled latent image in pixels. You can use any positive integer number for this parameter, but it should be a multiple of the original width.
Height:
This is where you set the height of the upscaled latent image in pixels. You can use any positive integer number for this parameter, but it should be a multiple of the original height.
Crop:
This is where you choose whether to crop the upscaled latent image or not. Cropping is a technique that removes some parts of the image to make it fit a certain size or shape. You can choose from two options: Disable or Center. Disable will keep the whole upscaled latent image. Center will crop the upscaled latent image from the center to match the original size.
The output of the Upscale Latent Node is an upscaled latent image that you can connect to other nodes that can use a latent image as input, such as VAE Decode, KSampler, or AnimateDiff.
The Upscale Latent by Node is a node that makes the latent image bigger by a custom factor, such as 1.1x, 1.3x, 1.7x, etc. Making the latent image bigger by a custom factor can give you more flexibility and control over the image generation process, but it can also result in more noise and distortion.
The Upscale Latent by Node has three parameters that you can change:
Upscale_method:
This is where you choose the method that will be used to make the latent image bigger. Different methods have different effects on the speed and quality of the upscaling. You can choose from different methods, such as nearest-exact, bilinear, area, bicubic, or bislerp.
Scale_by:
This is where you set the factor that will be used to make the latent image bigger. You can use any positive number for this parameter, but the node will round it to the nearest 0.05. For example, if you enter 1.12, the node will upscale by 1.1x. If you enter 1.18, the node will upscale by 1.2x.
The output of the Upscale Latent by Node is an upscaled latent image that you can connect to other nodes that can use a latent image as input, such as VAE Decode, KSampler, or AnimateDiff.

VAE Decode/Encode are nodes in ComfyUI that allow you to transform images between pixel space and latent space using variational autoencoders (VAEs). VAEs are models that can learn to compress and reconstruct images using a lower-dimensional representation called latent space. Latent space is a hidden space that contains the information for the final image. You can use VAE Decode/Encode to perform various tasks, such as image-to-image translation, image enhancement, image inpainting, etc.
VAE Decode is a node that converts a latent image into a pixel image. It has two inputs and one output:
Samples:
This is where you connect the latent image that you want to decode. You can use any node that outputs a latent image, such as Empty Latent Image, KSampler, or VAE Encode.
VAE:
This is where you connect the VAE model that you want to use for decoding. You can use any node that outputs a VAE model, such as Load VAE, VAE Train, or VAE FineTune.
Image:
This is where you connect the pixel image that is decoded from the latent image. You can use any node that accepts a pixel image as input, such as Preview Image, Save Image, or VAE Encode.
VAE Encode is a node that converts a pixel image into a latent image. It has two inputs and one output:
Pixels:
This is where you connect the pixel image that you want to encode. You can use any node that outputs a pixel image, such as Load Image, VAE Decode, or AnimateDiff.
VAE:
This is where you connect the VAE model that you want to use for encoding. You can use any node that outputs a VAE model, such as Load VAE, VAE Train, or VAE FineTune.
Latent:
This is where you connect the latent image that is encoded from the pixel image. You can use any node that accepts a latent image as input, such as VAE Decode, KSampler, or Upscale Latent.
VAE Encode (for Inpainting) is a node that is similar to VAE Encode, but with an additional input for mask. Mask is a pixel image that indicates which parts of the input image are missing or corrupted. You can use VAE Encode (for Inpainting) to perform image inpainting, which is a technique that fills in the missing or corrupted parts of an image using the information from the rest of the image and the text prompt. It has three inputs and one output:
Pixels:
This is where you connect the pixel image that you want to inpaint. You can use any node that outputs a pixel image, such as Load Image, VAE Decode, or AnimateDiff.
VAE:
This is where you connect the VAE model that you want to use for inpainting. You can use any node that outputs a VAE model, such as Load VAE, VAE Train, or VAE FineTune.
Mask:
This is where you connect the mask image that indicates the missing or corrupted parts of the input image. You can use any node that outputs a mask image, such as Load ImageMask, ImagePadForOutPaint, or Image to Mask.
Latent:
This is where you connect the latent image that is inpainted from the pixel image and the mask image. You can use any node that accepts a latent image as input, such as VAE Decode, KSampler, or Upscale Latent.

The Save Image Node is a node that allows you to save the generated image to your local or cloud storage. It only has an input:
Image:
This is where you connect the image that you want to save. You can use any node that outputs an image, such as VAE Decode, Load Image, Image Scale, or Image Scale by.
The Save Image Node also has one parameter that you can change to control the saving process:
Filename_prefix:
This is where you enter the file name of the saved image. You can use any valid file name for this parameter, such as image.png, image.jpg, image.gif, etc.
If you want to save your files to a different directory than the default one in ComfyUI, you need a custom node called Comfy Image Saver, which you can install using the ComfyUI Manager. The Comfy Image Saver node lets you save the generated image to any location, format, and quality you want. The ComfyUI Manager is a tool that helps you manage your ComfyUI projects and nodes.
You can find both the Comfy Image Saver node and the ComfyUI Manager from these links.
I will explain more about how to use them in my next blog. Stay tuned!

The Queue Prompt button is the big button that you can click to generate an image from your workflow. A workflow is a series of nodes that are connected to each other, each performing a specific task or function. You can create your own workflow by adding and connecting different nodes, such as Load Text, Load Image, VAE Encode, KSampler, VAE Decode, etc.
When you click the Queue Prompt button, ComfyUI will send your workflow to the server, where it will be processed and executed. The server will then return the generated image to your browser, where you can preview it, save it, or modify it.
The Queue Prompt button also shows the queue size, which is the number of workflows that are waiting to be processed by the server. The queue size can vary depending on the demand and availability of the server. If the queue size is zero, it means your workflow will be processed immediately. If the queue size is positive, it means your workflow will be processed after the previous workflows in the queue.
Queue size:
This is the number that shows how many workflows are waiting to be executed. When you click Queue Prompt, the queue size will increase by one. When the backend finishes executing a workflow, the queue size will decrease by one. You can use the queue size to monitor the progress and status of your image generation.
Extra Options
The Extra Options is a checkbox that you can check to reveal more options for the image generation process. The Extra Options are:
Batch count:
This is a slider that you can use to set the number of images that you want to generate from your workflow. You can use any positive integer number for this option, but a higher number will use more memory and take longer to process. The default value is 1, which means only one image will be generated.
Auto Queue:
This is a checkbox that you can check to enable the automatic queuing of your workflow. This means that ComfyUI will automatically send your workflow to the server every time you make a change to it, without you having to click the Queue Prompt button. This can be useful if you want to see the results of your changes in real time, but it can also consume more resources and bandwidth.
Queue Front, View Queue, View History
The Queue Front, View Queue, and View History are buttons that you can use to manage and view your workflows and images. The buttons are:
Queue Front:
This button lets you move your workflow to the front of the queue, which means it will be processed before the other workflows in the queue. This can be useful if you want to prioritize your workflow over the others, but it can also be unfair to the other users who are waiting for their workflows to be processed.
View Queue:
This button lets you view the queue of workflows that are waiting to be processed by the server. You can see the details of each workflow, such as the text prompt, the nodes, the parameters, and the status. You can also cancel or reorder your workflows in the queue, or move them to the front of the queue.
View History:
This button lets you view the history of workflows that have been processed by the server. You can see the details of each workflow, such as the text prompt, the nodes, the parameters, and the generated image. You can also save or load your workflows from the history, or delete them from the history.
Save, Load, Refresh, ClipSpace, Clear, Load Default, Manager
The Save, Load, Refresh, ClipSpace, Clear, Load Default, and Manager are buttons that you can use to save, load, refresh, clip, clear, load default, or manage your workflows. The buttons are:
Save:
This button lets you save your workflow to your local or cloud storage. You can choose the format and the name of the saved file. You can also use the Save (API format) button to save your workflow as a JSON file, which you can use to run your workflow from the command line with the API.
Load:
This button lets you load a workflow from your local or cloud storage. You can choose the file that contains the workflow that you want to load. You can also download and load other users’ workflows from the web, which is what makes ComfyUI awesome, as it allows the community to share their nodes network.
Refresh:
This button lets you refresh your workflow, which means it will reload the nodes and the parameters from the server. This can be useful if you want to update your workflow with the latest changes or fixes from the server, or if you encounter any errors or bugs in your workflow.
ClipSpace:
This button lets you clip the space of your workflow, which means it will remove any empty or unused space from your workflow. This can be useful if you want to make your workflow more compact and organized, or if you want to fit your workflow in a smaller screen or window.
Clear:
This button lets you clear your workflow, which means it will delete all the nodes and the parameters from your workflow. This can be useful if you want to start a new workflow from scratch, or if you want to reset your workflow to its initial state. You can also use the Clear (with confirmation) button to clear your workflow with a confirmation dialog, which can prevent you from accidentally clearing your workflow.
Load Default:
This button lets you load the default workflow, which is the built-in workflow that ComfyUI provides for you to start with. The default workflow contains some basic nodes, such as Load Text, Load Image, VAE Encode, KSampler, VAE Decode, etc. You can use the default workflow as a template or a reference for your own workflow, or you can modify it to suit your needs and preferences.
Manager:
This button lets you open the ComfyUI Manager, which is a tool that helps you manage your ComfyUI projects and nodes. You can use the ComfyUI Manager to install, update, or uninstall custom nodes, which are nodes that are not included in the standard ComfyUI package, but can be downloaded and installed separately. You can also use the ComfyUI Manager to create, edit, or delete your projects, which are collections of workflows that you can organize and access easily. The ComfyUI Manager is only available when you install it, and I will talk about it in a different blog.
ComfyUI has many more nodes than the ones that appear by default when you start it up. These nodes are custom nodes that you can download and install using ComfyUI-Manager. These custom nodes are created by the community and offer various functionalities and features for Stable Diffusion. However, there are so many custom nodes in ComfyUI that it is impossible to cover them all in this guide. Therefore, in this section, I will only introduce some of the custom nodes that I have learned and used.
I will update this guide as I discover more custom nodes. If you have any requests or suggestions for custom nodes that you want to learn more about, please let me know. However, keep in mind that this section is only an overview of the custom nodes, and I will not go into details about how to use them. I will save that for a future tutorial where I will show you some practical workflows using these custom nodes.
GLIGENTTextBoxApply node
This node lets you play with the text prompt that you use to create images. A text prompt is a sentence or a phrase that describes what you want the image to look like. For example, “a blue sky with white clouds”.
This node gives you a tool that helps you change the text prompt in different ways. You can use it to try different words, phrases, or styles that mean the same thing or something similar. For example, you can change “a blue sky with white clouds” to “a clear day with fluffy clouds” or “a bright azure sky with cotton-like clouds”. You can also use it to add or remove words, such as “a blue sky with white clouds and a rainbow” or “a blue sky”.
The tool will show you how these changes affect the image that you get. You can see if the image looks better or worse, or if it matches what you want.
This node also has some parameters that you can adjust to control the tool. They are:
width:
This is where you set the width of the tool in pixels
height:
This is where you set the height of the tool in pixels
x:
This is where you set the horizontal position of the tool on the screen
y:
This is where you set the vertical position of the tool on the screen
The GLIGENTTextBoxApply node is a fun and useful node that lets you explore different ways of writing text prompts for your image generation projects. You can use it to improve your text prompts and get better images. I hope this helps you understand how to use it. If you have any questions, feel free to ask me.

Access the Settings by Clicking on the Cogwheel
Require confirmation when clearing workflow:
This is a checkbox that you can check to enable the confirmation dialog when you clear your workflow. This can prevent you from accidentally clearing your workflow without saving it.
Prompt for filename when saving workflow:
This is a checkbox that you can check to enable the filename prompt when you save your workflow. This can allow you to choose the name of the saved file, instead of using the default name.
When displaying a preview in the image widget, convert it to a lightweight image, e.g. n webp, jpeg, webp;50, etc :
This is a text box that you can use to enter the format and the quality of the preview image in the image widget. The image widget is a small window that shows the generated image from your workflow. You can use this option to reduce the size and the loading time of the preview image, but it can also affect the quality and the accuracy of the preview image.
Disable sliders:
This is a checkbox that you can check to disable the sliders in the nodes. Sliders are graphical controls that allow you to adjust the values of the parameters in the nodes. You can use this option to improve the performance and the stability of ComfyUI, but it can also make it harder to change the values of the parameters.
Disable rounding floats (requires page reload):
This is a checkbox that you can check to disable the rounding of the floating-point numbers in the nodes. Floating-point numbers are numbers that have a decimal point, such as 1.23, 4.56, etc. You can use this option to preserve the precision and the accuracy of the floating-point numbers, but it can also make them harder to read and write.
Decimal places [0 = auto] (requires page reload):
This is a text box that you can use to enter the number of decimal places that you want to display for the floating-point numbers in the nodes. You can use any positive integer number for this option, or you can use 0 to let ComfyUI decide the number of decimal places automatically. You can use this option to control the precision and the readability of the floating-point numbers.
Enable Dev mode Options:
This is a checkbox that you can check to enable the developer mode options in ComfyUI. Developer mode options are advanced options that are intended for developers and testers of ComfyUI, such as Save (API format), Queue Front, View Queue, View History, etc. You can use this option to access the developer mode options, but you should be careful and responsible when using them, as they can affect the performance and the functionality of ComfyUI.
Save menu position:
This is a checkbox that you can check to save the position of the menu in ComfyUI. The menu is the bar that contains the buttons and the options for ComfyUI, such as Save, Load, Refresh, ClipSpace, Clear, Load Default, Manager, etc. You can use this option to remember the position of the menu, so that it will not move or reset when you reload or restart ComfyUI.
Logging:
This is a checkbox that you can check to enable the logging of the events and the errors in ComfyUI. Logging is a process that records and saves the information about what happens in ComfyUI, such as the nodes, the parameters, the images, the messages, the warnings, the exceptions, etc. You can use this option to keep track of the history and the performance of ComfyUI, or to debug and troubleshoot any problems that you encounter. You can also use the View Logs button to view the logs that are saved in ComfyUI.
Ctrl+up/down precision:
This is a text box that you can use to enter the precision of the Ctrl+up/down shortcut in ComfyUI. The Ctrl+up/down shortcut is a keyboard shortcut that allows you to increase or decrease the values of the parameters in the nodes by a small amount. You can use any positive number for this option, but a smaller number will result in a finer adjustment, while a larger number will result in a coarser adjustment. The default value is 0.01, which means the values of the parameters will change by 0.01 when you use the Ctrl+up/down shortcut.
Invert Menu Scrolling:
This is a checkbox that you can check to invert the direction of the menu scrolling in ComfyUI. The menu scrolling is the action of moving the menu up or down by using the mouse wheel or the touchpad. You can use this option to reverse the direction of the menu scrolling, so that it will match your preference or your device settings.
Number of nodes suggestions:
This is a text box that you can use to enter the number of nodes suggestions that you want to see in ComfyUI. The nodes suggestions are the suggestions that ComfyUI gives you when you add a new node to your workflow. You can use any positive integer number for this option, but a higher number will show you more suggestions, while a lower number will show you fewer suggestions. The default value is 5, which means you will see 5 suggestions when you add a new node to your workflow.
Grid Size:
This is a text box that you can use to enter the size of the grid in ComfyUI. The grid is the background of the workflow area, where you can see the horizontal and vertical lines that help you align and arrange your nodes. You can use any positive integer number for this option, but a higher number will make the grid bigger, while a lower number will make the grid smaller. The default value is 20, which means the grid size is 20 pixels by 20 pixels.
Color palette:
This is a dropdown menu that you can use to choose the color palette of ComfyUI. The color palette is the set of colors that ComfyUI uses for the nodes, the parameters, the buttons, the menus, etc. You can choose from different color palettes, such as Default, Dark, Light, Blue, Green, etc.
Link Render Mode:
This is a dropdown menu that you can use to choose the link render mode of ComfyUI. The link render mode is the way that ComfyUI draws the links between the nodes. You can choose from different link render modes, such as Straight, Curved, or Angled. Straight will draw the links as straight lines. Curved will draw the links as curved lines. Angled will draw the links as angled lines.
In my next guide, I will showcase some of the community nodes that enhance ComfyUI. These are custom nodes created and shared by other users, offering new features and functions. My guide will be a dynamic resource that updates with the latest community nodes and explains their uses.
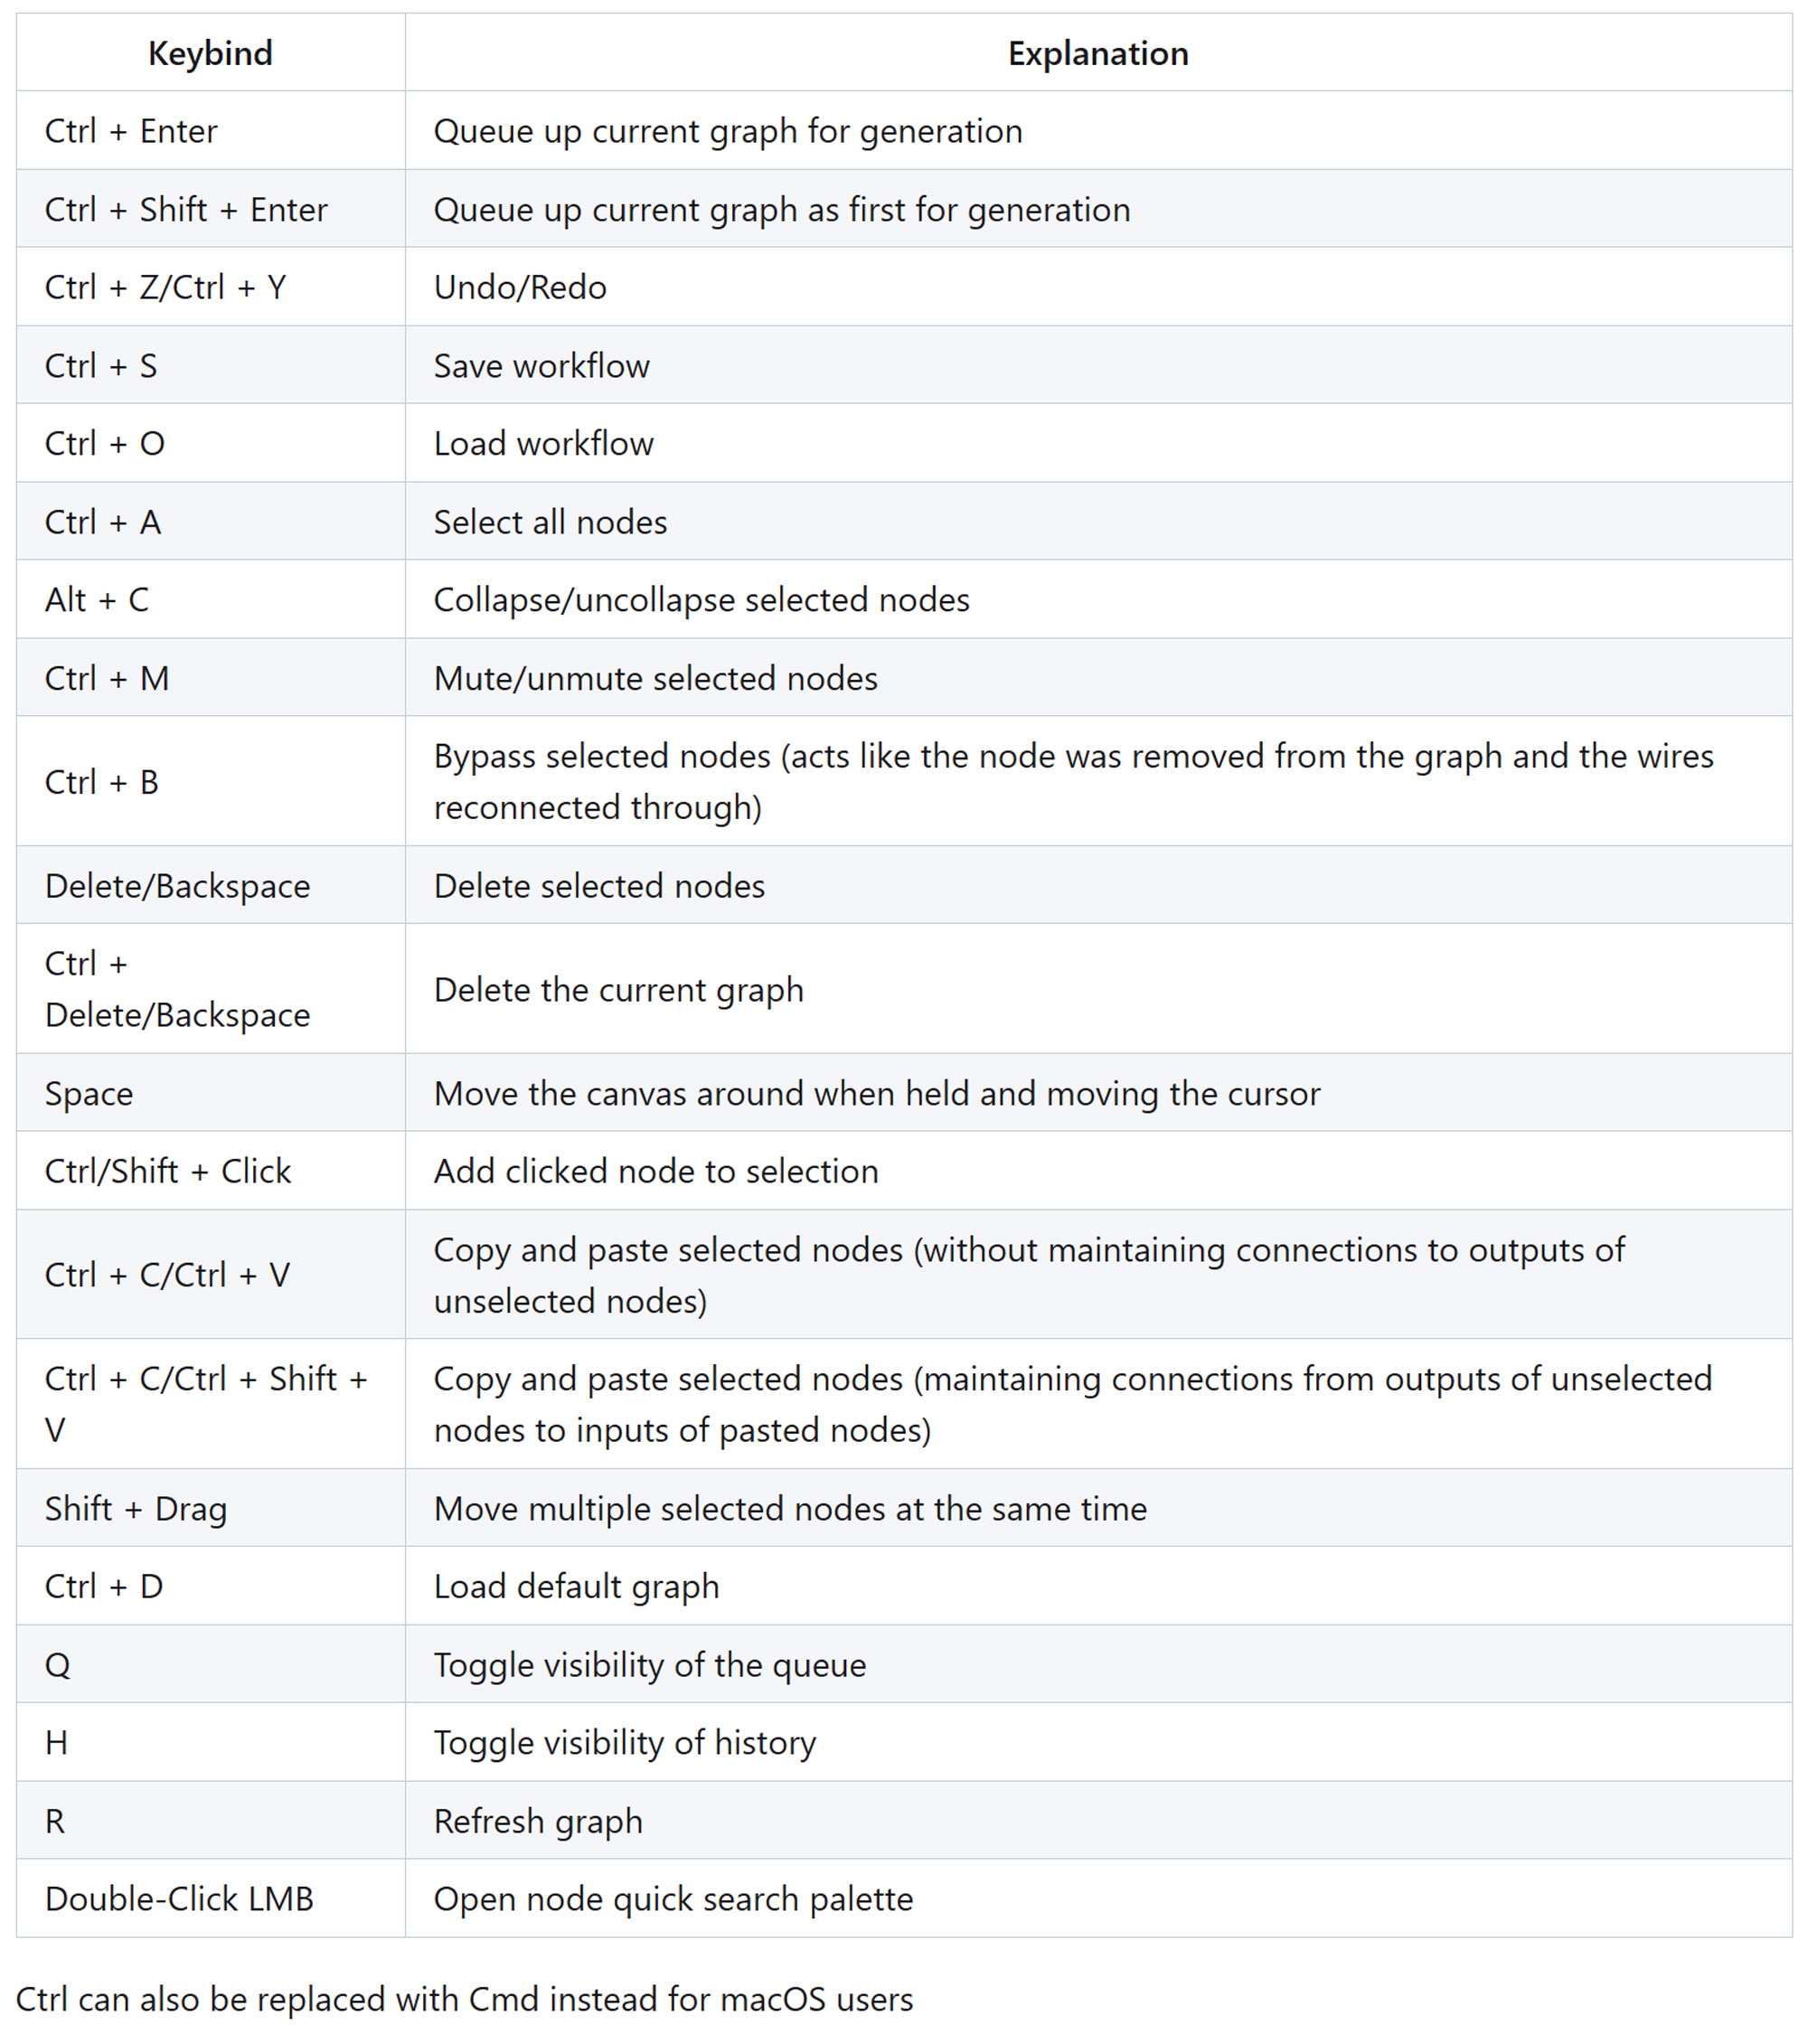
ComfyUI Hotkeys
Thoughts Final
ComfyUI has many more nodes than the ones that appear by default when you start it up. These nodes are pre-built into ComfyUI, but they are hidden from the main interface. You can access them by using the search function in the add node menu.
Some of these hidden nodes are experimental, advanced, or require additional dependencies, so you should be careful and read the documentation for each node before using them. I have already explained some of these hidden nodes, such as CLIPMergeSimple and CLIPTextEncodeSDXLRefiner, but there are others that we have not covered yet.
In addition to the pre-built nodes, there are also custom nodes that you can install, remove, disable, or enable using ComfyUI-Manager. These custom nodes are created by the community and offer various functionalities and features for Stable Diffusion. You can find a list of custom nodes and their descriptions on GitHub. With a basic understanding of the default nodes, you should be able to learn how to use the hidden and custom nodes as well. However, since there are so many nodes in ComfyUI, I cannot cover them all in this guide. We will explore some practical use cases for these nodes in another time.
ComfyUI is a powerful web UI for Stable Diffusion, with a supportive community and innovative tools. It is a great playground to explore new AI generation technology. However, I personally prefer Invoke, which has a more sophisticated and less complicated design. It lets me create with my creativity, instead of figuring out how to connect many nodes. ComfyUI is easy to use when following someone else’s workflow, but creating my own requires more technical skills than I enjoy. Therefore, I recommend you to check out my Invoke installation guide above.
Invoke is an AI tool that can generate images based on prompts. It uses Stable Diffusion, a state-of-the-art generative model, and provides a user-friendly browser interface.
In this tutorial, you will learn how to install Invoke for Stable Diffusion and how to use it to generate amazing images from your own prompts.


Leave a Reply