How to Install Stable Diffusion Web UI – The Complete Guide for Automatic1111
In this guide, we will explore a hassle-free approach on How to Install Stable Diffusion, a powerful web user interface. What sets this method apart is the utilization of GitHub Desktop, which provides the unique advantage of easy rollback options. By leveraging GitHub Desktop, you gain the ability to effortlessly revert installations of both the Web UI itself and any accompanying extensions. This is particularly valuable as updates to these applications can occasionally introduce issues to your existing installation.
Understanding Stable Diffusion
Stable Diffusion is a powerful webUI designed to simplify the deployment and management of web-based applications. It provides an intuitive interface for configuring settings, monitoring performance, and interacting with your applications—all without the complexities of command-line interfaces.
Before we dive into Stable Diffusion, let’s explore the broader landscape of web user interfaces. Here are four popular options:
Automatic1111:
The original favorite, Automatic1111, gained prominence early on. Its straightforward design and functionality appealed to users seeking a reliable webUI.
ComfyUI:
When SDXL 1.0 was released, ComfyUI emerged as a contender. Known for its up-to-date features and strong community support, it quickly became a go-to choice.
Invoke:
Designed with professional studios in mind, Invoke boasts a sleek and polished UI. It’s ideal for those who demand both aesthetics and functionality.
Foocus:
If simplicity is your priority, Foocus fits the bill. With a user-friendly interface reminiscent of Automatic1111, it offers ease of use without compromising on essential features.
How to Install Stable Diffusion with GitHub Desktop
The beauty of using GitHub Desktop lies in its user-friendly interface, making it accessible even to those who are not well-versed in technical matters. Through this approach, you can keep Stable Diffusion and its associated extensions consistently up to date, with the added flexibility to selectively update repositories as you see fit. As the app runs, you can monitor which repositories require updates, empowering you to manually choose which ones to update at any given time.
Unlike traditional installation methods that rely heavily on command lines, this tutorial presents a streamlined alternative that simplifies the process. By following the steps outlined here, you can effortlessly set up Stable Diffusion and maintain a robust Web UI framework, ready to accommodate your needs. So, let’s get started!
Table of Contents
Step 1: Installing requirements for Xformers
You will need to have the CUDA Toolkit installed. You can find the CUDA Toolkit below. Additionally, to ensure proper functionality, you may need to install Microsoft Visual Studio, which can be found below. After downloading, follow the onscreen direction to install it.
Step 2: Install Python 3.10 and Add to PATH
To ensure a seamless installation of Stable Diffusion and its crucial component, torch, it is vital to install Python 3.10.6. (I’m now using 3.10.9 because of Invoke and it works just fine on all three web UIs (Invoke, A1111, ComfyUI). Follow the steps below:
Visit the Python website
Download from Python 3.10.6 or Python 3.10.9.
Both have been proven to work. 3.10.9 works well with Invoke.
Python 3.10.6 (Win 64-bit) Python 3.10.9 (Win 64-bit)During the installation process:
Make sure to click on the option “Add Python 3.10 to PATH”. This step is crucial as it ensures Python is easily accessible from the command line and other applications.
Click Install Now.

Verifying Python Installation:
After the installation, it is recommended to verify that Python is correctly added to the system’s PATH variable. Here’s how you can check:
- Right-click on “This PC” or “My Computer” and select “Properties“.
- Navigate to “Advanced System Settings“.
- Under the “Advanced” tab, click on “Environment Variables“.
- In the “Environment Variables” section, locate the “Path” variable and click “Edit“.
- Ensure that the path to Python 3.10 (e.g., C:\Python310) is included. If it is not listed, you may need to reinstall Python and ensure that the “Add Python 3.10 to PATH” option is selected during installation.

Step 3: Install Git
Git, the command line version, is essential for subsequent steps in the installation process. Here’s how to install Git:
Visit the Git website at:
Download the Git installer:
Visit the link above to find a version that is compatible with your system, or click on the button below to download the 64-bit Windows Setup.
64-bit Git for Windows SetupRun the installer:
Follow the on-screen instructions.
Select the recommended settings :
Proceed with the installation using the default options.
Step 4: Create a GitHub account and Install GitHub Desktop

Begin by creating an account on www.github.com.
Once registered, proceed to download and install GitHub Desktop from the official website (https://desktop.github.com/).
Install Github Desktop
This will enable you to log in to the desktop app and create a repository for your installations.
Download GitHub Desktop (Win64)

Step 5: Login to Your Github Account from Github Desktop
This will enable you to log in to the desktop app and create a repository for your installations. Below is an example of how to clone your repositories for everything related to Stable Diffusion.


This is the Stable Diffusion prerequisite guide. Here we will learn how to prepare your system for the installation of Stable Diffusion’s distinct Web UIs—Automatic1111, Invoke 3.0, and Comfy UI
If you’re already equipped with these prerequisites, then you’re in the perfect position to proceed with the installation of Automatic1111. This article will guide you through a simple, step-by-step process, paving the way for a streamlined Automatic1111 setup.
Step 1: Download and Install GitHub Desktop
Step 2: Copy and Paste the Repository
- Go to the Automatic1111 GitHub Repository.
- Copy and Paste the Repository which is the page URL. (Link below)
Step 3: Open GitHub Desktop and Clone Repository
- Launch the GitHub Desktop app
- Go to File > Clone Repository > Click on the URL tab
- Paste the repository link to the Repository URL location.
- For the Local Path, select the folder you want to install Automatic1111 in.
- Click on “Clone” to clone the repository to your local path.

By following these detailed steps, you can confidently install Stable Diffusion, leveraging the convenience and rollback capabilities offered by GitHub Desktop, along with the compatibility of Python 3.10 and the essential Git command line tool. This approach ensures a smooth installation experience.
Step 4: Run the Windows Batch File to Install Dependencies
Proceed to run the provided Windows Batch File (.bat). This file automates the installation of all the necessary components required for Automatic1111 to function properly. Here’s how to proceed:
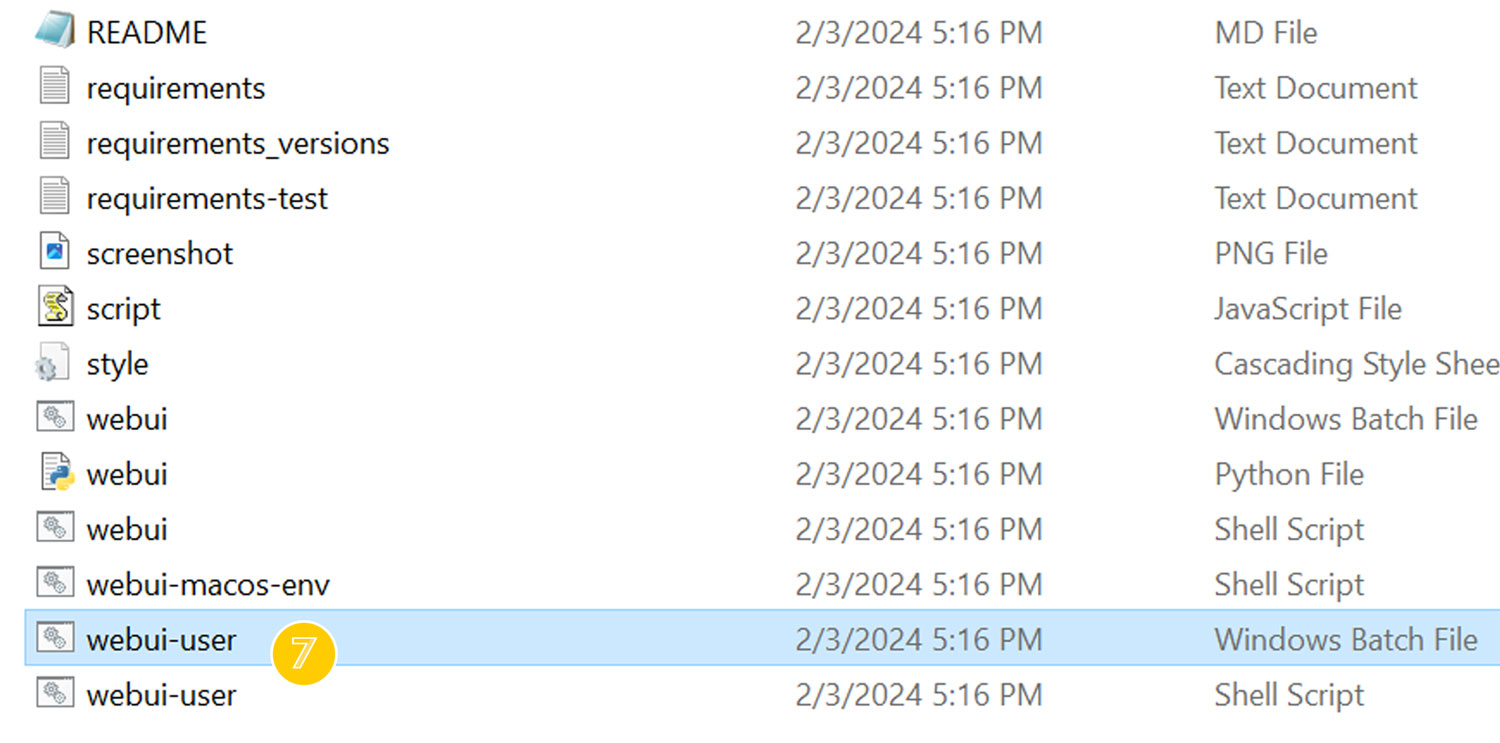
- Locate the webui-user windows Batch File in the downloaded files or repository.
- Double-click on the webui_user.bat file to execute it.
- The .bat file will initiate the installation process, which may take some time to complete. Be patient and let the process run until it finishes.
- You’re now done Installing Automatic111, but we’re going to install xformers to improve the performance.

Step 5: Installing Xformers
To install Xformers for Stable Diffusion, follow these steps:
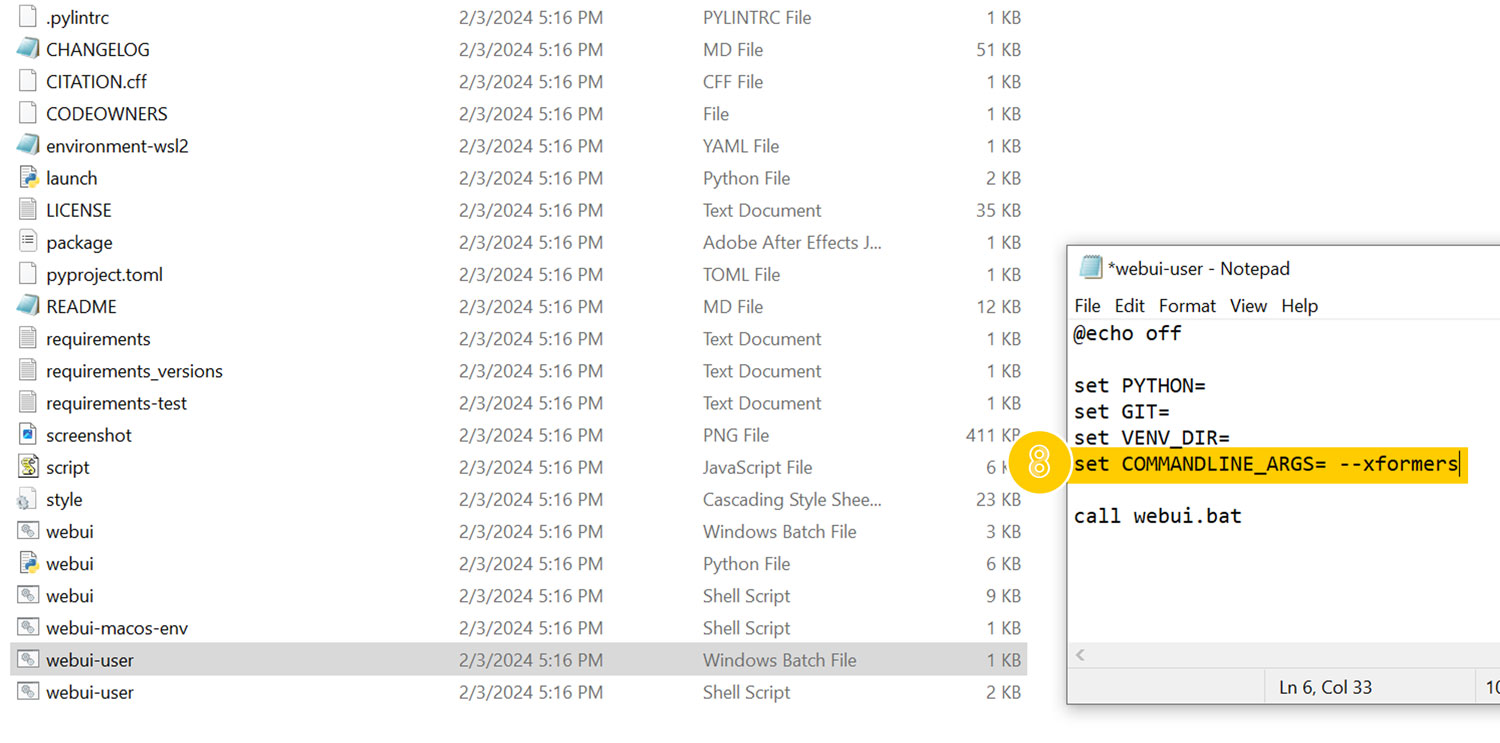
- Locate the “webui-user.bat” Windows Batch file.
- Right-click on the file and select “Edit” to open it.
- In the line that says “set COMMANDLINE_ARGS=”
- add “–xformers” at the end. The modified line should look like this:
- “set COMMANDLINE_ARGS= –xformers“
- Run the “webui-user.bat” Windows Batch file again.
- You’ve now successfully installed the WebUI and can proceed with using Stable Diffusion with it’s improved performance.

You’re now ready to use Stable Diffusion. If you’re interested in exploring installation options for extensions, see my detailed guide below.

Enhance your Stable Diffusion experience with Automatic1111 Extensions. Follow our comprehensive guide to install Automatic1111 extensions.
Optional Step: Updating Xformers
Warning: Do not do this unless you need to.
Xformers, an optimization library essential for speeding up generation processes, tends to update automatically whenever you initiate A1111. However, sometimes, it doesn’t quite work as expected. I’ve experienced this issue firsthand, so I’ve laid down a step-by-step guide to help you check if you have the latest version, and if not, how to manually update it.
Verifying and Updating Your Xformers Version
- Locate Your A1111 Installation Folder:
Head to your A1111 installation. In my setup, it’s labeled “stable-diffusion-webui”. - Access Command Prompt in the Folder:
- Once inside the “stable-diffusion-webui” directory, look at the top directory bar, which displays the folder breadcrumb.
- Click on the empty space right next to the breadcrumb. This action will make the path editable.
- Now, type “cmd” and hit Enter.
- A command prompt will open with the directory, something like: D:\stable-diffusion-webui>
- Activate the Virtual Environment:
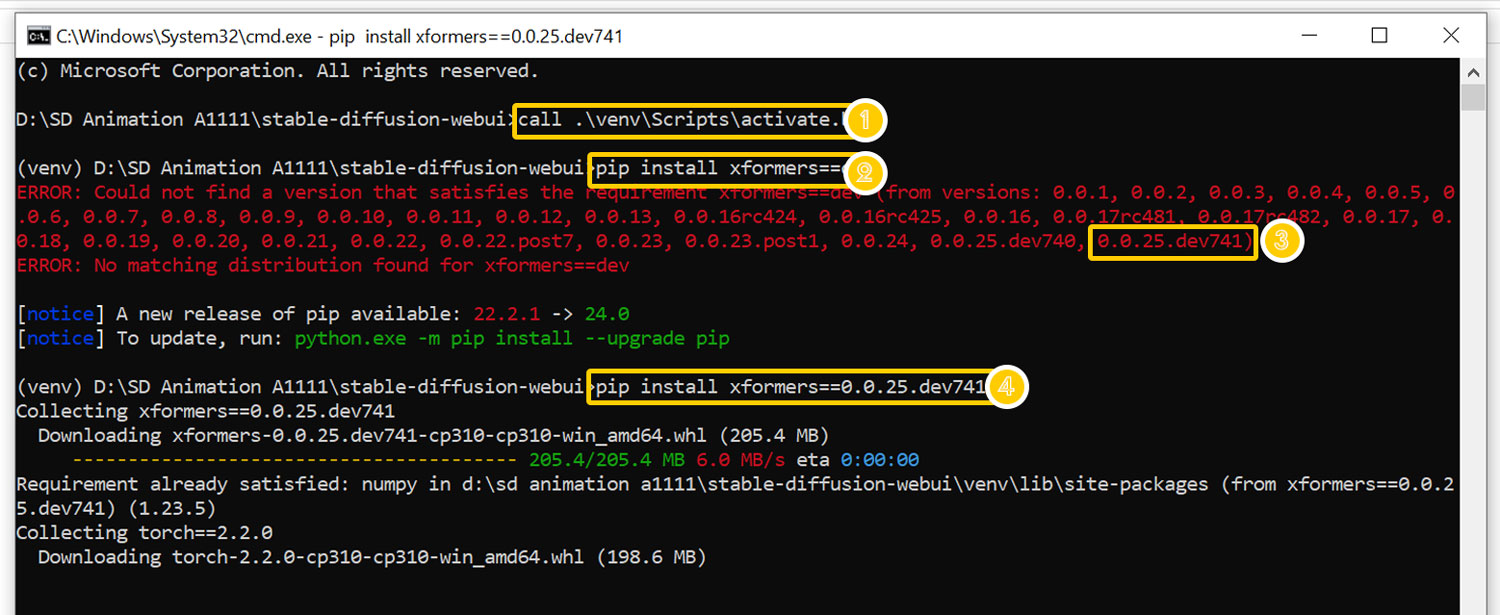
Enter the following command: call .\venv\Scripts\activate.bat- List Available Xformers Versions:
- To see all versions of Xformers, type: pip install xformers==dev
- The highlighted version will indicate the latest one. (The last one on the list)
The version can vary depending on when you’re going through these steps.
- Install the Latest Xformers Version:
- Using the latest version you identified in the previous step,
type: pip install xformers==[your-identified-version-number] - For instance, during my last check, the version was 0.0.25.dev741, so the command was:
pip install xformers==0.0.25.dev741 - Press Enter to start the update.
- Using the latest version you identified in the previous step,

If you’ve followed along, your command prompt should look something like this:

- Navigate to the installed file in GitHub Desktop
- Select the repository, and then click ‘Fetch Origin.’


Learn how to install Stable Diffusion Models for AUTOMATIC1111 Web UI. Access powerful art generators with convenient web interfaces.

Installing the Automatic1111 Web UI for Stable Diffusion requires a solid groundwork. If you’ve been following our guide series, you’ve likely laid down this essential foundation. This tutorial builds upon the preparatory steps detailed in our previous blog.
Reference: Github Automatic1111 User Guide.
Visit Civitai Community to download fine tuned models to play with.
Learning Stable Diffusion 101:
- How to Install Stable Diffusion Web UI
- Mastering the Automatic1111 User Interface: A Comprehensive Guide for Beginners
- Prompt Weights & Punctuations – How to use it in Automatic1111- Stable Diffusion
- Words of Power: The Essential Cheat Sheet for Super Prompts Techniques
- Maximize Your Workflow Efficiency: Pre-Planning with Stable Diffusion’s XYZ Plot


Leave a Reply