
Stable Diffusion Prerequisite Installation Guide: Automatic1111, Invoke, Comfy UI Fooocus
This is the Stable Diffusion prerequisite guide. Preparing your system for the installation of Stable Diffusion’s distinct Web UIs: Automatic1111, Invoke, and ComfyUI. This requires a bit of patience. There are important foundation that must be laid out first, making sure not just a seamless installation process, but also an optimal, hassle-free user experience once you start using these interfaces.
In this detailed Stable Diffusion Prerequisites Installation Guide, we aim to equip you with all the knowledge necessary to tackle these prerequisites, providing a clear, step-by-step walkthrough for each preparatory stage. We cover everything from setting up a GitHub account, installing Python, Git, to the pivotal Xformers installation.
Once these foundational elements are securely in place, you will be all set to proceed with the installation of the Stable Diffusion’s Web UI’s. Without any further ado, let’s jump into the prerequisites, and get your system primed and ready for Stable Diffusion!
Table of Contents
Step 1: Installing requirements for Xformers
You will need to have the CUDA Toolkit installed. You can find the CUDA Toolkit below. Additionally, to allow proper functionality, you may need to install Microsoft Visual Studio, which can be found below. After downloading, follow the onscreen direction to install it.
Step 2: Install Python 3.10 and Add to PATH
For a seamless installation of Stable Diffusion and its important component, torch, it is vital to install Python 3.10.6. (I’m now using 3.10.9 because of Invoke and it works just fine on all three web UIs (Invoke, A1111, ComfyUI). Follow the steps below:
Visit the Python website
Download from Python 3.10.6 or Python 3.10.9.
Both have been proven to work. 3.10.9 works well with Invoke.
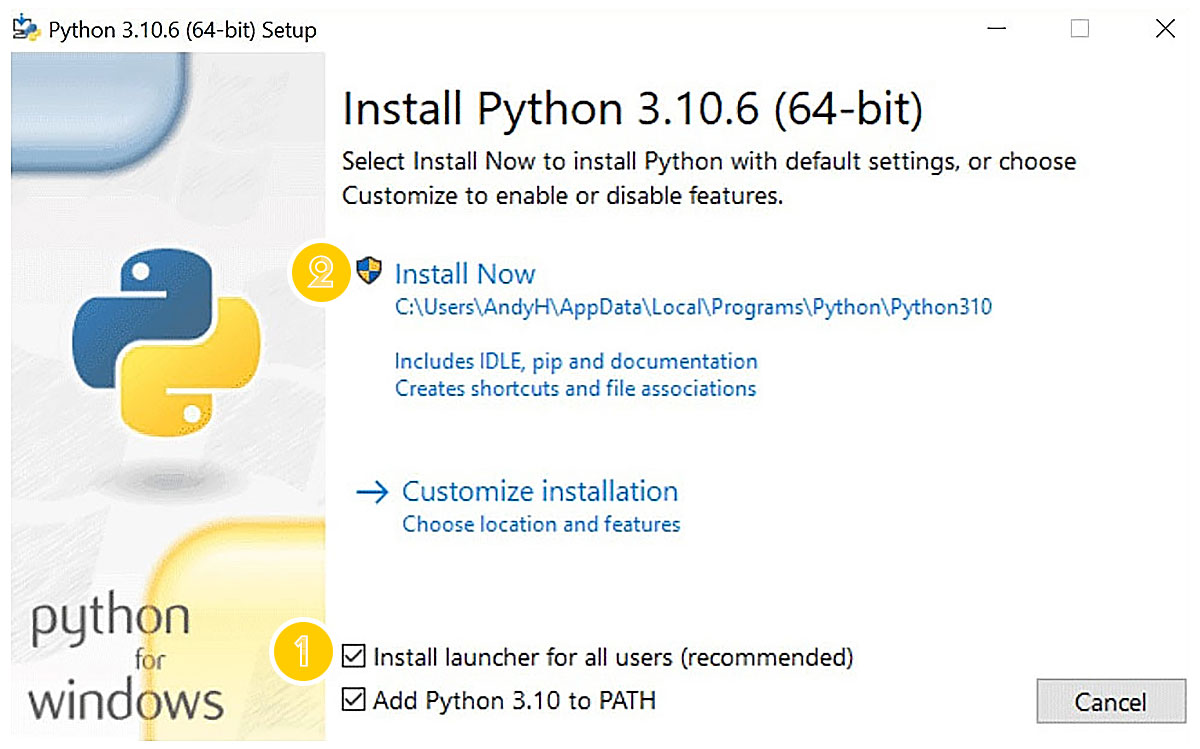
Python 3.10.6 (Win 64-bit) Python 3.10.9 (Win 64-bit)During the installation process:
Make sure to click on the option “Add Python 3.10 to PATH”. This step is crucial as it ensures Python is easily accessible from the command line and other applications.
Click Install Now.
Verifying Python Installation:
After the installation, it is recommended to verify that Python is correctly added to the system’s PATH variable. Here’s how you can check:
- Right-click on “This PC” or “My Computer” and select “Properties“.
- Navigate to “Advanced System Settings“.
- Under the “Advanced” tab, click on “Environment Variables“.
- In the “Environment Variables” section, locate the “Path” variable and click “Edit“.
- Ensure that the path to Python 3.10 (e.g., C:\Python310) is included. If it is not listed, you may need to reinstall Python and ensure that the “Add Python 3.10 to PATH” option is selected during installation.

Step 3: Install Git
Git, the command line version, is essential for subsequent steps in the installation process. Here’s how to install Git:
Visit the Git website at:
Download the Git installer:
Visit the link above to find a version that is compatible with your system, or click on the button below to download the 64-bit Windows Setup.
64-bit Git for Windows SetupRun the installer:
Follow the on-screen instructions.
Select the recommended settings :
Proceed with the installation using the default options.
Step 4: Create a GitHub account and Install GitHub Desktop:

- Begin by creating an account on www.github.com.
- Once registered, proceed to download and install GitHub Desktop from the official website (https://desktop.github.com/).
Step 5: Login to Your Github Account from Github Desktop
This will enable you to log in to the desktop app and create a repository for your installations. Below is an example of how to clone your repositories for everything related to Stable Diffusion.

Stable Diffusion Prerequisite: Setting Up for Web UI Installation
With the completion of the preparatory stage, you’ve successfully set a solid groundwork for the installation of Stable Diffusion’s Web UIs – Automatic1111, Invoke AI, and Comfy UI. Now, you’re at a stage where you can choose which UI you’d like to explore first.
How to Install Stable Diffusion: Invoke AI, Automatic1111, ComfyUI or WebUI Forge

Learn how to install Invoke Training UI with this step-by-step guide. Use this training UI to customize your Stable Diffusion models.


Leave a Reply