Invoke Training User Interface | Understanding the Training Configuration
Upon first launching the Invoke Training User Interface, you may feel overwhelmed by the assortment of tabs presented, fearing a steep learning curve. However, the reality is much simpler. Each tab is grounded in the same foundational settings, with some tabs adding specific parameters, like textual inversion, to enrich functionality.
Upon first launching the Invoke Training User Interface, you may feel overwhelmed by the assortment of tabs presented, fearing a steep learning curve. However, the reality is much simpler. Each tab is grounded in the same foundational settings, with some tabs adding specific parameters, like textual inversion, to enrich functionality.
In this guide, we’ll focus primarily on the “Training” section, exploring its settings in detail. I’ll walk you through each option, providing examples to illustrate their practical application. Keep in mind, the UI is subject to continuous enhancement, promising new features and improvements over time. I am still just learning how to use this and this is a documentation of my learning process, in hope what I learn along the way can help you too.
Feel free to leave a comment if you find any inaccuracies that need correcting, or if, like me, you’re trying to fully understand how to use the Invoke Training UI and model training.
Table of Contents
Invoke Training User Interface Configuration
Currently, the Invoke Training UI features five tabs, each dedicated to configuring the training for a particular concept. The “SD” tab is tailored for training with the Stable Diffusion 1.5 base model, while the “SDXL” tab is designed for the Stable Diffusion XL 1.0 model.
Choosing Between Textual Inversion vs. LoRa
SD LoRA
SD Textual Inversion
SDXL Textual Inversion
SDXL LoRA & Textual Inversion
LoRA, which stands for Low-Rank Adaptation, is a technique designed for fine-tuning Stable Diffusion models. It allows for the injection of trainable layers into the model, which can adapt the model to specific styles or concepts with a smaller number of trainable parameters. This results in reduced GPU memory requirements and faster training times, making it a practical choice for users with limited computational resources.
Textual Inversion in Stable Diffusion involves creating special tokens that the model learns to associate with specific images or styles. This method is beneficial for personalizing image generation without altering the underlying model. It’s particularly useful for generating images that align closely with a small set of example images, allowing for a more targeted and personalized output.
This is an advanced form of Textual Inversion applied to the upgraded Stable Diffusion XL 1.0 model. It benefits from the enhanced capabilities of SDXL, such as better handling of simpler language prompts and improved text legibility within images. The XL version allows for the creation of high-quality, personalized images with greater ease.
Combining LoRA and Textual Inversion in Stable Diffusion XL leverages the strengths of both techniques. LoRA’s efficient fine-tuning is complemented by Textual Inversion’s ability to personalize outputs. This combination can lead to highly accurate and specific image generation, catering to users who require precision and personalization in their AI-generated content.
Choosing between Stable Diffusion (SD) 1.5, Stable Diffusion XL (SDXL) 1.0, textual inversion, and LoRa depends on your specific needs and objectives. If your focus is on general image generation with a broad range of capabilities, the SD 1.5 base model provides a solid foundation with proven versatility. For projects requiring higher fidelity or more complex image outputs, the SDXL 1.0 offers enhanced capabilities and improved output quality due to its larger model size and extended training.
Textual inversion is ideal when you want to personalize the model’s response to text prompts, enabling it to generate images that align more closely with your unique vision or concepts not well-represented in the original training data. On the other hand, LoRa is perfect for fine-tuning on specific tasks or datasets without the computational burden of retraining the entire model. It allows for quick adaptations or updates to the model, maintaining high performance while incorporating new knowledge or preferences. Thus, your choice depends on whether you prioritize general versatility, high-quality outputs, personalization, or efficient model adaptation.
Reference Config File Path
This section pertains to the file containing your chosen training settings. You have the flexibility to save various configurations and easily switch between them, which automatically updates all related settings. As you adjust your preferences, these settings are preserved in a YAML file within your local directory.
To revisit and apply a previous configuration, simply paste the file’s path into this section, click on “Reload reference config,” and your saved settings will be reinstated.
If this is your first time training, just keep this at default. When you tweak the settings and saved the file, you can reload it later on to continue working on it. To do that, just copy and paste the local path of the saved file in the line below:

Basic Configs Overview
The Basic Configuration section is your starting point for setting up the training environment. It lets you choose the foundational model for training, specify the destination for your training outputs, and define the duration of the training run. Additionally, it covers the frequency of saving model snapshots for evaluation and the intervals at which the model’s output quality is assessed through image generation.
Selecting your Base Model
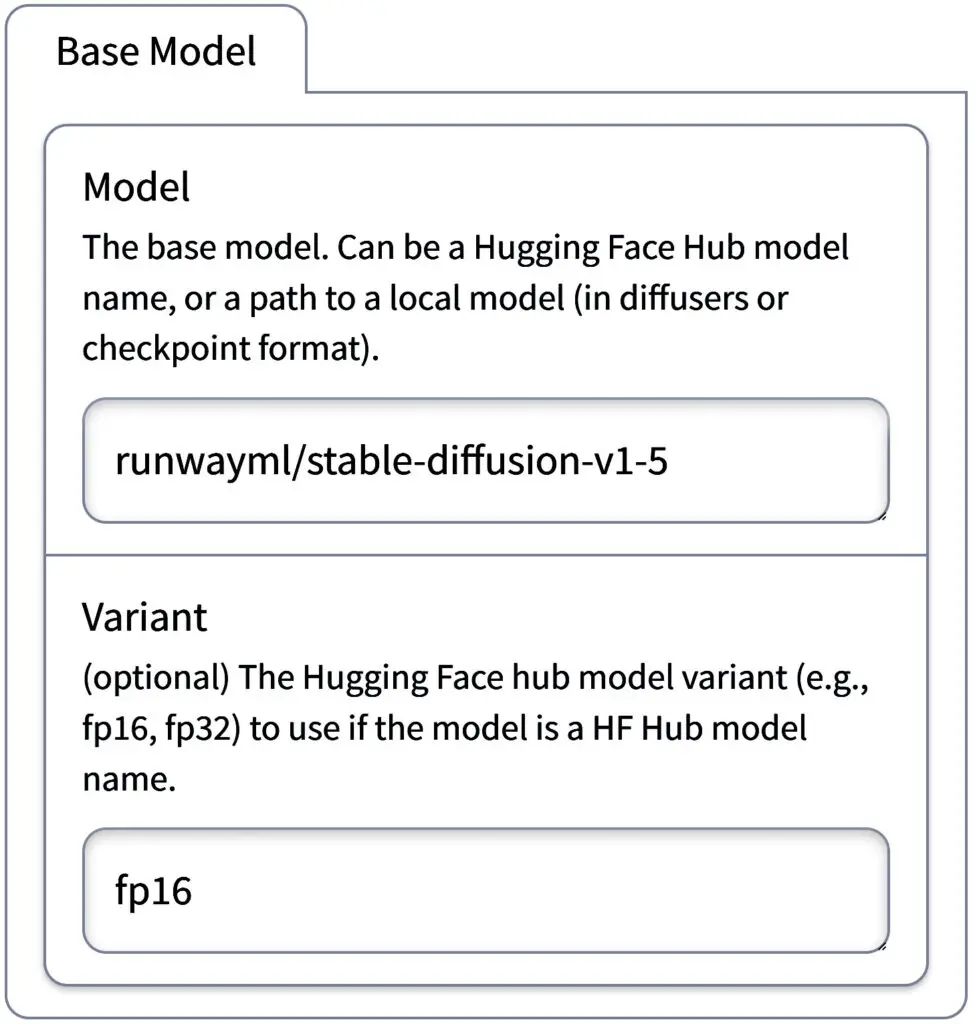
Model: Initially, you can stick with the default model or choose a specific base model such as SDXL or SD1.5. If you prefer not to start with the SDXL base model, opting for a community fine-tuned model is another viable route.
To continue training a model you’ve previously worked on, simply enter its local path or the Hugging Face Hub model name in the designated field. This input field adapts to the tab you’re currently viewing, ensuring relevant options are always at your fingertips.
The base model. Can be a HuggingFace Hub model name, or a path to a local model (in diffusers or checkpoint format).
runwayml/stable-diffusion-v1-5
Enter the local path of your model in this field to proceed with its training. Your input should resemble the following example.
D:\Models\SD Models\absolutereality_v1.safesensors
Understanding Variants
(optional) The Hugging Face hub model variant (e.g., fp16, fp32) to use if the model is a HuggingFace Hub model name.
fp16
(optional) The Hugging Face hub model variant (e.g., fp16, fp32) to use if the model is a HuggingFace Hub model name.
fp32
Variant (Optional): When using a model from the Hugging Face Hub, you may encounter model variants labeled as fp16 or fp32. These denote the precision format of the model’s floating-point operations. FP16, or 16-bit floating-point, offers faster computation and reduced memory usage at a slight accuracy trade-off, making it suitable for most training scenarios.
FP32, or 32-bit floating-point, provides higher numerical accuracy and stability, preferred for precise calculations or when the training process involves very small number operations. The default choice, fp16, is generally sufficient for a wide range of tasks. Stick to the default fp16 if this is your first time.
VAE Model
(optional) If set, this overrides the base model’s default VAE model. It’s recommended to leave just as is.
madebyollin/sdxl-vae-fp16-fix
(optional) If set, this overrides the base model’s default VAE model. I wouldn’t change this and available for the SDXL training.
Your VAE local path here.
VAE Model (Optional): This setting comes into play if you’re training an SDXL model and wish to override the base model’s default VAE (Variational Autoencoder) configuration. Selecting a specific VAE model allows for customization of the model’s internal representation, potentially enhancing the quality or uniqueness of generated images.
This streamlined approach to the Basic Configuration section is designed to demystify the initial setup process, making it more accessible for users to start their model training with confidence.
Training Outputs
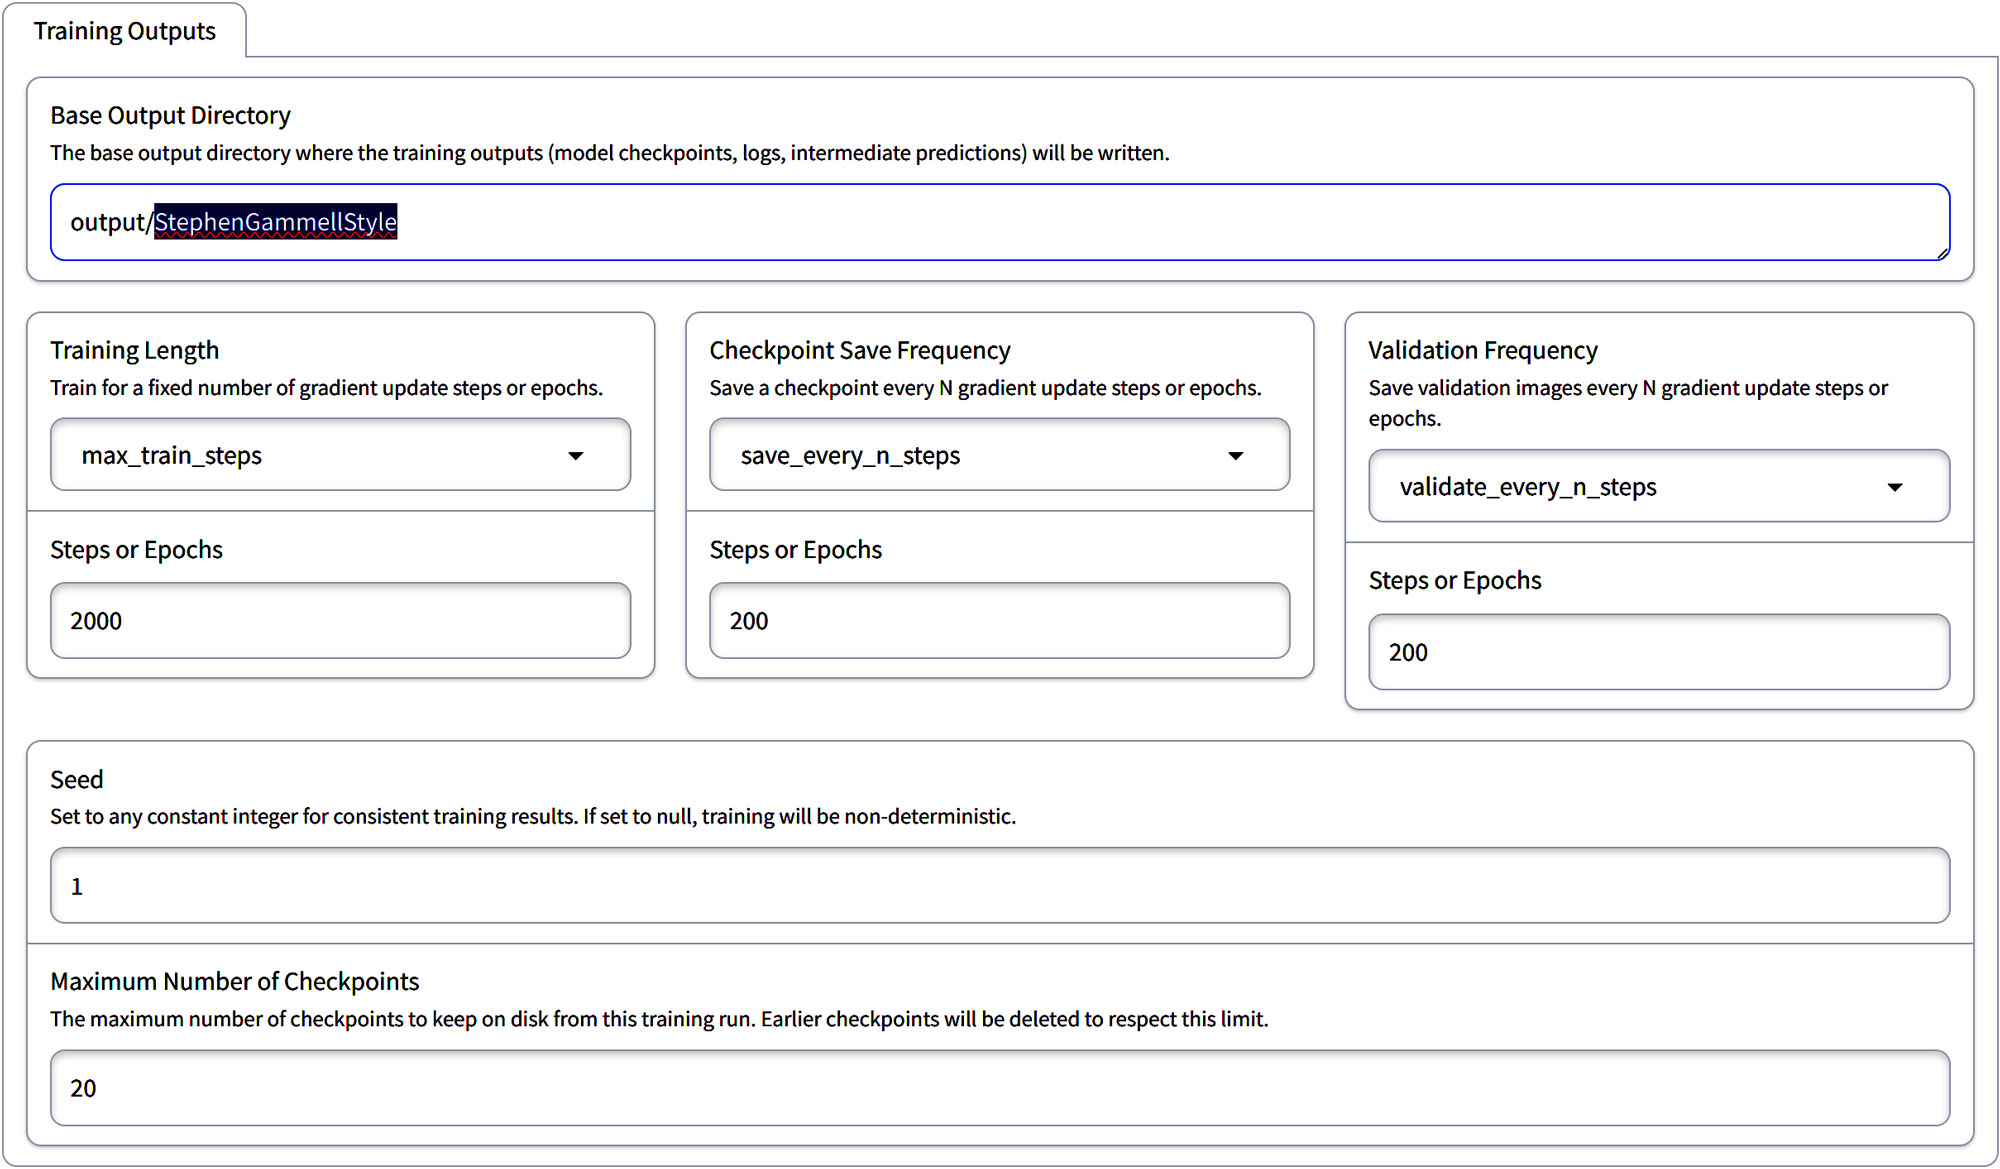
The Base Output Directory is the designated location for storing all training-related files, including model checkpoints, logs, and intermediate predictions. It’s essential to set this directory according to the specific training session you are conducting to keep your projects organized and easily accessible.
Base Output Directory
The current default path is set to “output/sdxl_ti_bruce_the_gnome“. If you’re undertaking a training session named, make sure it corresponds to the name of your training model you created. In my case it is, “StephenGammellStyle“, you’ll need to update this path to “output/StephenGammellStyle” to reflect the training’s theme and ensure that all output files are correctly categorized under this new session name.
Use these Default Settings
Training Length
For this section, you can leave it the default until you’ve experimented with it and know what you need to change.
Default Settings:
These configurations provide flexibility in adjusting the duration of the training period and the frequency with which the model’s state is saved and its output quality evaluated. There’s the option to organize training sessions around epochs if this suits your preference. In steps-based training, each step processes a single image from the dataset.
An epoch is defined as a complete pass through the entire dataset. For instance, with our dataset comprising approximately 26 images, it equates to 26 steps constituting one epoch. Maintaining the current settings would result in approximately 80 epochs of training, which might seem extensive.
However, this approach allows for continuous monitoring and validation throughout the training process, ensuring that the model’s development is carefully observed and managed.
Checkpoint Frequency
Choosing the right save frequency depends on the length of training, the total number of training steps, the available storage, and how often you wish to evaluate or potentially revert to earlier model states.
The checkpoint save frequency determines how often your training process saves a “checkpoint,” which is essentially a snapshot of your model at a specific point in training. These checkpoints include the model’s learned weights and potentially other metadata necessary for resuming training or evaluating the model’s performance at that stage.
This frequency is typically set by specifying a number of steps or epochs after which a checkpoint is saved. For instance, if you set the checkpoint save frequency to every 500 steps, the training process will automatically save a checkpoint every time another 500 steps of training are completed. Similarly, if set based on epochs, a checkpoint will be saved after each specified number of complete passes through the dataset.
Saving checkpoints at regular intervals is important for several reasons:
Steps or Epochs (default at 200):
This could mean either 200 steps or 200 epochs, depending on what you choose. If it’s steps, the model will make 200 updates. If it’s epochs, the model will go through the entire dataset 200 times.
The right number for these settings can vary. It’s often a good idea to try different numbers and see what gives you the best results.
Validation Frequency
Validation Frequency is a training configuration setting that determines how frequently the model’s output quality is assessed during the training process. This setting is important for making sure that the model is learning correctly and making accurate predictions.
In practical terms, if you set a validation frequency of every 100 steps, the model will pause after every 100 steps of training to perform a validation check. During this check, the model processes a separate validation dataset not used in the main training, to predict outcomes. The results are then compared against known outcomes to evaluate the model’s current performance. This process helps in identifying if the model is improving, if it’s starting to overfit the training data, or if adjustments to the training parameters are needed.
Regular validation is key for:
Choosing the right validation frequency depends on the size of your dataset, the complexity of the model, and the computational resources available. It’s a balance between getting timely feedback on the model’s performance and managing the additional computational load that comes with frequent validations.
Seed Configuration
Setting a seed allows the training process to be deterministic. That means if we trained something that we really liked and want to retrain it on the same dataset, using the same seed will get you to the same resulting model.
| Default Settings: 1 |
Maximum Checkpoints
Specifies the limit on the number of training checkpoints saved on your disk. To manage storage effectively, older checkpoints are automatically deleted once this threshold is reached. This setup helps in maintaining a balance between having sufficient historical data to revert to earlier model states and managing disk space efficiently.
| Default Settings: 20 |
Data Source Configuration Guide
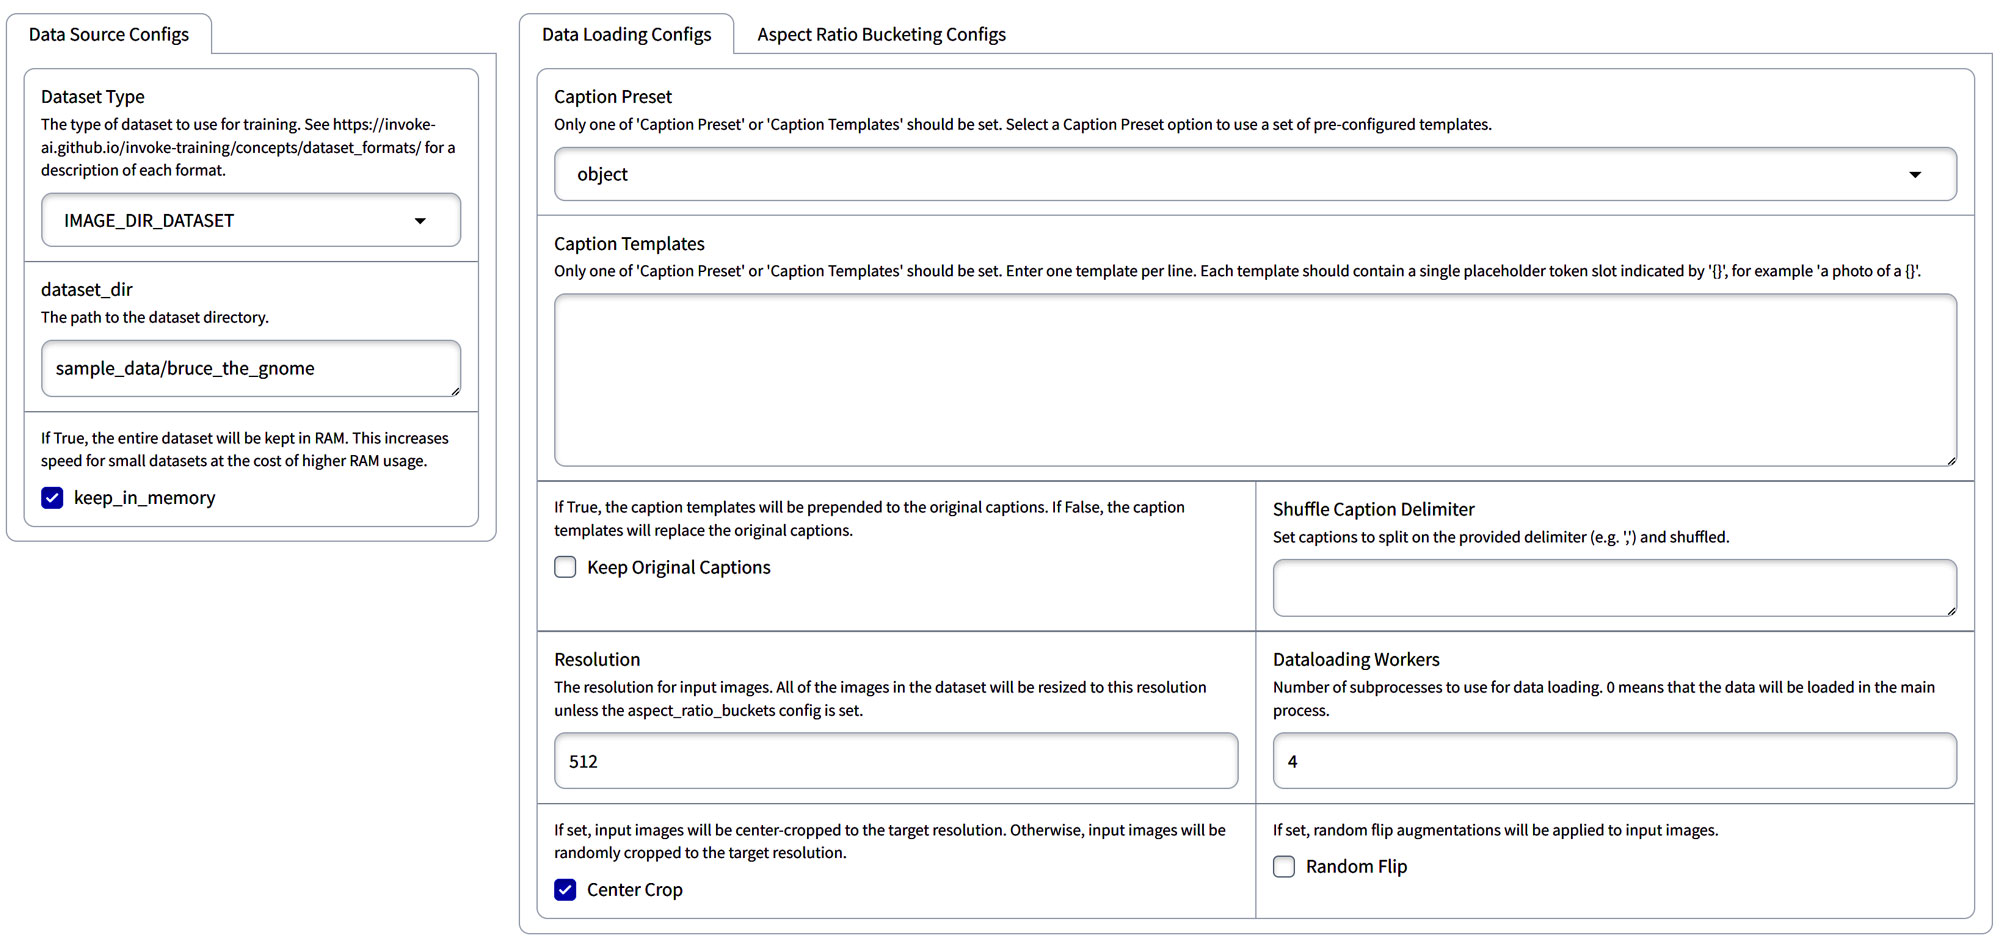
This section is about the data loading options. Our data source can be a number of options. It might be an HF_HUB_IMAGE_CAPTION_DATASET, so if you’re pointing to a hugging face, you might be able to find an image caption dataset that you can use.
Data Source Configs
The one that we have been using in this series in our dataset tool was a JSONL dataset so we will select IMAGE_CAPTION_JSONL_DATASET.
| Dataset Type Selection | Description |
|---|---|
| HF_HUB_IMAGE_CAPTION_DATASET | Access image-caption datasets from Hugging Face. |
| IMAGE_CAPTION_JSONL_DATASET | For datasets in JSONL format with image-caption pairs. Preferred choice for this series. |
| DIRECTORY_DATASET | Use when you have a directory of images and captions in text files, with names matching. |
| IMAGE_DIR_DATASET | Best for datasets with images only. After creating a JSONL dataset, use this and specify the path in dataset_dir, e.g., C:\Users\AndyH\Downloads\HorrorInkStyle\StephenGammellStyle.jsonl. |
Dataset Directory Overview
A directory dataset typically consists of a collection of images paired with corresponding text files containing captions. For successful integration, each text file must share its name with the associated image file. If your collection fits this structure, you can easily import it as a directory dataset.
Dataset Types
- IMAGE_DIR_DATASET: Choose this option if your dataset contains only images. It automatically imports all images from the specified folder.
- IMAGE_CAPTION_JSONL_DATASET: If you’ve compiled your dataset into a JSONL format — as we have for the “StephenGammell” dataset — select this option. Simply provide the JSONL file path in the
dataset_dirfield, likeC:\Users\AndyH\Downloads\HorrorInkStyle\StephenGammellStyle.jsonl.
Memory Management
- Keep in Memory: If your system has ample memory, enable this option to speed up data processing. On systems with limited memory, such as those with smaller GPUs, it’s best to leave this unchecked.
Data Loading Configs
In the Data Loading Configurations, you’re presented with two primary paths for handling captions:
- Caption Presets: These are ready-made formats that you can apply to your data. You have two main types to choose from:
- Object: Ideal for datasets focusing on people, items, or any specific objects, like clothing.
- Style: Best suited for datasets where the emphasis is on a particular artistic style or aesthetic.
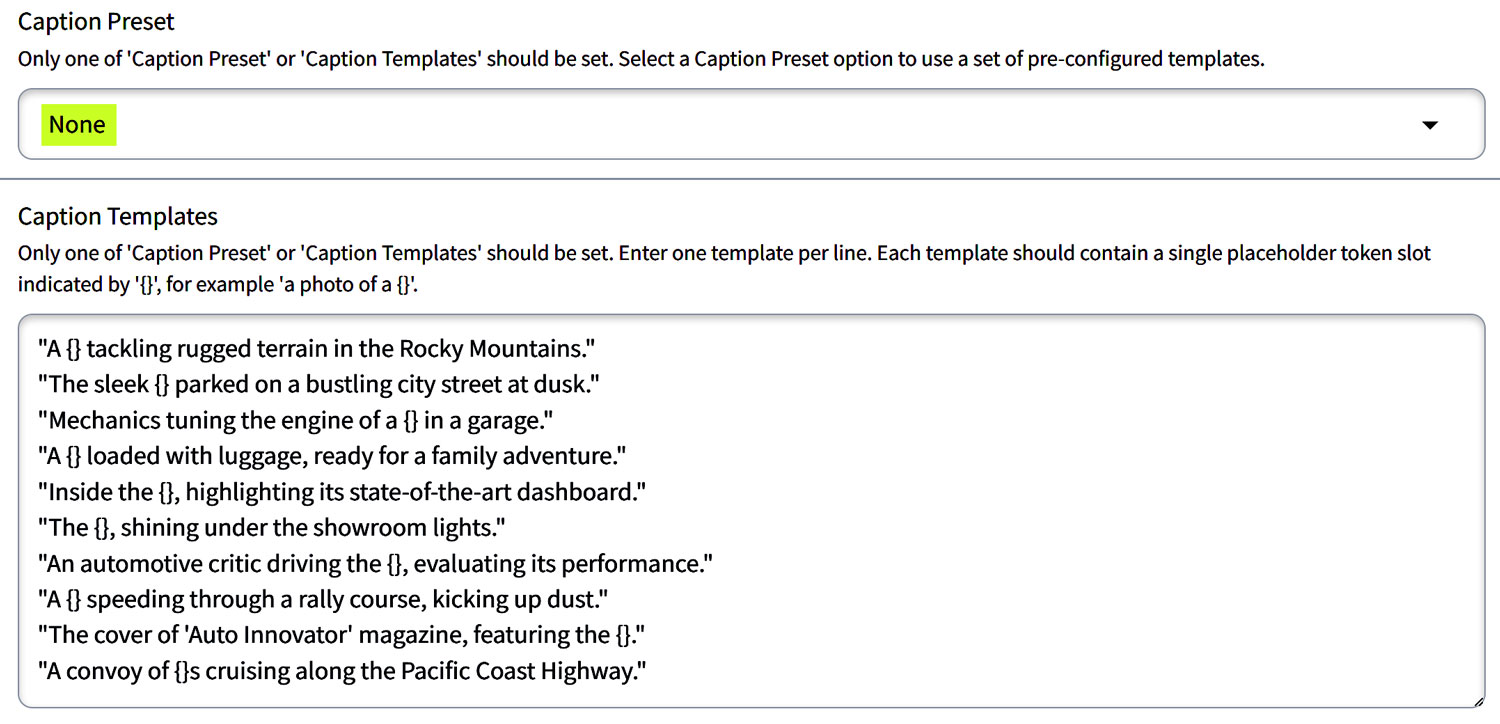
- Caption Templates: Here, you create a unique caption structure that will be applied across all data entries. To incorporate specific data points dynamically, use curly brackets
{}to mark where placeholder tokens should be placed.
Caption Preset
Selecting a caption preset or crafting a custom template gives you control over the contextual framing of your images, ensuring consistency in how your model interprets and learns from the captions.
| Caption Preset Type | Use Case | Purpose | When to Use |
|---|---|---|---|
| Object | Ideal for datasets with recognizable objects or subjects. | Enhances the model’s ability to learn specific attributes, functions, or scenes associated with various objects, improving recognition and generation capabilities. | Your dataset primarily includes distinct, identifiable objects. |
| Style | Suited for datasets emphasizing artistic styles, themes, or expressions. | Tailors captions to reflect stylistic elements and moods, aiding the model in capturing and recreating the essence of artistic directions or thematic nuances. | Your dataset focuses on capturing and replicating a certain style. |
| None | Must be on when using Caption Templates | When using Caption Templates, you need the Caption Preset to be set to none, to use Caption Templates. | Use this when you want to create your own caption template. |
When selecting a preset, consider the primary goal of your training:
- For Object Recognition: Opt for the Object Preset if you want the model to recognize and generate clear, detailed images of specific objects.
- For Style Replication: Choose the Style Preset if your aim is for the model to capture and recreate the essence of a particular style or artistic theme.
- For None: Choose this to work with Caption Templates. You can only use Caption Preset or Caption Templates, not both.
By carefully selecting the appropriate preset, you direct the training process towards developing a more focused understanding of the content, whether that be detailed object recognition or nuanced style replication.
Caption Templates Explained
When opting for Caption Presets, you select from predefined options like ‘Object’ or ‘Style’. If you choose this route, you’ll need to ensure that ‘Caption Templates’ are not in use. Essentially, it’s an either-or situation:
- Use ‘Object’ when focusing on concrete items within images.
- Use ‘Style’ for images where the artistic style or aesthetic is the focus.
- Set ‘Caption Templates’ to ‘None’ to activate ‘Caption Preset’.
Using Caption Templates:
If you decide to utilize Caption Templates, here’s what you need to remember:
- Exclusivity: Set the ‘Caption Preset’ to ‘None’ to ensure that the templates work correctly.
- Unique Tokens: The placeholder within curly brackets
{}should be a unique token that you’ve created, specifically for your model. - Uncommon Names: This token should be something unrecognizable by the system (like ‘D08garoo!‘ instead of ‘dog’) to avoid confusion with pre-existing models.
- Isolation: The token is meant to represent the “new concept” or unique aspect of your images. It should be distinctive and not commonly used.
- Contextualization: When training, you want to isolate this unique concept from other elements in the image to ensure the model learns it effectively.
- Embedding Naming: When saving your embedding, the token is linked to the filename you choose in the UI, which you can name freely.
- Simplicity: Aim for captions that are not overly descriptive of the ‘thing’ but rather place the ‘thing’ in varied contexts.
- Example: Instead of describing a rose in detail, use the unique token in a sentence that describes its various settings or interactions.
Practical Caption Template Example:
- Unique Token: “Ajxutk” represents a newly introduced concept in your dataset.
- Template: “A photo of a {} in the scene.”
- Implementation: Each image caption is created to include “Ajxutk”, isolating it as the consistent element across varied backdrops or situations.
In this way, Caption Templates are a powerful tool for instructing the model on what the consistent new concept is across different images, ensuring it learns to recognize or generate this concept within diverse contexts.
Captioning Examples
Caption Templates with the {} placeholder for unique tokens. The {} serves as a placeholder for whatever unique concept you’re training, like “Ajxutk“, without explicitly naming it in the template.
Caption Template Example:
- Template: “A photo of a {} in the scene.”
- Implementation: When training, you replace
{}with your unique concept token (e.g., “Ajxutk”) in the data before training, not in the UI template itself.
Additional Template Examples:
| Training Focus | Objective | Template Example | Implementation Detail |
|---|---|---|---|
| Object | To recognize a specific, uniquely named object. | “This image captures a {} on the table.” | Replace {} with your unique object token (e.g., “Vasx01”) in your dataset. It helps the model to identify the object in various settings. |
| Subject | To understand a subject within different contexts. | “In this picture, a {} is seen in its natural habitat.” | Substitute {} with a unique subject token (e.g., “Animx02”) in your training data, teaching the model to recognize the subject across diverse environments. |
Using Variables in Templates:
These templates use {} as a stand-in for the unique identifier you’re teaching the model to recognize. The key is to ensure the rest of the caption provides context or situational variety without overshadowing the unique concept you’re focusing on. This method aids the model in learning the significance of the new concept (“Vasx01” or “Animx02”) among diverse scenarios or descriptions.
It’s important that when preparing your dataset for training with these templates, you replace the {} with your chosen unique token directly in your dataset captions. This process effectively teaches the model about the new, specific concept you’re introducing.
ADvanced Caption Template Homework (For Textual Inversion)
Training a specific textual inversion like the Toyota FJ Cruiser 2024 Concept across various scenarios involves crafting detailed captions that highlight the vehicle in different contexts. First, we’ll create a unique token to represent the Toyota FJ Cruiser 2024 Concept. For this example, let’s use “TJFJ2024Cpt“.
Keep in mind
Creating a Unique Token
- Unique Token: “TJFJ2024Cpt“
- Purpose: To let the model uniquely identify the Toyota FJ Cruiser 2024 Concept, distinguishing it from other models or generic concepts.
Caption Template
Next, we’ll draft 10 captions using our unique token, placing the vehicle in a wide range of scenarios to enhance the training’s breadth and depth. These are not representative of good captions. It is just to show how to use tokens as variables.
| # | Caption Scenario | Training Caption with Unique Token (don’t write the actual token when training) |
|---|---|---|
| 1 | Off-road in the mountains | “A {TJFJ2024Cpt} tackling rugged terrain in the Rocky Mountains.” |
| 2 | Urban cityscape | “The sleek {TJFJ2024Cpt} parked on a bustling city street at dusk.” |
| 3 | Undergoing maintenance | “Mechanics tuning the engine of a {TJFJ2024Cpt} in a garage.” |
| 4 | Family road trip | “A {TJFJ2024Cpt} loaded with luggage, ready for a family adventure.” |
| 5 | Showcasing technological features | “Inside the {TJFJ2024Cpt}, highlighting its state-of-the-art dashboard.” |
| 6 | In a showroom | “The {TJFJ2024Cpt}, shining under the showroom lights.” |
| 7 | Being reviewed by automotive press | “An automotive critic driving the {TJFJ2024Cpt}, evaluating its performance.” |
| 8 | Participating in a rally race | “A {TJFJ2024Cpt} speeding through a rally course, kicking up dust.” |
| 9 | Featured in a car magazine | “The cover of ‘Auto Innovator’ magazine, featuring the {TJFJ2024Cpt}.” |
| 10 | As part of a convoy on a scenic route | “A convoy of {TJFJ2024Cpt}s cruising along the Pacific Coast Highway.” |
How it should look inside Invoke Training UI
| Caption Template Tool and Embeddings: The caption template tool, using placeholders like “{}” to represent new tokens, is primarily designed for embeddings, which involve training new tokens. If you’re combining this with LoRA (Low-Rank Adaptation) training, where the focus is on more contextual information within images, you might use a caption like “a {}.” In this setup, you would choose the “keep original captions” option. During training, the system prepends the new “{}” token to existing captions, focusing on elements of the image unrelated to the main subject (e.g., excluding the car). |
| Trigger Words in LoRA Training: If your focus is solely on LoRA, there wouldn’t be a placeholder token. Instead, within your dataset, you would create a “trigger word” that the model uses to identify and process images based on specific characteristics or contexts you’ve defined. This means you would use the token name you created for the training instead of the curly bracket {}. |
| Training Focus on a Specific Example: The captions are crafted not only to help the model recognize an object like the “Toyota FJ Cruiser 2024 Concept” but also to understand its versatility, features, and appeal in various scenarios. This approach aims to give the model a deep understanding of the vehicle’s identity and functionality across different settings. |
| Textual Inversion Training: Above I provided examples of how to write Caption Templates, but it’s just an example of how to use the curly brackets {}. This might not be as effective when using general captions that could apply to any image, such as “painting of a {}” or “a photo of a {}.” These variations, designed to focus more on the object itself and less on the surrounding context, are less suited to pivotal tuning, which often benefits from more contextually rich captions. |
| Combining LoRa and Textual Inversion: Training LoRa and Textual Inversion together can be effective. It’s important to maintain specific captions for LoRa training, where the chosen template is prepended to each caption during the process. This dual approach helps generate a specialized token and leverages the strength of both methods—creating new tokens and enhancing existing ones. |
| Learning Process and Strategy: Currently, understanding these training concepts is an ongoing process. A good starting point is to experiment, observe any issues with your LoRA objectives, and then inquire about the reasons behind these issues and possible solutions. This iterative cycle is fundamental to learning and optimizing your training strategies. |
Below are links you can check out to further explore how to train LoRAs.
The examples below show how to use “{}” as placeholders for your Textual Inversion tokens. This method is specific to Textual Inversion and demonstrates the use of curly brackets. Please note that the captions provided are not examples of effective captioning; they are just illustrative of how to incorporate placeholders.
Combining Textual Inversion with LoRA training is something that is more advanced. As I learn more, I will update this page.
This captions and data sets guide is intended for those who seek to deepen their knowledge of Captioning for Training Data Sets in Stable Diffusion. It will assist you in preparing and structuring your captions for training datasets.
| Keep Original Captions: Activate this option if you prefer to manually refine your captions using the dataset tool. It preserves the original text, allowing for custom edits. When this is selected, any presets or templates you’ve set up will be appended to these customized captions during training, providing a hybrid approach of manual and automated captioning. In other words, you need to turn this on if you already have a Caption dataset file for your LoRA images. |
| Shuffle Caption Deliminter: This tool helps add variety to the captions processed by the system from one epoch to the next. If your captions contain commas or periods, you can enter that punctuation mark in this tool. For example, if your caption reads “A dog with 6 legs, 2 heads,” you can enter a comma (“,”) in the box. The tool will then shuffle the segments of the caption randomly based on this delimiter. This randomness can enhance the model’s resilience in understanding individual concepts, as it becomes less tied to their specific position in the prompt. If your captions do not use commas, leave this box empty. |
| Resolution: This setting varies by mode. For SDXL, it’s trained to use a resolution of 1024, so we’ll set it at 1024. For SD1.5, the resolution should be 512. |
| Dataloading Workers: The default setting is 4 workers. If your system has limited resources, you may consider reducing this number. |
| Center Crop: You can opt to randomly crop to the target resolution or use center cropping based on your specific needs and objectives. |
| Random Flip: Enabling this option allows the system to randomly flip images. This is related to the shuffle caption concept; flipping images can introduce more diversity, helping the system to understand different orientations of the content. This is particularly useful if you have a small dataset, as it effectively increases the amount of data available. |
Aspect Ratio Bucketing Configs
Aspect Ratio Bucketing Configs: This feature is particularly valuable when dealing with large datasets composed of images with various aspect ratios, especially useful during LoRa training. By enabling Aspect Ratio Bucketing, you can adjust the image resolutions and dimensions to better match your target resolution. For example, if you are using SDXL, you might set your target resolution to 1024, with a start dimension of 768 and an end dimension of 1280. This ensures that all processed images conform to dimensions that are optimal for your training objectives.
- Use Aspect Ratio Bucketing: Enable this setting to activate the feature.
- Target Resolution: Set this to the resolution you aim for, such as 1024 for SDXL.
- Start Dimension: Set this starting dimension, for example, 768.
- End Dimension: Set this as your maximum dimension, such as 1280.
- Divisible By: Specify a number that all dimensions should be divisible by, to maintain consistency across processed images.
Textual Inversion Configs
Obviously only available for TI training. This section gets pretty advanced so we’ll just recommend leaving some of the things you don’t understand at default like the Num Vectors at the default of 4.
You will need to update the Placeholder Token and the initializer token. The placeholder is going to be a special word to associate the learned content with. You want this to be a very unique token and not a normal word that is commonly used because the model will most likely already know a word that is pretty common and will be confused. This isn’t going to be what you end up using in Invoke or any UI you’re using this trained model on. We just use the name of the embedding. So this is something that you will typically want to have to be a very unique combination that is unlikely to already be used or understood by the system. so instead of calling our token “StephenGammellStyle”, we can call it “St3p3henG@ammellStyle”. This is something really unique and most likely won’t be already understood in the model.
The Initializer Token is going to be a word or phrase that is a good place to start in the grand understanding of what this word means. Example: If I want to train in my new kind of interpretation of StephenGammell’s Style, my new style might be a reasonable place to start like GammellStyle. This phrase might not work because it could be split into multiple tokens like watercolor. If that is the case you will go ahead and use the initial phrase instead of the Intializer Token.
- Num Vectors
- Placeholder Token
- Initializer Token
- Initial Phrase
Optimizer Configs
When we get down to the optimizer configuration, this is really just controlling how the system is going to update its understanding of what its training on over the course of the training process. The optimizer is effectively deciding how much its understanding of the concept should change at different parts of the learning process.
The Learning Rate is the initial start of that process of how aggressively it should learn new content. By default it is set at 0.002. A higher learning rate means that you’re going to get a more aggressive learning process in place, which means it could learn the concept more quickly, but will likely have a lot of volatility because it might make errors in the learning process. A lower learning rate might not learn the concept as quickly, but it doesn’t have catastrophic results if it makes a mistake. Too high of a learning rate can make it really hard to land on the proper understanding, because it’s constantly over indexing on mistaken information and too low of a learning rate means that you’re just going to have to train forever to get to anything meaningful or substantive in the training process. A great place to start always is going to be the default which is 0.002. Try it. See if it’s able to pick up what it needs to and adjust from there.
The Advanced Settings:
The advanced settings change other hyperparameters of the learning process. This is way too advance and requires a lot of math, so just leave it at default. The general take away here would be unless you understand or are following some guide that’s telling you to update these settings, just leave them at default. You can typically get a good training process completed without ever updating these advanced parameters.
- Optimizer
- Core
- Learning Rate
- Advanced
- Weight Decay
- Biase Correction
- Safeguard Warmup
Speed / Memory Configs
Speed and memory configuration section allows for us to tune the training process to leverage more resources if we have them. Or utilize techniques that allows us to reduce the amount of memory that is needed in order to generate the training at the cost of speed. You can leave these at the default settings, but obviously if you need to update these, you can go in and increase your accumulation steps if you want to reduce your vram requirements and you can utilize some of these other options by following the on screen instructions.
- Gradient Accumulation Steps
- Mixed Precision
- Cache Text Encoder Outputsz
- Enable CPU Offload during Validation
- Cache VAE Outputs
- Gradient Checkpointing
General Training Configs
The general training configs allow us to adjust the Learning Rate Scheduler. This just determines how that learning rate is being adjusted over the course of the training process. We can also introduce warm-up steps which can ease the training process into updating weights. We also have some advanced training configurations which you might not want to touch unless you know what you’re doing. Leave this as default until you understand the basics first, but if you do have the VRAM for it, the batch size configuration is available for you to play around with. The higher values will increase the speed at the expense of more resource.
- Core
- Train UNet
- UNet Learning Rate
- Learning Rate Scheduler
- Train Text Encoder
- Text Encoder Learning Rate
- Warmup Steps
- Advanced
- LoRa Rank Dim
- Minimum SNR Gamma
- Max Gradient Norm
- Batch Size
Validation
You will always want to update your validation prompts to match our placeholder tokens or the trigger words if we’ve captioned a LoRa dataset for it. In this case with Invoke Training UI’s default is:
A photo of bruce_the_gnome at the beach
A photo of bruce_the_gnome read a book
Replace ‘bruce_the_gnome” with your placeholder token name which we used above as “St3p3henG@ammellStyle”.
A St3p3henG@ammellStyle painting at the beach
A St3p3henG@ammellStyle painting of a library
- Validation Prompts
- # of Validation Images to Generate per Prompt
Config Output
Once you’re satisfied with the settings, you can click on Generate Config. This will show you all of the configuration variables. You can save these settings by pressing the save button on the top right that will allow you to reload this in the future if you want to reuse it.
- Generate Config
Run Training
After you’re done, press start training.
- Start Training


Leave a Reply