Mastering Real Estate Photography: A Comprehensive Guide to Capturing Stunning Property Images
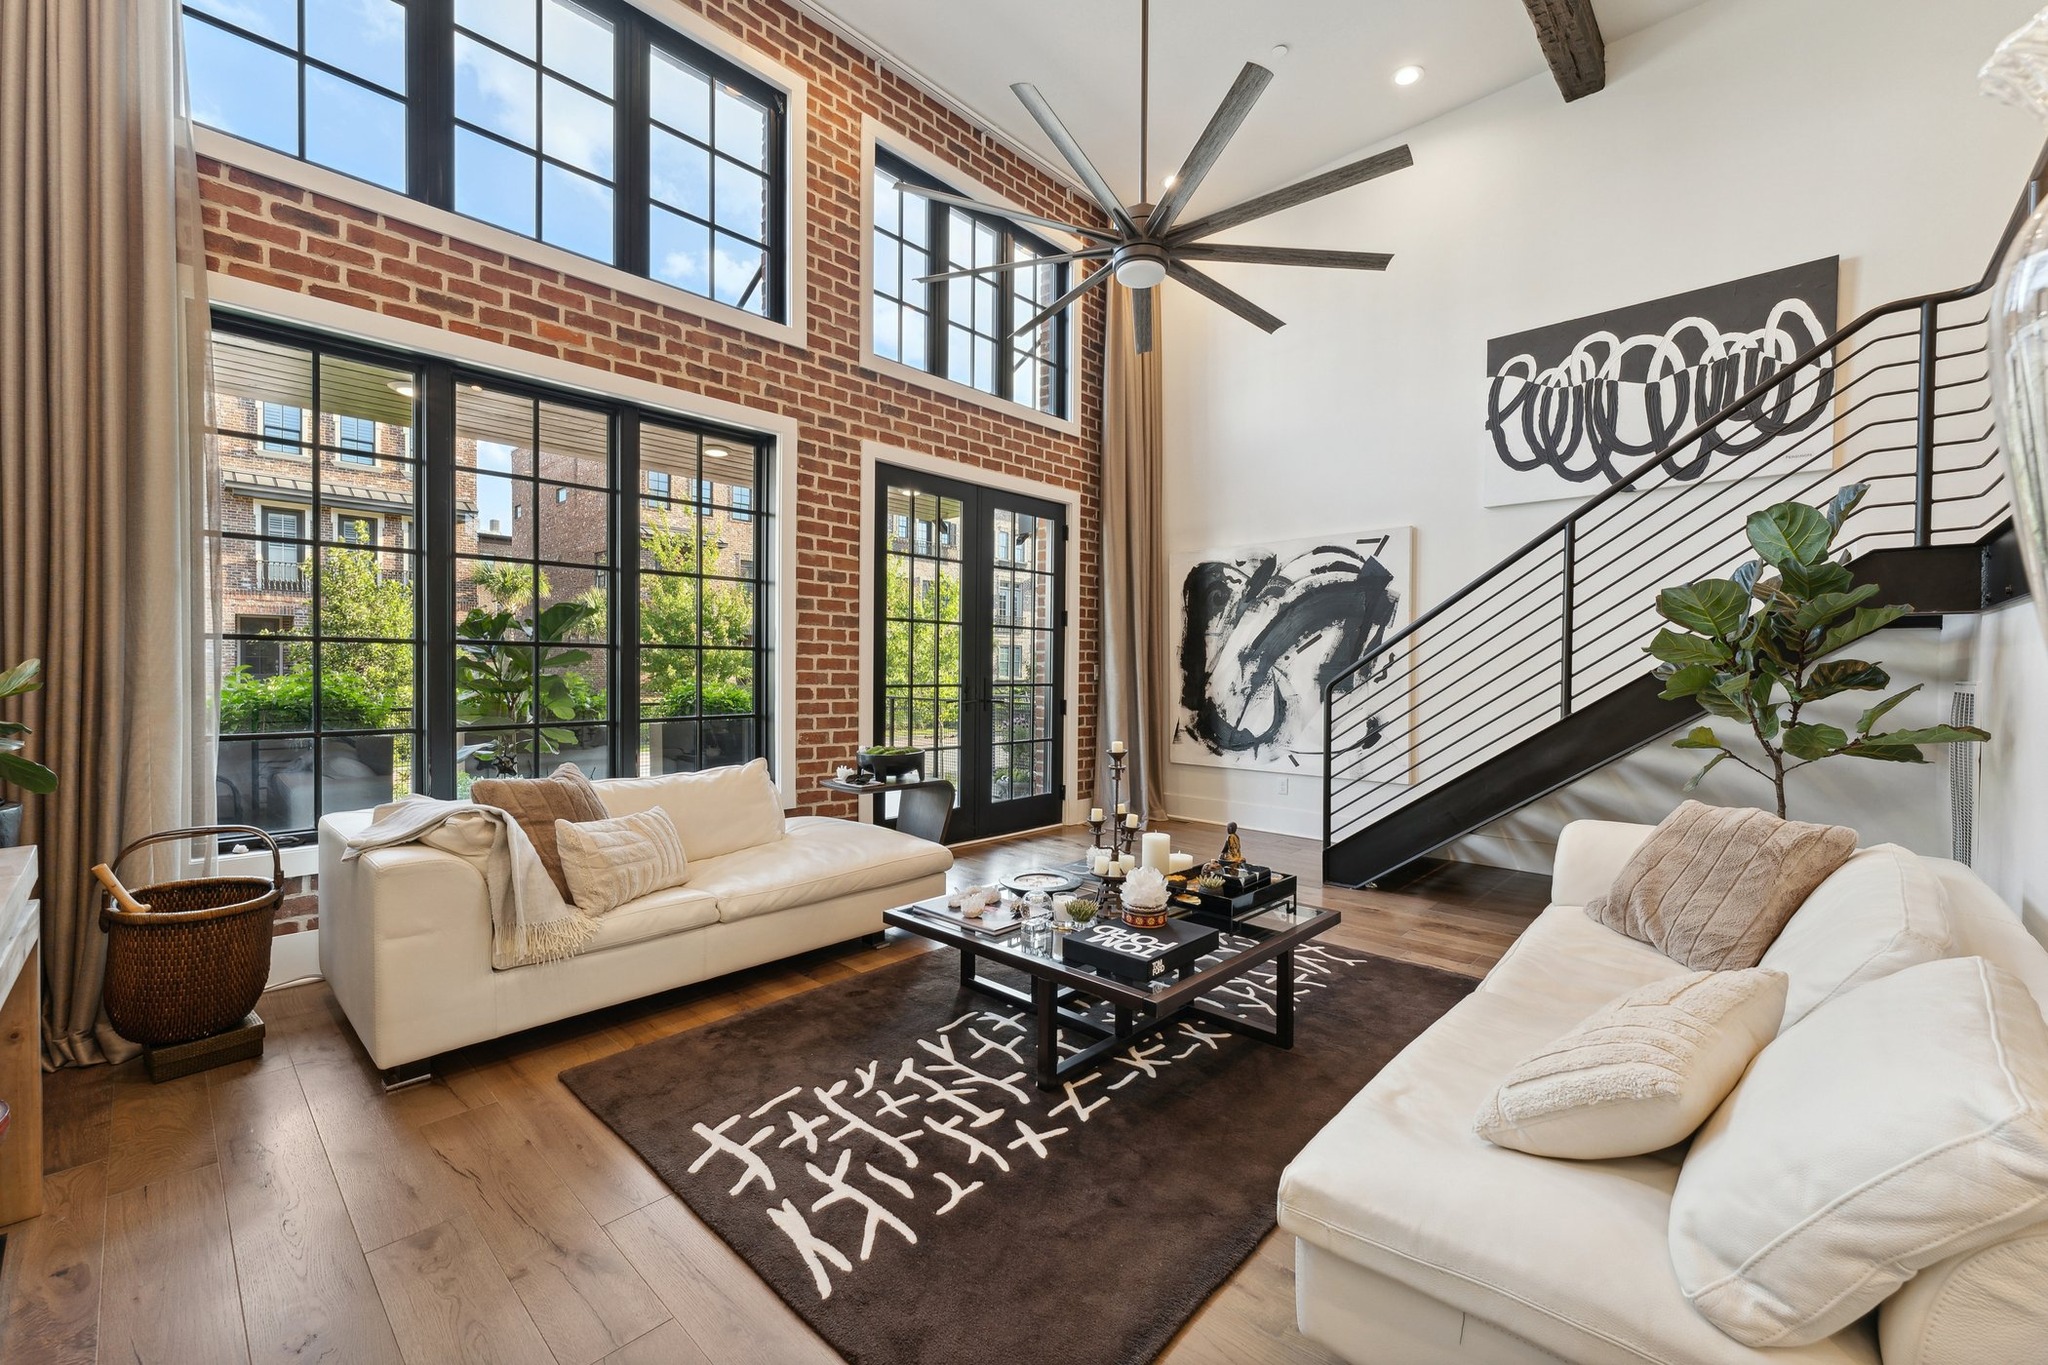
If you’re here, you’re looking for tips on Mastering Real Estate Photography. Capturing stunning real estate photos is an art that combines technical skill with a keen eye for detail. High-quality images can significantly impact a property’s marketability, making it essential to master the techniques that highlight its best features. This tutorial will guide you through the essential steps to take professional real estate photos, covering everything from equipment selection to post-processing. Whether you’re a seasoned photographer or a beginner, these tips will help you create images that stand out and attract potential buyers.
Table of Contents | Mastering Real Estate Photography
1. Equipment Essentials
To achieve professional-quality real estate photos, having the right equipment is very important. Here are the essentials:
- Camera: A DSLR or mirrorless camera with manual settings is ideal. These cameras offer greater control over exposure, focus, and other critical settings.
- Lens: A wide-angle lens (10-22mm for cropped sensors, 16-35mm for full-frame) is essential for capturing expansive interior and exterior shots. It helps to showcase the space more effectively.
- Tripod: Stability is key in real estate photography. A sturdy tripod ensures that your shots are sharp and consistent, especially in low-light conditions.
- Remote Shutter Release: This tool helps to avoid camera shake when taking photos, ensuring crisp images.
- Flash: While natural light is preferred, a flash can be useful for interior shots to fill in shadows and balance the lighting.
Having the right equipment sets the foundation for capturing high-quality real estate photos. In the next sections, we’ll learn about camera settings, composition techniques, and more to help you make the most of your gear.
2. Camera Settings
Getting the right camera settings is crucial for capturing high-quality real estate photos. Here’s a detailed guide to help you set up your camera for both interior and exterior shots:
Mode
- Aperture Priority (A/Av) or Manual (M) Mode: Aperture Priority allows you to control the depth of field while the camera adjusts the shutter speed. Manual mode gives you full control over all settings, which is ideal for consistent results.
Aperture
- Set between f/8 and f/11: This range provides a deep depth of field, ensuring that both the foreground and background are in sharp focus. It’s perfect for capturing the entire room or property clearly.
ISO
- Keep it low (100-400): A lower ISO reduces noise and ensures cleaner images. In well-lit conditions, ISO 100 is ideal. For dimmer interiors, you might need to increase it slightly, but try to stay below ISO 400 to maintain image quality.
Shutter Speed
- Determined by the camera in Aperture Priority mode: In Manual mode, adjust the shutter speed to ensure proper exposure. Use a tripod to avoid camera shake, especially with slower shutter speeds.
White Balance
- Set to Auto or adjust based on lighting conditions: Auto white balance works well in most situations, but you can manually adjust it to match the lighting (e.g., daylight, tungsten) for more accurate colors.
Bracketing
- Enable exposure bracketing: Take multiple shots at different exposures (e.g., -2, 0, +2 EV) to capture a wide dynamic range. This is particularly useful for HDR processing, which combines these exposures to create a balanced image.
Focus
- Use Single Point AF: Focus on a central point in the scene to ensure sharpness. For interiors, focusing on a key feature like a piece of furniture or a doorway works well.
File Format
- Shoot in RAW: RAW files retain more detail and offer greater flexibility in post-processing compared to JPEGs.
By setting up your camera correctly, you’ll be able to capture well-exposed, sharp, and vibrant real estate photos. In the next section, we’ll discuss the importance of vertical lines and how to maintain proper composition.
3. Vertical Lines and Composition
Maintaining straight vertical lines and proper composition is important in real estate photography. These elements ensure that your photos look professional and appealing. Here’s how to achieve this:
Vertical Lines
- Importance: Straight vertical lines (e.g., walls, door frames) are essential to avoid distortion and maintain a natural look. Crooked lines can make a space appear unbalanced and unprofessional.
- Technique:
- Use a Tripod: Ensure your camera is level. Most tripods have a built-in bubble level to help with this.
- Tilt-Shift Lens: If available, a tilt-shift lens can correct perspective distortion directly in-camera.
- Post-Processing: Use software like Adobe Lightroom or Photoshop to straighten vertical lines if needed. Look for tools like the “Transform” or “Lens Correction” features.
Composition
- Rule of Thirds: Divide your frame into a 3×3 grid and place key elements along these lines or at their intersections. This creates a balanced and engaging composition.
- Leading Lines: Use lines within the scene (e.g., hallways, furniture) to guide the viewer’s eye through the photo.
- Declutter: Remove personal items and unnecessary clutter to create a clean, inviting space. This helps potential buyers focus on the property itself.
- One-Point Perspective: Align horizontal lines parallel to the top and bottom edges of the frame. This technique is effective for capturing rooms without making them look claustrophobic.
- Two-Point Perspective: Most real estate photos will use this perspective, where lines converge at two points. Ensure vertical lines remain parallel to the sides of the frame.
By paying attention to vertical lines and composition, you can create visually appealing and professional real estate photos that effectively showcase the property. In the next section, we’ll discuss the proper height of the camera for different types of shots.
4. Camera Height
The height at which you position your camera can significantly impact the perspective and overall quality of your real estate photos. Here’s how to determine the optimal camera height for different types of shots:
Interior Shots
- General Rule: Position the camera at chest height, approximately 4 to 5 feet off the ground. This height provides a natural perspective that mimics how people view a room when standing.
- Kitchens and Bathrooms: Set the camera 1.25 to 2 feet above the counter height. This ensures you capture the countertops and avoid showing the undersides of cabinets.
- Bedrooms: Position the camera 1.25 to 2 feet above the bed height. This helps to showcase the bed and surrounding furniture without distortion.
- Living Rooms and Dining Areas: Maintain the general chest height rule, but adjust slightly based on the room’s layout and furniture arrangement.
Exterior Shots
- Eye Level: For exterior shots, position the camera at eye level (about 5 to 6 feet) to capture a natural and inviting view of the property.
- Adjust for Features: If the property has unique features like a garden or pool, adjust the height to highlight these elements effectively. Lower angles can emphasize landscaping, while higher angles can provide a comprehensive view of the property.
Special Considerations
- Avoid Distortion: Keeping the camera level is crucial to avoid distortion. Use a tripod with a built-in bubble level to ensure your camera is perfectly horizontal.
- Adjusting for Different Rooms: Each room may require slight adjustments in camera height to best capture its features. Always review your shots and make necessary changes to achieve the best composition.
By carefully considering the height of your camera, you can ensure that your real estate photos are well-composed and visually appealing. In the next section, we’ll discuss the importance of bracketing and exposures to capture a wide dynamic range.
8. Post-Processing
Post-processing is a crucial step in real estate photography, as it enhances your images and ensures they are visually appealing and professional. Here’s a detailed guide to effective post-processing techniques:
HDR Processing
- Merge Bracketed Shots: Combine multiple exposures (e.g., -2, 0, +2 EV) to create a single image with a balanced exposure. This technique helps to capture a wide dynamic range, ensuring that both highlights and shadows are well-exposed.
- Software: Use programs like Adobe Lightroom, Photoshop, or dedicated HDR software like Photomatix to merge and tone-map your images.
Perspective Correction
- Straighten Vertical Lines: Use tools in Lightroom or Photoshop to correct any distortion and ensure vertical lines are straight. This step is essential for maintaining a professional look.
- Lens Correction: Apply lens correction profiles to fix any distortion, vignetting, or chromatic aberration caused by your lens.
Color Correction
- White Balance: Adjust the white balance to ensure colors are accurate and consistent across all images. This step is particularly important if you’ve shot in different lighting conditions.
- Color Temperature: Ensure that the color temperature is consistent throughout your images. Use warming or cooling filters as needed to achieve a natural look.
Exposure and Contrast
- Adjust Exposure: Fine-tune the exposure to ensure the image is neither too dark nor too bright. Use the histogram to guide your adjustments.
- Enhance Contrast: Increase contrast to add depth and dimension to your photos. Be careful not to overdo it, as too much contrast can make the image look unnatural.
Sharpening and Noise Reduction
- Sharpening: Apply sharpening to enhance details and make your images look crisp. Focus on areas that need it most, like edges and textures.
- Noise Reduction: Use noise reduction tools to minimize any graininess, especially in images shot at higher ISO settings. Balance noise reduction with detail preservation to avoid a soft, blurry look.
Retouching
- Remove Imperfections: Use tools like the clone stamp or healing brush in Photoshop to remove minor imperfections, such as dust spots or small blemishes.
- Enhance Details: Highlight key features of the property by enhancing details like textures and patterns. This can make the property look more appealing and inviting.
Consistency
- Develop a Workflow: Create a consistent editing workflow to streamline your post-processing. This ensures that all your images have a uniform look and feel, which is important for professional presentations.
- Presets: Consider using or creating presets in Lightroom to apply consistent adjustments across multiple images quickly.
By following these post-processing techniques, you can significantly enhance the quality of your real estate photos, making them more attractive to potential buyers. In the next section, we’ll discuss additional tips and best practices to further improve your real estate photography.
9. Additional Tips and Best Practices
To further enhance your real estate photography, here are some additional tips and best practices that can make a significant difference in the quality of your images:
Staging
- Arrange Furniture and Decor: Proper staging can highlight the best features of a property. Arrange furniture and decor to create a welcoming and functional space.
- Remove Personal Items: Clear out personal items and clutter to make the space look clean and inviting. This helps potential buyers envision themselves in the home.
Lighting
- Golden Hour: For exterior shots, shoot during the golden hour (shortly after sunrise or before sunset) to capture soft, flattering light.
- Consistent Lighting: Ensure consistent lighting throughout your shots to avoid harsh shadows and overexposed areas. Use natural light as much as possible and supplement with artificial light if needed.
Shot List
- Plan Your Shots: Create a shot list to ensure you cover all important areas of the property. Include wide shots of each room, detail shots of unique features, and exterior shots.
- Vary Angles: Capture each room from multiple angles to provide a comprehensive view. This helps to showcase the space more effectively.
Drones
- Aerial Shots: Consider using a drone for aerial shots of the property. This can provide a unique perspective and highlight the property’s surroundings and landscape.
- Regulations: Ensure you comply with local regulations and obtain any necessary permits for drone photography.
Editing Workflow
- Consistency: Develop a consistent editing workflow to maintain a uniform look across all your images. This includes color correction, exposure adjustments, and perspective correction.
- Presets: Use or create presets in editing software like Lightroom to streamline your workflow and ensure consistency.
Client Communication
- Understand Client Needs: Communicate with your clients to understand their specific needs and preferences. This helps you tailor your shots to meet their expectations.
- Feedback: Seek feedback from clients to improve your photography and address any specific requests they may have.
Legal Considerations
- Property Release: Obtain a property release form if you plan to use the images for commercial purposes. This ensures you have the legal right to use and distribute the photos.
- Privacy: Be mindful of privacy concerns, especially when photographing occupied properties. Avoid capturing personal items or sensitive information.
By incorporating these additional tips and best practices, you can elevate your real estate photography and create images that truly stand out. In the next section, we’ll discuss the importance of developing a consistent workflow to streamline your process and ensure high-quality results.
10. Workflow
Developing a consistent workflow is essential for streamlining your real estate photography process and ensuring high-quality results. Here’s a step-by-step guide to help you establish an efficient workflow:
Preparation
- Plan Your Shots: Before arriving at the property, create a shot list to ensure you cover all important areas. This includes wide shots of each room, detail shots of unique features, and exterior shots.
- Staging: Ensure the property is clean and staged. Remove personal items and clutter to create a welcoming and neutral space.
Shooting
- Set Up Equipment: Assemble your camera, lens, tripod, and any additional gear. Ensure your camera settings are optimized for the environment.
- Capture Bracketed Shots: For each scene, take multiple exposures (e.g., -2, 0, +2 EV) to capture a wide dynamic range. This is particularly useful for HDR processing.
- Review Shots: Periodically review your shots on the camera’s display to ensure proper exposure, composition, and focus.
Importing and Organizing
- Transfer Files: Import your photos to your computer and organize them into folders by property and date.
- Backup: Create backups of your files to prevent data loss. Use external hard drives or cloud storage for redundancy.
Editing
- Initial Adjustments: Use software like Adobe Lightroom to make initial adjustments to exposure, white balance, and contrast.
- HDR Processing: Merge bracketed shots to create a balanced exposure. Use HDR software like Photomatix or Lightroom’s HDR merge feature.
- Perspective Correction: Straighten vertical lines and correct lens distortion using tools in Lightroom or Photoshop.
- Color Correction: Adjust white balance, color temperature, and saturation to ensure natural and consistent colors.
- Sharpening and Noise Reduction: Apply sharpening to enhance details and use noise reduction to minimize graininess.
- Retouching: Remove minor imperfections and enhance key features using tools like the clone stamp or healing brush in Photoshop.
Exporting and Delivery
- Export Settings: Export your edited photos in high resolution for print and lower resolution for web use. Ensure the file format and size meet your client’s requirements.
- Delivery: Use online galleries, cloud storage, or USB drives to deliver the final images to your client. Ensure the delivery method is convenient and accessible for them.
Review and Feedback
- Client Feedback: Seek feedback from your clients to understand their satisfaction and address any specific requests. This helps you improve your services and build strong client relationships.
- Self-Review: Periodically review your workflow and make adjustments to improve efficiency and quality.
By following this workflow, you can streamline your real estate photography process, ensuring consistent and high-quality results. This approach not only saves time but also enhances your professionalism and client satisfaction.
Learn about personal branding for photographers. Photography isn’t just about capturing moments; it’s an art form that reflects your unique perspective and style. But how do you turn your passion into a profitable business? How do you stand out from the crowd and attract your ideal clients? How do you create a brand that showcases your awesome work and personality?
Conclusion
Mastering real estate photography is a career that combines technical expertise with a creative eye. By following the guidelines outlined in this tutorial, you can capture stunning property images that highlight the best features of any space. From selecting the right equipment and setting up your camera to mastering composition, lighting, and post-processing, each step is important in creating professional-quality photos.
Remember, the key to success in real estate photography lies in attention to detail and consistency. By developing a systematic workflow and continuously refining your skills, you can produce images that not only attract potential buyers but also set you apart as a skilled photographer.
Whether you’re just starting out or looking to enhance your existing skills, this comprehensive guide provides the foundation you need to excel in real estate photography. Happy shooting, and may your journey in mastering real estate photography be both rewarding and inspiring! 📸


Leave a Reply