ADetailer Workflow 04: Learn to Change ground of Your Images with Merge and Invert
Change the Background with ADetailer Merge and Invert
In this ADetailer workflow, I want to put everything we learned together, using all the tips and tricks we’ve learned in previous guides. ADetailer is a powerful tool for detailing, not changing the entirety of the image, so keep that in mind when using it. I started by generating a series of images that have blurred backgrounds with people in the back to play around with the Detection model confidence thresholds, some that are close up portraits so we can play around with the face and eyes models, and some simple outfits for us to retouch and detail. I made sure that hands are visible as well.
The Detection model can identify and segment different objects and people in your images, the Face and Eyes models can modify the facial features and expressions of your subjects, and the ControlNet in this case helps constrain the details within the contour of the image if it deforms outside the original image, which will cause overlapping problems.
By combining these sliders in ADetailer, you can do some pretty fun detailing work that exceeds what Hires.fix features can do.
Table of Contents
The Prompts and Settings You Need to Follow Along
| Prompts: |
|---|
| Portrait of a beautiful redhead swimsuit woman emerging from a pool, her face glistening with water droplets, capturing the essence of spontaneity and refreshment. The setting is lively with blurred figures in the background, suggesting a social atmosphere. The image focuses on the woman’s expression, a mix of invigoration and serenity, as she emerges from the water. Soft lighting, highlights the wet texture of her skin, adding depth. Background blurred, creating a striking contrast between the sharpness of the woman’s features and the indistinct ((crowd of people)) |
| Negative Prompts: |
|---|
| ng_deepnegative_v1_75t, cartoon, painting, illustration, (worst quality, low quality, normal quality:2) |


Why would you use multiple models?
One reason to use multiple checkpoints in image processing is to leverage the unique strengths of different models, enhancing the aesthetics of the final image. Some models excel at creating detailed backgrounds and bokeh effects, while others might be better at rendering faces and eyes with high accuracy. This approach allows for greater control and flexibility, enabling you to tailor different parts of the image according to your needs, such as making certain areas appear animated.
In this tutorial, we’ll focus on using the multiple detection models. This approach allows us to render both the face and the entire body with high detail while changing the background to something else.
When to Use Separate Width/Height Adjustments
When employing certain detection models like the person model, you may notice that the masked areas become blurry post-generation. This issue can be addressed by increasing the Inpainting resolution and enabling the ‘Use separate height’ setting to 2048×2048. This adjustment enhances the depth and detail of both the face and clothing. Too big of a resolution may cause some deformation dysmorphia, so play around with it. Also make sure that when you increase the resolution here, you need to do it make sure you increase by the same aspect ratio, otherwise you will stretch the image.
Changing the Background Using Merge and Invert
Additionally, to refine the background without affecting the subject, we’ll use the merge and invert mode. This technique adds details to the entire image or allows us to outright change the background without affecting the subject.
For further refinement, use a seed from a previous iteration and apply your ADetailer settings to achieve the desired results. If the outcome is not satisfactory, repeat the process. This iterative method allows you to enhance even the poorest images, adding details that were previously missing and testing the robustness of ADetailer.
ADetailer Workflow 04: Change Background with Inpainting and Merge and Invert
In this workflow, I want to combine everything we learned, using Photoshop for the final touches. Some things are easier to do outside of A1111, even though you can tweak the masks until they are perfect. However, that would take too much time and effort, so I suggest using Photoshop’s Generative Fill and layer masking features to fix these changes in minutes, instead of generating and testing for hours. With that said, let’s begin.
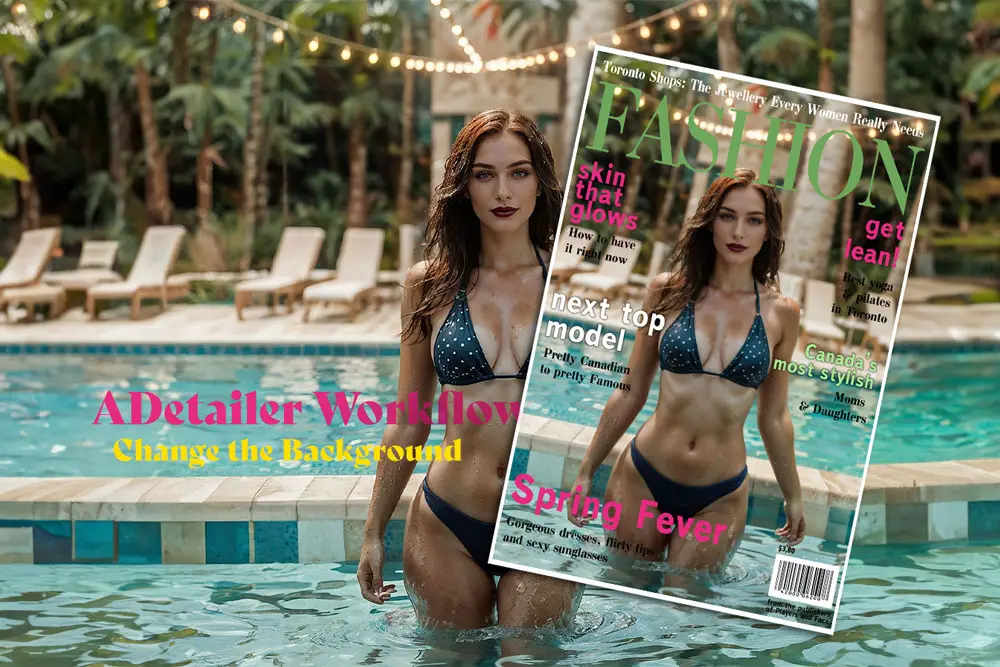
Below are the starting point and the final image we will try to achieve. I will provide the steps and the context along the way.
 ADetailer Adjustments (Middle) Retouched Image (Right)")
1st ADetailer Tab – Face Detail
Generate the image with the provided prompts.
For this image, we’re using the image seed: 1235330458
Enable ADetailer.
Click on the checkbox.
Select ‘face_yolov8s.pt’
Under the ‘ADetailer Mode’ dropdown menu,
In the ADetailer Prompt
Type in “purple shiny lipstick [SEP] Green eyes”
Generate.
You should have the face adjusted detailed.

2nd ADetailer Tab – DeepFashion2
Under the ‘ADetailer Mode’ dropdown menu:
Select ‘deepfashion2_yolov8s-seg.pt’
In the ADetailer Prompt:
Type in “((polka dot)) bikini”
Change the ‘Inpaint denoising strength’ to 1.
Enable ‘Use separate checkpoint’:
Select ‘majicmixFantasy_v20.safesensors’
Under the ControlNet model drop down menu:
Select ‘control_v11f1e_sd15_tile’
Generate:
You should now have polka dots on her bikini.


To change outfits with deepfashion2, you need a high denoising strength. At 0.4, it does nothing, but at 0.7, it follows the prompts, but overlaps the original image. With ControlNet on, you lose some prompt features, so you need to increase the denoising strength to 1. Without ControlNet, you get deformation at 1.0. Different SD models also affect the changes. I experimented with some models to get what I wanted. You can try different settings and see the results.
3rd ADetailer Tab – Background Change
Under the ‘ADetailer Mode’ dropdown menu:
Select ‘person_yolov8s-seg.pt’
In the ADetailer Prompt:
Type in “poolside, bokeh blur”
Set your ‘detection confidence threshold’ to 0.94
Under ‘Mask Preprocessing’:
Click on ‘Merge and Invert‘ under the Mask merge mode.
Change the ‘Inpaint denoising strength’ to 0.8
In the ControlNet model dropdown menu:
Select ”control_v11p_sd15_inpaint‘ model.
Generate:
You should have your final Stable Diffusion image.


What We Did and Why We Did It
1. Detection Confidence to Select Only the Subject
The first thing you do here is to generate the image and get the Detection Confidence ratings.
You will see the subject is rated at 0.94 so we will increase the Detection Confidence to 0.94 which tells the model that we only want to mask anything that is 0.94 or higher. In this case, its our woman in the bikini.
The first step is to generate the image and check the Detection Confidence ratings. The subject has a rating of 0.94, so we set the Detection Confidence to 0.94 to mask only the subject, which is the woman in the bikini.
2. Using Masking Merge Mode to Change Background
We can change the background by using ‘Merge and Invert’ with the ‘person_yolov8s-seg.pt’ detection model.
This model masks the whole body and lets us modify the background or the foreground with the Masking Merge Mode. ‘None’ changes the subject, but ‘Merge and Invert’ changes the background.
3. Inpainting Denoising Strength to make Noticeable Changes
I noticed that the Inpainting denoising strength at 0.4 makes the image too sharp and unpleasant.
At 0.7 and higher, the changes are more noticeable.
4. ADetailer prompts to Change the Landscape
You can see that the first image has a city with bokeh blur.
That’s because my original prompt was just “bokeh blur” and it randomly put the woman in a city. I added the ‘poolside’ prompt to move her to a pool, which is closer to the original image and removes the background people.
When you don’t use ‘Merge and Invert’, the subject changes instead of the background. It essentially inverts the mask.
How to Use Photoshop Generative Fill to Polish Your Image before Upscaling

After you’ve completed the previous tutorial, you’ll have your ‘final image’ which still has some imperfections. You can keep trying to fix it in Automatic1111, but it takes too long to adjust the masking and other parameters until you get it right. It can take a whole day because our videocards are not fast enough to generate instantly. Luckily, there are other tools like Photoshop that do amazing things with their AI technology.
Using Adobe’s Generative Fill, you can fix the problem spots in minutes by selecting them and pressing generative fill. Generative Fill uses AI to create realistic and seamless fills that match the surrounding areas, unlike other fill tools that use cloning or blending. It’s magic, and it makes my years of learning old school tools kind of irrelevant. It feels like I’m starting over with new workflows.
Here are the steps to use Adobe Photoshop’s Generative Fill:
Select your problem areas with the marquee tool.
You can hold down SHIFT and select multiple areas at once.
After you’ve selected the areas:
You can either go to Edit > Generative Fill > Generate, or right click the canvas > Generative fill > Generate. It will provide you with 3 images to choose from that you like best. If you don’t like them, you can re-generate until you get better results.
Using Photoshop Layers to Hide Unwanted Areas and Restore Better Areas
The final step of this tutorial is to fix the unrealistic splashes on her right thigh after we added ADetailer to it. The original image of her in the water had better splashes, so we will use it as the base layer. We will overlay the new image on top of it and use a layer mask to reveal the better splashes from the base layer.

Here are the steps to do this in Photoshop:
Open both the original image and the new image in Photoshop.
Drag and drop the new image onto the original image to create a new layer on top of it.
Select the new layer:
Click on the layer mask icon at the bottom of the layers panel. This will create a white layer mask that shows the entire new layer.
Select the brush tool.
Set the foreground color to black. Adjust the brush size and hardness as needed.
Paint over the splashes on her right thigh with the black brush.
This will hide the new layer and reveal the original layer underneath, showing the better splashes.
Save your image and enjoy the improved result.

Next Blog: How to Upscale and Detail Your Image
You have learned how to change the background of your images with Merge and Invert and ADetailer Inpainting in this tutorial. You have used all the tools available to you in ADetailer to create stunning effects and transformations. But what if you want to upscale your image and add more details while keeping the original aesthetics?
In the next guide, I will show you how to use Img2Img and ADetailer to upgrade your image like the one above. You will learn how to enhance the quality and realism of your image within Automatic1111. Click Here.

What is ADetailer and why is it useful? ADetailer or After Detailer is a web-UI extension that allows you to automatically enhance your images using inpainting and other techniques. It is especially useful for fixing common problems such as distorted faces or hands in your generated images. ADetailer works with Stable Diffusion, a powerful tool…


Leave a Reply