How to Install WebUI Forge in 8 Steps: A Faster & Powerful Way to Use Stable Diffusion
Installing the WebUI Forge for Stable Diffusion requires a solid groundwork. If you’ve been following our guide series, you’ve likely laid down this essential foundation. This tutorial builds upon the preparatory steps detailed in our previous blog so that you can learn how to Install WebUI Forge for Stable Diffusion.
This installation guide presumes that you’ve successfully completed the prerequisites necessary for Stable Diffusion. If you haven’t gone through these steps yet, we highly recommend checking out our comprehensive “Prerequisites Installation Guide to Stable Diffusion’s Web UI’s: Automatic1111, Invoke, and Comfy UI” in the links below. The prerequisites guide will will work for the WebUI Forge and Fooocus.
What is WebUI Forge?
WebUI Forge is a software project that aims to improve the functionality and efficiency of the Stable Diffusion WebUI, an interface for generating realistic images using a deep learning model called Stable Diffusion. Stable Diffusion is a state-of-the-art technique that can produce high-quality and diverse images from text descriptions or latent codes.
WebUI Forge optimizes the resource management and speeds up the inference process by intelligently managing the GPU memory usage and reducing unnecessary computations. WebUI Forge is inspired by Minecraft Forge, a modding tool for the popular sandbox game Minecraft. WebUI Forge allows users to create and customize their own image generation modules and extensions, as well as use the pre-built ones.
The project is based on Automatic1111, another interface for Stable Diffusion. It preserves the same user experience as Automatic1111, but enhances its performance and features. It also has important preinstalled ControlNets and more, including SVD and Zero123 .

This is the Stable Diffusion prerequisite guide. Here we will learn how to prepare your system for the installation of Stable Diffusion’s distinct Web UIs—Automatic1111, Invoke 3.0, and Comfy UI
Table of Contents
If you’re already equipped with these prerequisites, then you’re in the perfect position to proceed with the installation of Automatic1111. This article will guide you through a simple, step-by-step process, paving the way for a streamlined Automatic1111 setup.
Step 1: Download and Install GitHub Desktop
Step 2: Copy and Paste the Repository
- Go to the WebUI Forge GitHub Repository.
- Copy and Paste the Repository which is the page URL. (Link below)
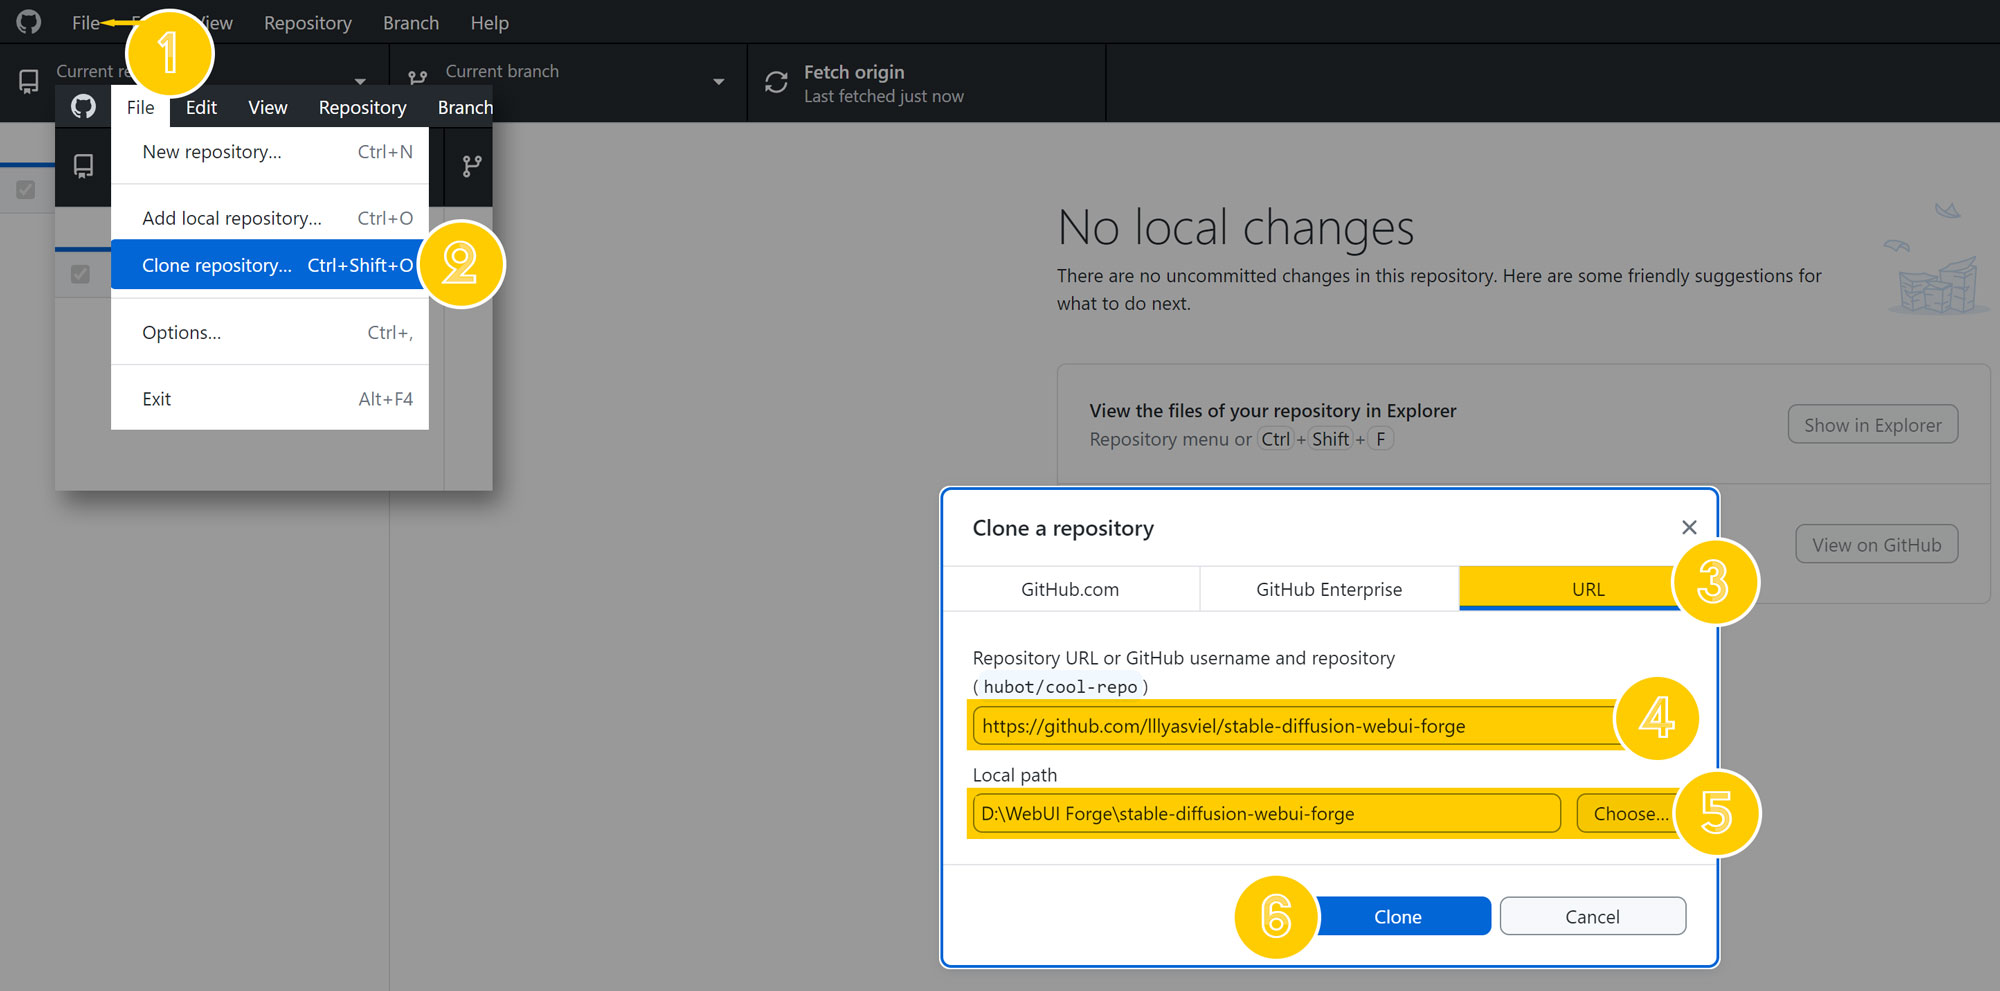
Step 3: Open GitHub Desktop and Clone Repository
- Launch the GitHub Desktop app
- Go to File > Clone Repository > Click on the URL tab
- Paste the repository link to the Repository URL location.
- For the Local Path, select the folder you want to install WebUI Forge in.
- Click on “Clone” to clone the repository to your local path.

By following these detailed steps, you can confidently install Stable Diffusion, leveraging the convenience and rollback capabilities offered by GitHub Desktop, along with the compatibility of Python 3.10 and the essential Git command line tool. This approach ensures a smooth installation experience.
Step 4: Run the Windows Batch File to Install Dependencies
Proceed to run the provided Windows Batch File (.bat). This file automates the installation of all the necessary components required for Automatic1111 to function properly. Here’s how to proceed:
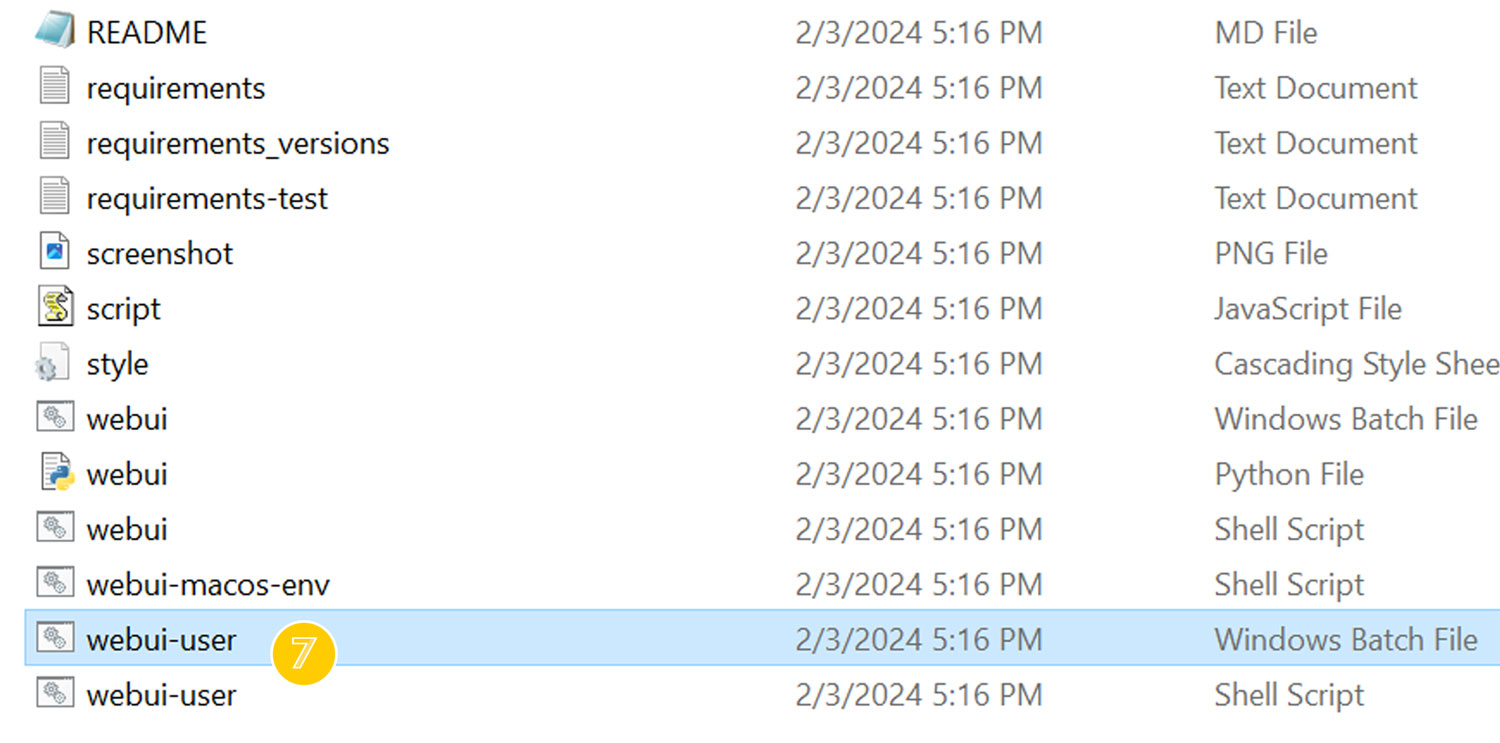
- Locate the webui-user windows Batch File in the downloaded files or repository.
- Double-click on the webui_user.bat file to execute it.
- The .bat file will initiate the installation process, which may take some time to complete. Be patient and let the process run until it finishes.
- You’re now done Installing Automatic111, but we’re going to install xformers to improve the performance.

Step 5: Installing Xformers
To install Xformers for Stable Diffusion, follow these steps:
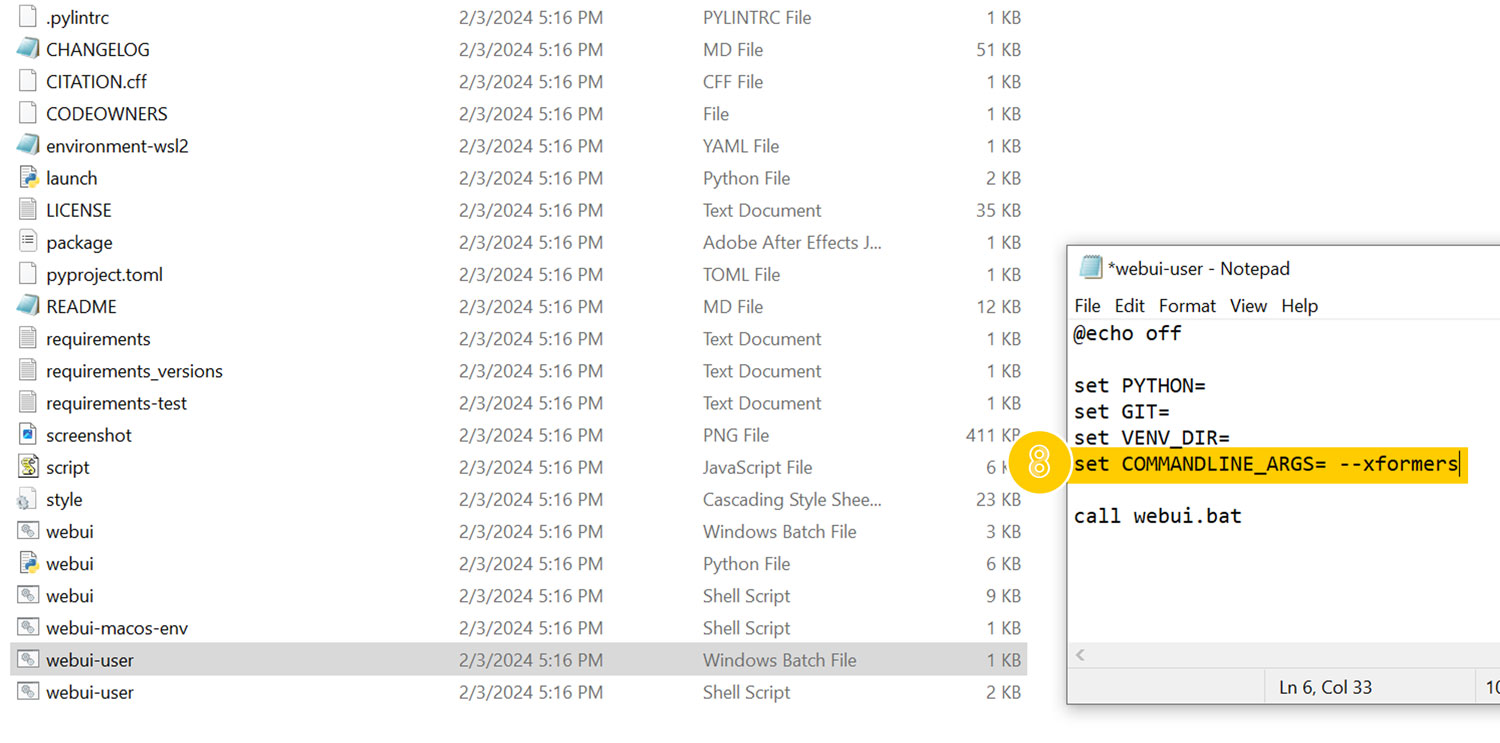
- Locate the “webui-user.bat” Windows Batch file.
- Right-click on the file and select “Edit” to open it.
- In the line that says “set COMMANDLINE_ARGS=”
- add “–xformers” at the end. The modified line should look like this:
- “set COMMANDLINE_ARGS= –xformers“
- Run the “webui-user.bat” Windows Batch file again.
- You’ve now successfully installed the WebUI and can proceed with using Stable Diffusion with it’s improved performance.

You’re now ready to use Stable Diffusion. If you’re interested in exploring installation options for extensions, see my detailed guide below.

Enhance your Stable Diffusion experience with Automatic1111 Extensions. Follow our comprehensive guide to install Automatic1111 extensions.
Step 8: Launch WebUI Forge
Launch WebUI Forge
- Double click webui_user.bat
- In the cmd window, look for something like this:
- Running on local URL: http://127.0.0.1:7860
- Paste the URl in your browser to Launch WebUI Forge.
Step 7: Update WebUI Forge
Confirm Latest Release
After Installing the WebUI Forge, you will need to update it to the most recent release to avoid potential bugs that are unfixed.You can confirm the latest Releases.
https://github.com/lllyasviel/stable-diffusion-webui-forgeUpdate WebUI Forge
To update WebUI Forge, you have 3 options below.
- Option 1: Github Desktop
- Option 2. Windows Batch File Git Pull
Right click and edit your webui-user Windows batch file
Type in git pull - Option 3. Forge Update Batch File
You can get the Forge Update Batch File by downloading the one-click installation package in the next step or download the update windows batch file below and place it in your installation folder.
Update Troubleshooting
Sometimes you will do all the above to get the most recent update, but it still won’t update. The only way I know to troubleshoot that is to install a fresh copy. This will apply to Automatic1111 as well. Good luck!


Step 8: Install ControlNet Models
For this step, I want to show you a better way to manage your ControlNet models. This allows you to use them in all available WebUI’s in the future without creating duplicates.
Download all ControlNet Models
Create a New Folder for ControlNet Models
- Place all downloaded ControlNet models in this folder.
- Save the folder destination.
- Example: D:\Models\ControlNet Models
Launch WebUI Forge
- Go to Settings > ControlNet
- Goto Extra path to scan for ControlNet models (e.g. training output directory)
- Paste your ControlNet Model Folder Path here.
- Apply Settings > Reload UI
- You’re Done. Everything below is optional.

You’re now done! Everything below will be optional.
For Beginners: One-click installation package
This step is for those who are new to Stable Diffusion and are installing everything fresh. Skip this step if you’re an experienced user because you’ll likely have all the prerequisites for running Stable Diffusion and will not want to re-install everything. [Repo]
Use this one-click installation package (with git and python included).
After you download
Place the webui_forge_cu121_torch21 in your installation folder and uncompress the file.
Run
run.batto InstallRun
update.batto update.
Note that running update.bat is important, otherwise you may be using a previous version with potential bugs unfixed.
Warning: Do not do this unless you need to.
Xformers, an optimization library essential for speeding up generation processes, tends to update automatically whenever you initiate A1111. However, sometimes, it doesn’t quite work as expected. I’ve experienced this issue firsthand, so I’ve laid down a step-by-step guide to help you check if you have the latest version, and if not, how to manually update it.
Verifying and Updating Your Xformers Version
- Locate Your WebUI Forge Installation Folder:
Head to your WebUI installation. In my setup, it’s labeled “stable-diffusion-webui”. - Access Command Prompt in the Folder:
- Once inside the “stable-diffusion-webui” directory, look at the top directory bar, which displays the folder breadcrumb.
- Click on the empty space right next to the breadcrumb. This action will make the path editable.
- Now, type “cmd” and hit Enter.
- A command prompt will open with the directory, something like: D:\stable-diffusion-webui>
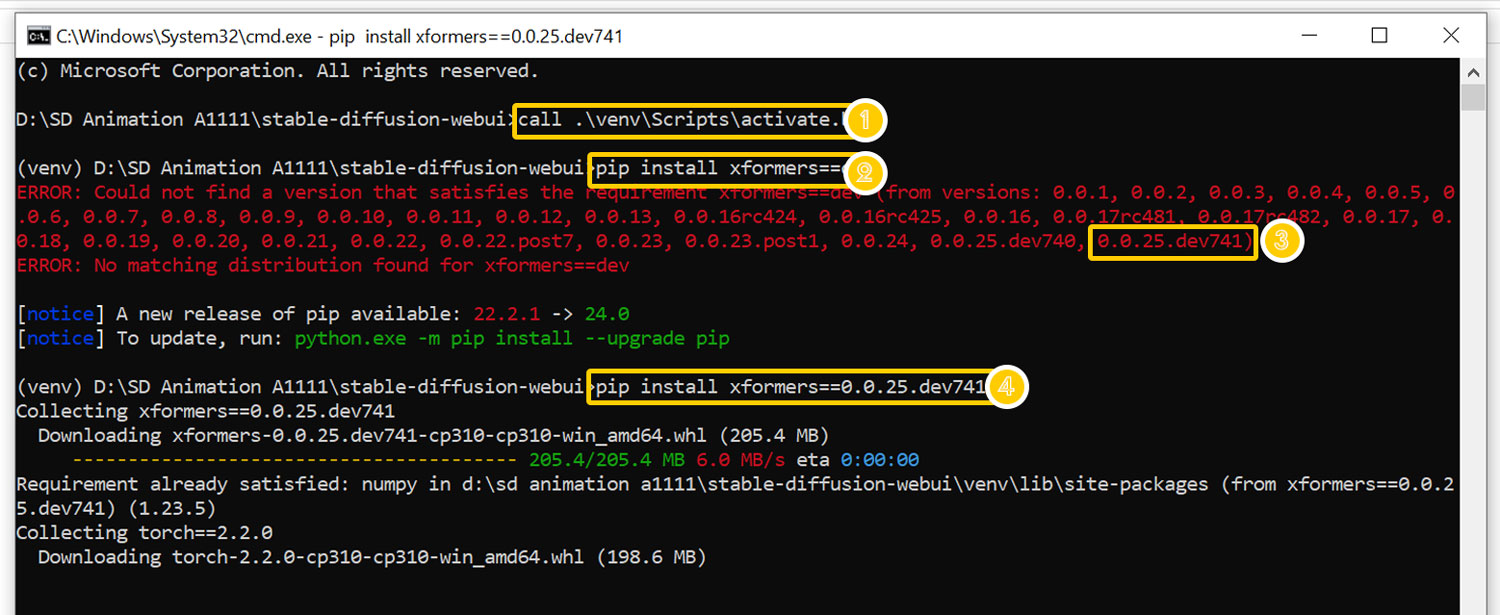
- Activate the Virtual Environment:
Enter the following command: call .\venv\Scripts\activate.bat- List Available Xformers Versions:
- To see all versions of Xformers, type: pip install xformers==dev
- The highlighted version will indicate the latest one. (The last one on the list)
The version can vary depending on when you’re going through these steps.
- Install the Latest Xformers Version:
- Using the latest version you identified in the previous step,
type: pip install xformers==[your-identified-version-number] - For instance, during my last check, the version was 0.0.25.dev741, so the command was:
pip install xformers==0.0.25.dev741 - Press Enter to start the update.
- Using the latest version you identified in the previous step,

If you’ve followed along, your command prompt should look something like this:

How to Install Stable Diffusion:
- How to Install Stable Diffusion Web UI (Complete Installation)
- Prerequisites Installation Guide to Stable Diffusion’s Web UI’s
- How to Install Stable Diffusion SDXL 1.0: A Step-by-Step Guide
- How to Install Automatic1111 Web UI for Stable Diffusion
- How to Install Comfy UI: A Streamlined Process for Enhanced Workflow
- How to Install InvokeAI 3.0: A Cleaner Web UI for Stable Diffusion
- How to Install WebUI Forge: A Faster Way to Use Stable Diffusion


Leave a Reply