Getting Started: Preparing Datasets with Invoke Training UI for Stable Diffusion
In this guide, we will be preparing datasets with Invoke Training UI. Learn how to effectively create data annotations and datasets for Stable Diffusion. This will be the first entry in our series on learning the Invoke Training UI. As artists and photographers, it’s essential to maintain creative control over your work. This series will guide you through using Invoke Training UI to train your own AI models, ensuring that you shape the art AI produces, rather than letting it dictate the outcome. After all, art loses its meaning if we let AI take the reins completely.
Understanding Data Annotation
At the heart of training AI models is data annotation. Think of it as teaching AI to understand different types of data—like text, images, and sounds—by labeling them with descriptive tags. These tags act like clues, helping the AI make accurate predictions and decisions, much like a student learning from a well-annotated textbook.
What is an IMAGE_CAPTION_JSONL_DATASET?
When we talk about “IMAGE_CAPTION_JSONL_DATASET,” we’re referring to a special way of organizing image data for machine learning. It’s a file that lines up data neatly, one item per line, in a format known as JSON Lines (.JSONL). This setup is not only tidy but also makes it easier to manage changes and add new information. Each line pairs an image with a caption, creating a clear, concise reference for the AI to learn from.
Imagine a digital photo album where each picture has a note underneath it—that’s essentially what this dataset is. It’s a collection of images, each accompanied by a caption that describes it, which is incredibly useful for training AI to generate its own image descriptions. For those who need more, platforms like Hugging Face and Papers With Code are treasure troves of tools and information to help you understand datasets.
Before you get started:
Learn how to install Invoke Training UI with this step-by-step guide. Use this training UI to customize your Stable Diffusion models.
Invoke Training – Documentation — Learn more about Invoke at invoke.com
Note: This UI creates datasets in IMAGE_CAPTION_JSONL_DATASET format. For more information about this format see the docs
Table of Contents
Preparing Datasets with Invoke Training UI
PREPARING AND SAVING IMAGES
Preparing images for training data for textual inversion involves several steps to ensure consistency and proper organization. Here’s a guide on how to prepare your images:

- Gather Your Images: Collect all the images you want to use for training and place them in a single folder.
- Naming the Folder: Give the folder a descriptive name that reflects the content or style of the images.
For example, if your images are horror-themed and drawn in ink, a name likeHorrorInkStyleis appropriate. - Renaming Images:
- Use a tool like Adobe Bridge to batch rename your files for consistency. (Or use Birme, its free.)
- The naming convention should be uniform, such as
HorrorInkStyle_01,HorrorInkStyle_02, and so on. - The number of padding digits (
xx) should reflect the total number of images. For 99 or fewer images, two digits (01,02, …,99) are sufficient. If you have more than 99 images, increase the padding accordingly (e.g.,001,002, …,999).
- Check for Consistency: Ensure that all images are consistent in terms of style, resolution, and format. This will help the model learn more effectively.
- Finalize the Dataset: Once all images are properly renamed and organized, your dataset is ready for use in textual inversion.
Remember, the key is to maintain a clear and consistent naming pattern that aligns with your project’s goals. 🚀
This captions and data sets guide is intended for those who seek to deepen their knowledge of Captioning for Training Data Sets in Stable Diffusion. It will assist you in preparing and structuring your captions for training datasets.
Load Existing Dataset

To load an existing dataset in the Invoke Training UI, you can follow these steps:
- Locate the .jsonl File: Find the
.jsonlfile on your computer that contains your dataset. - Enter the Path: Copy the local path to your
.jsonlfile and paste it into the field that says “Enter the Path to an existing dataset’s .jsonl file.”
It should look like this, ‘C:\Users\AndyH\Downloads\HorrorInkStyle\StephenGammellStyle.jsonl‘. - Specify Columns (Optional):
- If your
.jsonlfile includes specific columns for images and captions, you can enter the names of these columns in the “Image Column” and “Caption Column” fields. - These fields are optional and only necessary if your dataset includes separate columns for images and captions.
- If your
- Load the Dataset: Click on “Load existing dataset.” The UI will process the path you’ve entered and load your dataset.
Remember, if you’re starting from scratch and intend to create a new dataset, you can skip this step and proceed to the next one in your workflow.
Create New DataSet

Creating a New Dataset: This feature enables you to initiate a new dataset. You’ll need to specify the local directory for your image storage.
Creating a new .jsonl file for a dataset is an important step in organizing your data for training models.
Here’s a step-by-step guide to help you create this file:
- Prepare Your Images: Make sure all your images are in one folder and have been renamed consistently, as discussed earlier.
- Determine the Local Path: Identify the local path where your images are stored. For example,
C:\Users\AndyH\Downloads\HorrorInkStyle. - Name Your Dataset File: Decide on a name for your
.jsonlfile that reflects the style or content of your dataset. In my case, I’ve chosenStephenGammellStyle. - Create the .jsonl File:
- In the UI where you’re creating the dataset, paste the local path to your images.
- Type in the name you’ve chosen for your dataset followed by
.jsonl. It will look like this:StephenGammellStyle.jsonl.
- Generate the Dataset:
- Click on “Create New Dataset”.
- The system will create a new
.jsonlfile namedStephenGammellStyle.jsonlin the specified directory.
Here’s an example of what your input might look like in the UI:
| Local Path: C:\Users\AndyH\Downloads\HorrorInkStyle Dataset Name: StephenGammellStyle.jsonl |
And then, you simply click the “Create New Dataset” button to finalize the process. Remember to check the created .jsonl file to ensure it contains the correct paths and information for your images.
Editing and Saving DataSets

Editing and Saving Datasets allows you to fine-tune the dataset that your model will learn from. By providing clear and consistent annotations, you’re essentially teaching the model how to interpret and generate similar content. This process is not just about organizing images but also about imbuing them with meaning that the model can understand.
Below we will talk about what these settings mean.
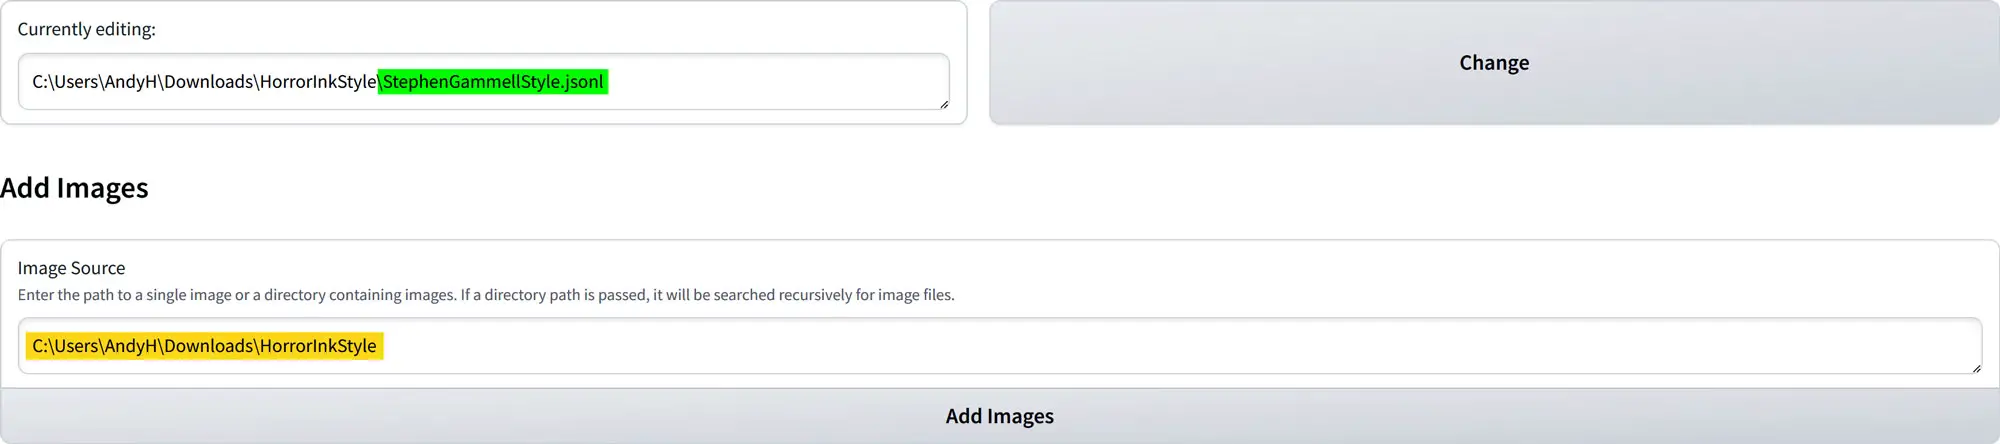
Currently Editing
- Viewing the Current File: The “Currently editing” section displays the name of the
.jsonlfile you are currently working on. - Changing the File: If you need to switch to a different dataset, click the “Change” button. This action will redirect you to a screen where you can enter a new local path to the
.jsonl
Add Images
- Adding Images to the Dataset: In the “Add Images” section, paste the local path to your folder containing the image dataset.
For example, it should look likeC:\Users\AndyH\Downloads\HorrorInkStyle. - Loading Images: After pasting the path, click the “Add Image” button to upload the images into the dataset, preparing you for caption editing.
Edit Captions
- Understanding Indexes: The “Current Index” indicates the number assigned to the current image displayed, starting with 0.
- Dataset Size: The “Dataset Length” shows the total count of images in your dataset. Note that the maximum “Current Index” will be one less than the “Dataset Length” due to zero-based indexing.
- Captioning Images: Use the “Caption” box to write descriptive captions for each image. Structuring your data with relevant captions is vital for training the model on specific styles and subjects. Captioning is important for training specific variables so we will go in depth in another blog. I’ve written a guide on how to caption, so check it out here.
Saving Progress
- Save and Navigate: Utilize the “Save and Go-To Previous” to save your caption and return to the previous image, or “Save and Go-To Next” to save and advance to the next image.
Reviewing Dataset
- Raw JSONL File View: This section displays the contents of your
.jsonlfile, including any captions you’ve saved. You have the option to edit this content at any time.

Next: Training in Invoke Training UI
This guide covers the essential functions of the Invoke Training UI for editing and saving datasets. In the upcoming guide, we’ll dive into the steps required to start training your model. For those interested in more advanced model training options, the Kohya_ss GUI is recommended, but this guide focuses on the foundational features of Invoke. In the next blog, we will start learning how to train within the Invoke Training UI.
Which training method should you use?
The ability to train custom models has become a vital skill across various fields. As AI continues to integrate into creative and technical domains, data annotation and model training are set to become valuable skill sets and some of the most sought-after professions. Within the creative field, we often use diffusion training, but when it comes to open-source localization, we have several options to choose from: Dreambooth vs LoRA vs Textual Inversion vs Hypernetworks. It can be a bit confusing, so which one should you use?


Leave a Reply